
|
Create Recklessly, Artist's Concrete for Mixed Media, 8 Ounce Jar SKU: XTL-01180 $21.99 |

|
Silver Plated Rectangle Bezel Pendant 48x24mm (1) SKU: PND-5889 $1.99 |

|
Nunn Design Bezel Charm, Triangle 15.5x18.5mm, Antiqued Copper (2 Pieces) SKU: PND-08084 $5.29 |
Related Videos

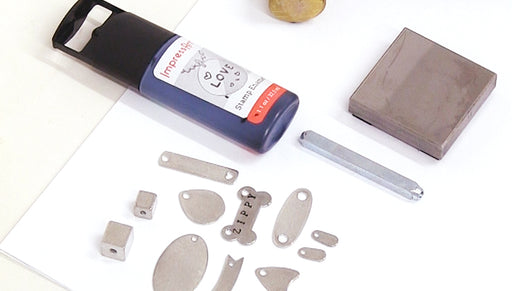
How to use ImpressArt Stamp Enamel
Use ImpressArt stamp enamel to make your metal stamp designs 'pop' and stand out more clearly against metal blanks. The ink fills the recess left b...
View full details

How to Use EnviroTex Jeweler's Clay
Learn how to use EnviroTex Jeweler's Clay, a 2 part self-hardening epoxy clay. In the video learn how to mix the clay, color it, apply mica powder,...
View full details

How to Seal and Colorize Vintaj Vogue Raw Brass
Learn how to seal Vintaj Vogue raw brass pieces to prevent oxidization and retain the warm gold color. Also learn how to add color to these pieces ...
View full detailsCustomer Reviews
Based on 1 review
Write a review