Note: Components and tools listed within this INSTRUCTIONS box and the printer-friendly PDF, if available,
may have been discontinued since this project was published. Refer to the PURCHASE COMPONENTS and TOOLS AND
OTHER SUPPLIES sections for current availability.
By following the instructions below, you will make one earring. Repeat all instructions to make the second earring. You will need a toothpick or extra fine paint brush to complete this project.
- If you are new to circular brick stitch, please watch the video: How to do Circular Brick Stitch Bead Weaving.
- Begin by using scissors to cut 2 feet of Fireline beading thread, and thread on your needle.
- Follow along with the video to weave a section of circular brick stitch in the following order, starting at the center: Lemongrass, Black, Red, Black, Red.
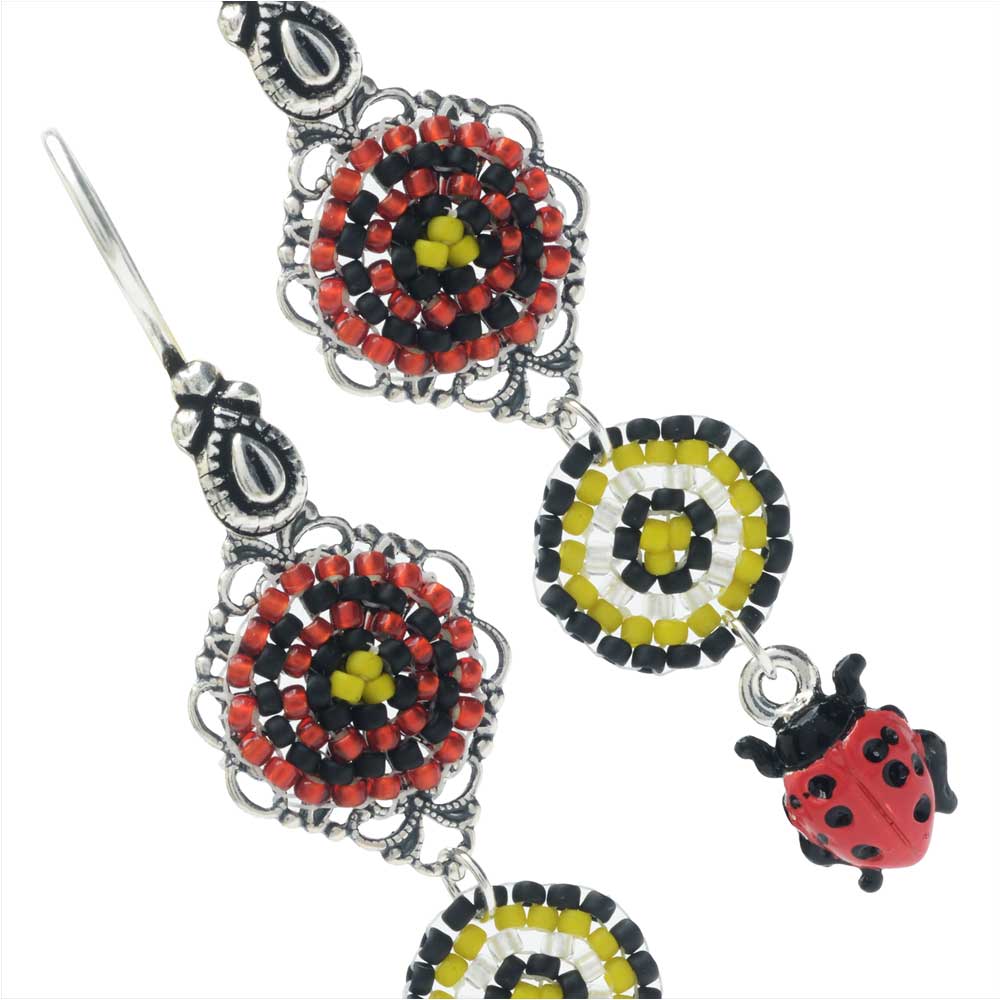
- Using the remainder of your thread, attach your bead woven circle onto a filigree connector as follows: Set the beaded section from step 3 in the center of the connector. Sew around the perimeter of your brick stitch, sending the needle through the corresponding holes of the connector as your thread path indicates. Tie off your thread and apply a small amount of G-S Hypo Cement to your knot. Let dry for at least one hour.
- Now cut 18 inches of Fireline and create another circle of brick stitch by weaving your beads in the following order, starting at the center: Lemongrass, Black, Crystal, Lemongrass, Black. Tie off and weave in your thread. Set aside.
- If you are new to using patina, please watch the video: How to Use Vintaj Patinas and Glaze.
- Using what you have learned in the video, apply two coats of Garnet patina to the wings of your ladybug charm. Let dry for at least 30 minutes.
- Use a tooth pick or fine paint brush to carefully apply two coats of Onyx patina to the spots, legs, and head of your ladybug. Again, let dry for at least 30 minutes.
- To assemble your earring: Use pliers to open a 4mm jump ring. Slide on your brick stitch circle from step 5 by fitting the jump ring between two beads anywhere along the rim of the circle, underneath the second thread bridge in from the outer edge of your bead work (see photo for reference). You can use the tip of an awl or toothpick to gently create space for the jump ring to fit between the beads. Close the jump ring.
- Next, open another jump ring and slide on the loop of your ladybug charm, making sure the painted side faces forward. Also slide on the brick stitch circle you just attached by following the same process as described in step 9, this time sliding the jump ring between two beads directly opposite from the first jump ring (see photo for reference).
- Finally, open the loop on your earring hook. Slide on the opening at the top of your filigree connector (see photo for reference). Close the loop of your earring hook.
- Enjoy your earrings!
WHAT YOU'LL NEED: (scroll down for purchase options)
- PND-5028 - TierraCast Fine Silver Plated Pewter Ladybug Charm 12.5mm (1)
Project uses 2 pieces. You will need 2 packages.
- FCO-7007 - Antiqued Silver Plated Ornate Filigree Diamond Connector Links 21mm (4)
Project uses 2 pieces. You will need 1 package.
- JSO-0015 - Toho Seed Beads, Round 15/0 25CF 'Silver Lined Frosted Ruby', 8 Grams
Project uses 1 tube. You will need 1 package.
- JSO-0061 - Toho Seed Beads, Round 15/0 2612F 'Semi Glazed Jet', 8 Grams
Project uses 1 tube. You will need 1 package.
- JSO-0089 - Toho Seed Beads, Round 15/0 PF21F 'PermaFinish Silver Lined Frosted Crystal', 8 Grams
Project uses 1 tube. You will need 1 package.
- JSO-0023 - Toho Seed Beads, Round 15/0 2600F 'Semi Glazed Lemongrass', 8 Grams
Project uses 1 tube. You will need 1 package.
- XTL-9078 - Vintaj Patina Opaque Permanent Ink - Black Onyx - 0.5 Ounce Bottle
Project uses 1 bottle. You will need 1 package.
- XTL-9079 - Vintaj Patina Opaque Permanent Ink - Garnet Red - 0.5 Ounce Bottle
Project uses 1 bottle. You will need 1 package.
- FJR-5454 - Silver Plated Open Jump Rings 4mm 22 Gauge (50)
Project uses 4 pieces. You will need 1 package.
- FEA-8572 - Antiqued Silver Plated Earring Hooks Ear Wires With Bali Style Teardrop Detail (5 Pairs)
Project uses 2 pieces. You will need 1 package.
- XTL-1001 - G S Hypo Cement Precise Applicator Essential!
Project uses 1 piece. You will need 1 package.
- XCR-1280 - FireLine Braided Beading Thread, 4lb Test and 0.005 Thick, 15 Yards, Crystal Clear
Project uses 7 feet. You will need 1 package.
RECOMMENDED TOOLS:- XTL-0034 - Wubbers Classic Series Round Nose Quality Jeweller's Pliers
- XTL-0020 - Baby Wubbers Quality Fine Chain Nose Jeweller's Pliers
- XTL-0373 - Tulip Premium Scissors, Gold Handle 5 Inch, 1 Pair
- XTL-3006 - Beadsmith English Beading Needles Size 12 (4 Needles)
- XTL-0880 - Paint Brush for ICED Enamels, Patinas & Paper Sealant, 1 Brush
- XTL-4003 - Beadsmith Bead And Pearl Knotting Fine Point Steel Awl


")
 Earn Reward Points with your purchase of project components or tools.


")


