Audio Transcript
Note: This audio transcript is auto-generated and may not be completely accurate.
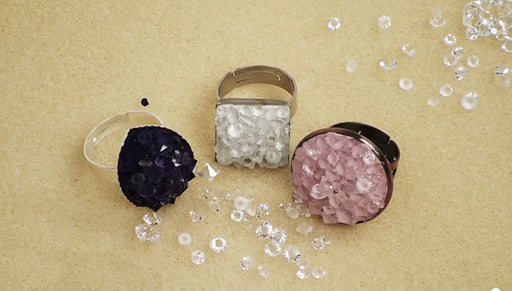
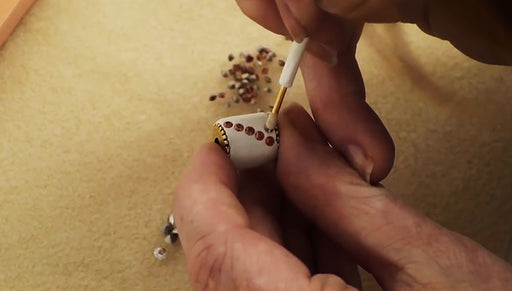
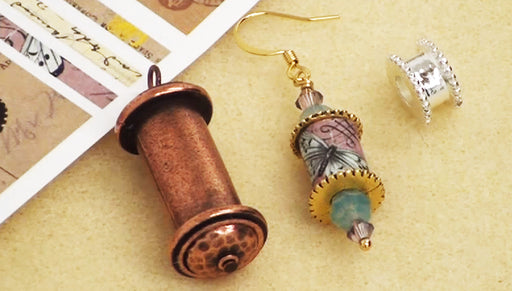
Hi, this is Julie with Beadaholique.com and I'm very excited to introduce you to a new line of products and these are Vintaj Patinas and they come in sets of three like this. I've pulled several different sets to show you the color range. We've got these wonderful pale pink and purple the nice brown earth tones I have a cream, yellow, black set purples and blues which are a litlle bit richer in tone and I got some great green with a turquoise you get do three in a set which makes it really nice to blend these and then another product you're gonna wanna consider using when you do use the Patinas is a glaze and this is put out by Vintaj as well it works as a sealer as well as a Patina extender and I'm going to show you just how to use it you're going to maybe want to use the Vintaj relief block, not necessary but you'll see a little trick on how to make your designs pop you're going to need a paintbrush some water, a paper towel and then I'm also working on a nonstick kraft mat. This actually a soldering mat but it works really well for this application as well so what's so great about the Patinas is that they are permanent and they were specially formulated for metal so you do not actually need to use a sealer to seal the Patina unless you wanna go ahead and relief the surface a little bit which I will show you how to do it so let's get started right away so you can see how fun these are I did a couple already, here's this great beetle and what I used on this guy was black and green I did a wash of turquoise and then I relieved it with the relief block. I want show you the exact same process but on this key so I'm going to grab my colors: olive green black and then also the turquoise what you want to do is shake these up and you'll hear a ball shake them up really well and they are super fast drying and I'm going to pour it out onto my nonstick mat take my paintbrush, I'm not going to paint, I'm going to dab I'm doing that to get all the nooks and crannies of these wonderful thing Vintaj metal pieces unless you're using a flat brush and that's also helping me to get into the little recesses, cover a lot of territory when you're done, go ahead and immediately wash your paint brush off with water this is going to dry very quickly so I right now going to add some cream into it while it's still a little bit wet you can lightly touch it, you'll see that not a lot comes off, it is drying pretty quick and I'm gonna put green sporadically, let it mix a little bit with the black and wash my paint brush off right away I'm going to let that dry, I'm going to the take two or three minutes to dry I'm going to go over the top with a turquoise wash now that may first coat is dry, I wanna apply a wash over the entire surface so I'm going to go ahead a little bit of paint on the mat and then take the glaze you want to do one part patina to two to three maybe even four parts of the Glaze depending upon how thin you want it just like that mix it up you're not going to use water to create a washed effect but you're going to use the glaze just going to paint this over the entire surface you can see that actually it wasn't as dry as it should of been, it has a little bit of color coming off, that's going to be okay for this application because it's not a precise science and I just want an overall color effect again wash off right away while this one is drying, I want to show you another technique I'm going to take this Vintaj arte metal I'm going to use different colors and I think I'm gonna go for a cream maybe even a pink and I'm going to do an all over base color in cream just dabbing on this piece I want to get a bit more of a modeled effect go ahead and take a bit of paper towel just go over the area I painted you're gonna pull off some of that paint add a little pink go into different spots dab does dry really quick just be aware of that rinse off my paint brush for really colorful look I'm going to add some purple again paper towel blot it and I have a really nice model look set that aside to dry clean off the brush while those two are drying, before I use a Vintaj relief block on it want to show you one more example I've got this Vintaj stamping blank which I've used an embossing plate on with the Vintaj BIGKick to create the design go and dab the black paint on the entire surface of the butterfly washout my paintbrush and then let the black coat dry for a minute and then and then go over and do s wash on top on him as well now I'm going to put a wash on the butterfly. I'm going to take my pink again I'm going to extend it with the glaze mix that up and just paint it the over the wash I'm just letting the paint settle into the recessed area I'm going to let that dry and then come back and use the Vintaj relief to bring out some of those raised areas now that my Patinas are completely dry, go ahead and take the left side of my Vintaj relief block and go over the top surface and expose some of the metal below. These is a arte metal piece, it's exposes some of the nice silver color if you've worked with arte metal that the main color is a black but when you use the Vintaj relief it pulls out of really wonderful rich silver There's that piece these are already done I actually love how the key looks, I'm not going to use the relief block on it It's perfect the way it is and I've got my butterfly and do the same thing, relief the surface you can see I'm pulling out some of that brass below It's getting a really interesting effect I'm happy with how that looks so now for sealing this piece here doesn't need to be sealed at all it just got the Patina on it and that's permanent. It doesn't need to be sealed that's the same with this piece right here that I did. I just had like a modeled effect that I did with the paper towel now technically these guys do not need to be sealed either they have Patina on them and they are good to go however if you want to keep it looking identical to this meaning that exposed area, the color that it is where I pulled out the brass and I pulled out the arte metal silver then you're gonna wanna go ahead and seal it paint a layer over the entire top surface you might want to do some dabbing just because it'll into the nooks and crannies you don't have to do this, if you're okay with that color changing ever so slightly as it ages as it naturally do and you don't need to if you want to keep that silver really silver You want to go ahead and just seal it with the glaze and not is all there is to using Vintaj Patinas and Glaze