Audio Transcript
Note: This audio transcript is auto-generated and may not be completely accurate.
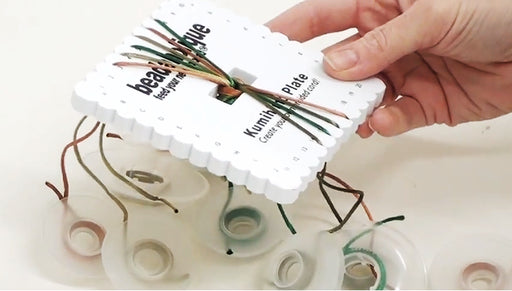
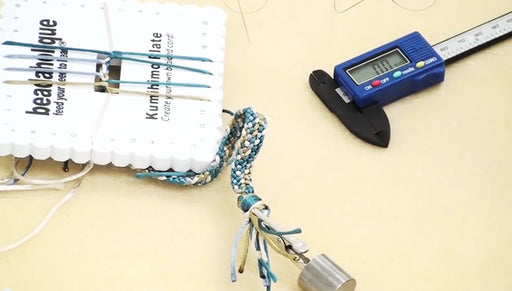
Hi this Julie with Beadaholique.com and today I want to show you how to do a flat kumihimo braid using a ten millimeter braid and show you how to add beads I brought a couple of examples. This is what we're going to do here in the video this technique where you have a nice braid in the middle and then beads along the side here is another example but this is a round braid an eight warp braid with beads. We have another video on how to do this on beadaholique.com and then I want to show you what is the standard ten warp flat braid looks like and that's this bracelet right here that I'm wearing so this is the focus of our project here in the video and I've gone ahead and I've used Super Lon and I used size 8/0 seed beads I've preloaded my bobbins already, so I've wound my bobbins and I got beads on it already. I have also attached a kumihimo weight through the center I've got these ten strands knotted and when you're doing this particular braid the ten warp you start with six strands up top and four at the bottom for this pattern I decided to do the for bottoms in this dark purple and then the teal color is the six at the top and have corresponding beads if you're not familiar on how to wind your bobbins, how to go ahead and put your strands on a kumihimo plate we do have other videos on kumihimo on beadaholique.com showing you how to do all that to start you're not going to use the beads. I'm going to start doing the standard ten warp braid take the five over to the lower case e on the side and take the six to the uppercase E on the left side then you're going to take the fifteen up to the five the four down to the fifteen fourteen to the four and the three to the fourteenth so we've just done half of our plate. Now do the other side and work our way to the right so the sixteen is going to go to the six the seven is going to go down to the sixteen the seventeen is gonna go to the seven and the eight is going to go to the seventeen and bring our sides back, so we need the e to go back up to the eight and that other E, the uppercase go up to the three. You'll notice now we've done a full circle and we've arrived at six again at the top and four again at the bottom. We're going to repeat that same pattern over. So we're gonna go with the five to the lowercase e and six to the uppercase E starting on the left side, so the fifteen to the five the four down to the fifteenth. Work our way over fourteen up to the four work our way over and three down to the fourtheen so the left side is done and sixteen up to the six, just move on over take the seven down to the sixteen move over seventeen to the seven and then the eight to the seventeen need to bring our threads back to their original position, the lowercase e goes up to the eight the uppercase E goes up to the three and this here's what we're doing, it's a standard ten warp flat kumihimo braid I'm going to do a little bit more and then I'll show you how to add beads so I've done a little bit and I've got this amount started here at the base and now when you're gonna finish your kumihimo flat braid cord ends which we have another video for. You need to be able to have enough you're going to be able to sew this like a straight line, a straight stitch to sew your cords together so they don't unravel and detach the ribbon crimp end to it so as long as you've got enough to do that you're ready to add beads to add your beads we're only going to be adding beads on the side strands, we're never going to add beads on these top and bottom strands. So that's how we're gonna create this where you've got the nice braid in the middle and the beads just along the edges take the lowercase e but before we move it up to the eight drop a bead and move over do the sane on the other side drop a bead and move over, if you're familiar with the round braid where you're used to catch those beads under the threads it is going to actually catch it for you when you continue on your braiding so you don't have to about that, they can just be loose like that we're going to proceed as normal I'm going to move our threads over in the same pattern as if there weren't any beads there at all so the fifteen to the five four to the fifteen fourteen to the four and three to the fourteen and look at what just happened this caught there which is exactly what you want do the right side the sixteen to the six the seven to the sixteen, seventeen to the seven and the eight to the seventeen now this one popped up so what you want to do is take your nail if that happens just slip it under there, make sure that stays so now do the exact same thing again our side thread just move that down don't worry about catching it under anything do the same on the other side and now just braid it as usual those are both caught so we're good to go, add another bead just drop it down there move it along same with the other side so you kind of see we have going here, you see that they're along the edge. So I'm just going to do some braiding here for a little bit and then I will show you what I've got so you can see how it progresses and then what I'll show you how to add just a few more so that you get the technique down and then you can go ahead and braid as long as you want. You can make a short bracelet or you make a necklace, anything that you like so I've braided a little bit more and I just want to show you what we have going here so here's the initial braid we did that we're gonna stitch into, will be able to attach our ends and finish the piece you can see iI have the beads on the side and this is what it looks like, you see how that's arching I'm going to do a little bit more. I want to show you a top down view as well I'm going to do one more so you can see it again. The side panel I'm going to have those ones be the ones with the beads and then we're just going to do our normal flat braid see how that's criss-crossing. That's what forming that nice design down the middle That was not a bead to go in there. It just slipped away and I just scooted it back towards the bottom all right I will do one more because I want to make sure you get this down just drop it in there you see how that's just feeding through. You got those beads along the side and just do a normal braiding technique if one pops up just make sure that it stays down there, if this was a side panel which that one was coax it under that little thread bridge and there we go so you'll just continue on as long as you want it to be and then if you do you wanna make this exact bracelet it is on beadaholique.com under our free projects in the bracelet section and that has a little magnetic clasp. Go to www.beadaholique.com to purchase beading supplies and to get design ideas!