Beadaholique Live Class: Designing Strung Jewelry - Beyond the Basics

SKU VID-1566
Designer: Design Team
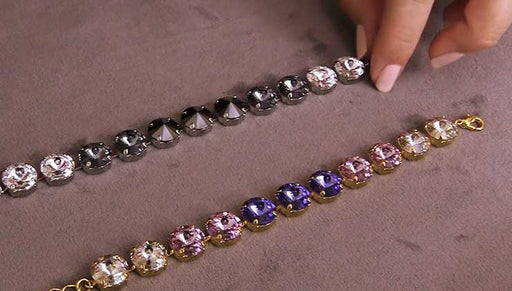
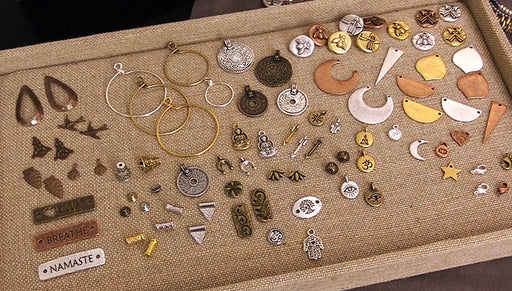
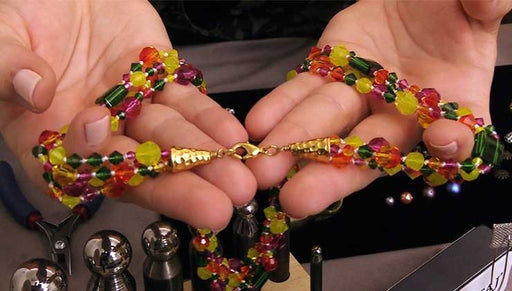
In this live class Kat Silvia and Julie Bean show you their design tips so that you can take your strung jewelry to the next level. Watch as they walk you through full projects and numerous finishing techniques for your stung jewelry projects.
Audio Transcript
Note: This audio transcript is auto-generated and may not be completely accurate.
hi everyone welcome back to the Vita holic design studio and we are here to talk all about strong jewelry so I'm Kat Silvia and I'm joined today by Julie beam and we do these wonderful live classes the first Friday of every month so you've probably joined us before so welcome back and if you're brand new welcome so yes today we're going to be talking about strong jewelry we're going to talk a little bit about some of the basics but then kind of taking it beyond the basics so if you've worked with stringing jewelry before we have lots of examples here to show you and lots of little different techniques and tips and tricks for you yeah so this is really a great class especially if you're a beginner but even if you're not a beginner we are gonna go beyond the basics so but if you are new to children making or you've been interested in before stringing is a really a fun way to get started you know I think it's a lot of people's first foray into jewelry making and stringing I think such and then we all come back to it yep never know there's a way so it's not like you try stringing and then you you go on to something else you're always continuing to string I know that some of my favorite projects are strap projects to this day yeah and well you know what I kind of like about it is sometimes you don't think of them as stringing projects when it's a little bit more complicated so I think that's what we're gonna talk a little bit about that today but of course everything that you see here you can get at beadaholique.com so we sell all the supplies and all the tools so if you're curious about a plier that we're using or a bead that we're using you can get all of that at beadaholique.com so I want to look at our table first yes okay you can look at everything even we have fun putting these tables together so can i a little behind the scenes cafe yesterday so always a day before the class we get together and we almost have like a little jewelry party we do we're like the shopping in our like drawers where we've had old projects you know we're getting stuff off our chests to show you things that we think might inspire you things that inspire us so let's take a look at the table sure okay so let's start over here actually and you're gonna see I'm gonna create a version of this project here so stay tuned for that but this is a nice way to do braiding with strong jewelry and then we have another example here we've got some fiber happening at the bottom we're gonna show you guys about incorporating chain into your strung jewelry and then of course you know if you guys have questions about sizing or anything like that we're gonna go over that we're going to talk about crimp tubes crimp beads we have lots of really great examples to kind of show you here we're gonna talk about strand reducers as well we have some beautiful examples up here and Julie's going to talk about that in a little bit we also have let's see what do we table here we have some strand spacers and that's kind of unusual one is a carrier bead so you can use a two hole bead as a strand spacer or three hole bead for that matter and then we've got some variety packs which are really nice especially if you're not sure which size crimp bead you want I have a really traditional strong necklace right here it's a single strand but you can see I added some glitz to it with these little rondell spacers over here I've been gemstone strong necklace and there's a little look a little tip I'm going to talk to you about how to do a toggle clasp on a strong necklace and then over here have a couple strung necklaces we actually did this during one of our beading breaks and what's interesting about these is they do not have a clasp so we've actually hidden a little crimp bead there and we've made it one continuous necklace that slides over your head so right now though before we go any further I have something I want to ask everyone so I am going to be making a bracelet and I have these three bracelets right here now these are all using Swarovski pearls and actually all three of them use the exact same ingredients of course color difference on the pearls but it is fun to see how you can take the same ingredients which are what I have in front of me right here and you can make different designs just based upon how you string and how you basically weave your beading wire in and out so I'm gonna call this one that a bracelet this is the scalloped one I'll show you what that looks like on the wrist and we just have these great magnetic clasps so we've got a scalloped one we have this one here which we're gonna say is the B option and that's a two strands continuous for basically the end higher length of the bracelet and then this one here we'll call C which has a focal which is wider and then it tapers to a little bit narrower and then is finished off with that same magnetic clasp so I would love to hear in the next maybe three five minutes yeah what you guys think so a is the scalloped B is a continual two strand and C is got this focal that tapers at the end so a B C just let us know in the comment section and then Brian who is checking comment and looking for questions it's gonna let us know what the overall consensus is and then I will build that style here I love it so yeah I'd love to hear me guys cuz it was fun it was really fun actually to take just one set of ingredients and then be like well how many different ways can I work this and I had to stop after three-four time but I have all the bracelet but I was having so much fun so that's good to keep in mind too especially if you maybe get some supplies that have extras because what you can actually do in this case is two of the bracelets the purple ones just you can make both of those bracelets with just one lot of everything you just need a second lot of these little spacer beads but you have enough crimp bead covers pearls you get two clasps you get enough strand spacers so that's kind of fun too yeah well I was gonna say it's great when you're you know thinking ahead to the holidays or any gift-giving or if you're going to be selling your jewelry you know and take the same ingredients and then it make two very different bracelets because someone might go oh I like this one and then someone say I like this one but it's the same I know it's a bit different so that's kind of a great thing a great little tip you know if you're planning I'm selling some jewelry as well yeah unless you stretch out your supplies it was like I'm always meet you how can I use this in a bunch of different ways exactly alright so let us know your votes and then we are going to get a consensus I'll build it but if you've watched us before you do know that we always have a giveaway on these monthly live classes because we want to share the love of beading with you guys so cat what do we have our giveaway alright so we have some great stuff today all right so to kind of get you guys into stringing what we're gonna do is we're gonna give you a couple of tools here so we're gonna be using the Zirin foreign one crimping pliers and they actually have a chain nose plier in them as well this is one of our favorite tool when it comes to straining so we're gonna give you guys this tool we're also gonna give you guys some great beading wire here and we're gonna give you a nice variety pack of 2x2 crimp tubes now this is a great thing and we're going to talk about this a little bit later but you know when you kind of find that standard size that you like to use and you want it some different colors you can go ahead and use that there as well and then we also have some bead Stoppers that we're going to be giving you and of course we have to give you some amazing needs so we're giving you this great bead mix from Jambi and this is really really fun it's all kinds of different Czech glass beads so we're giving this as well and then we also have this great bead board now this actually has a plastic cover on it cuz it's meant for travel as well but what you're gonna do with this is you can kind of but you see that there's some groups here and you can actually see it better in the photo there where you can actually line up your beads and get all your beading cord ready so you can really plan the style that you want to do and this is great for stringing so this is a bead board from the basement yeah so that's super fun know what I think what did he get going on my bracelet you'll see how to use those exact crimping pliers and the bead Stoppers so we'll show you how to use those tools for sure but the way you enter to win this giveaway if you haven't done all these with us before if you leave a comment and it can be anything be hi good morning you know a vote for the bracelet for the free what your favorite type of jewelry making project it is what your current project is it can be anything a question and that qualifies you to enter giveaway and we will announce the winner live at the end of this broadcast so good luck alright so one last look at the giveaway there and then we're going to start I into making things so welcome to everyone who's just joining us we are talking all about strung jewelry today we're going to be doing some basics and then beyond the basics so this will really help sort of elevate your strong jewelry so I think we're just about ready to dive in we're just gonna choose the bracelet that you guys have voted on the most for Julie to create all right so what's the consensus and let's make sure we do this right you'll double check me we did a B and C yes we did and it sounds like everyone wants to know how did you see fantastic right so I'm gonna be first reviewing my supplies here so just so you get a good overview of everything I'm going to be doing and I'm going to put this guy here so I have a little template which is always nice to be able to have a little pattern to follow so first off I'm gonna be using beadalon beading wire so we are so if you're doing a strong project traditionally you're going to be using beading wire and that's what we're going to be covering in this class now you can use other materials too I think you know a lot of people consider a stretch bracelet a strong bracelet and some different materials but a really good sturdy foundation is important and for a lot for everything you see on our table here we are using beading wire now I'm gonna be using a 19 strand beading wire says it right there as point zero one five and that is a nice good medium beading wire I say most of the time Kat and I are gonna use something around the nineteen strand point zero one five yeah I'd say that's fairly accurate and Kat do you really quickly want to talk about their different strands and what that means cuz that's a really common question that we get yeah I was gonna say alright so what we're gonna do is we're gonna kind of lay these out in front of you here so what you can see here is if you look really closely you can see that there's a little illustration on each of these and when we say that it's seven strand 49 strand nineteen strand what that means is that is the number of steel cables that are inside there so it's actually you know if you were to look at a really big wire you'd see that but of course this is tiny beading wire but it's all these little cables and then they're wrapped in a nylon coating now often times you'll see that it'll say the word clear all that means is that that nylon coating is clear so for example with this gold one the nylon coating is gold so that's sort of the difference there so when you're looking at the color you're looking at the color of the coating not the color of the wire underneath now you won't really see that but Vega yeah just to give you guys a little extra tip if you're trying to choose the right beading wire the higher the number of strands the more string like it's going to be so the more flexible it's going to be the lower number of strands the stiffer it's gonna be and it's gonna be a little bit more prone to kinking but this you know the seven strand especially in a point zero one eight this is going to be really great for using with something like gemstones you know because you can actually have that weight and you probably want it to have a really good shape and a nice stiffness to it so that that sort of kind of can help guide you but also that's also why if you're just getting into it sometimes you recommend the 19 strand it's a good sort of middle ground to start with and then the other thing that we're gonna talk about a little bit later but I just want to show you guys now that we have a close-up on these you can see here that beadalon actually tells you the number of crimp bead and crimp tube that you're going to need that printing might be a little bigger there we go perfect yeah so so it has a number one and a number two and if we look here on the package that beadalon has it actually tells you the numbers so it's a number one number two number three and number four so we're going to talk about this again a little bit further but this is a nice little multi pack so that you can match the tube to the the wire now of course there are always exceptions because once you start to do multiple strands through the crimp tube it you tend to have to adjust but that's why we love these multiple packs there yeah and you can always go into the beadaholique.com website and you can check we're going to have that information in the product listing so you always see there's a little option to do click see more yep and that will help to tell you all of them because we do trying to list that for you and then if you are just getting started this is a tip that cat always recommends look at our project yeah look and see what we did so if you are having something that's got three strands coming to one and you want to know what what size crimp bead do I use or crimp tube cover check out a previous project got hundreds of hundreds of hundreds of projects just check the listings and that will give you a good guide yeah and you can actually filter our projects by string so if you're really just looking for stringing and you just kind of want to know what cord we used what crimp cover size all that stuff and then you can choose your beads and have fun from there but that you know we really do that to give you guys that guy so please utilize that at beadaholique.com alright so that was a really long intro just to talk about the netting anyway we're gonna use but it's really such a basic component to your strong projects we want to go over that when we get asked that a lot as well so we wanted to kind of debunk that for you we did for sure and I think as we're creating our projects we are gonna stop and pause and talk about some of the materials and you hopefully give you some more information about that alright so we've got our beading wire now we have now if I was just doing a single strand necklace or bracelet I would probably use a two millimeter by two millimeter crimp tube I personally love crimp tubes I'm not as big of a fan of crimp beads I find them harder to use yeah you'll notice that we use a lot of crimp tubes as opposed to crimp beads I just find them easier but this bracelet actually does something little different where it's got two strands of the beading wire that needs to go into a single crimp bead which means when you loop it around the clasp loop you're gonna have four strands going through a single crimp tube so I'm going to actually use a larger size this is going to be a 2.5 by 2.5 millimeter so I'm going to go up in size which ohso means I'm going to go up in size for my crimp bead cover and I'm gonna be using a 5 millimeter compete cover so those are some of my really basic supplies now for all the fun stuff that you're really gonna get to see in the design I am using this rawski crystal tee should look pearl so this is a new pearl and the color is so pretty I love it it's just such a gorgeous color and we found it looks really great with silver and gold I've chosen to pair it with gold and I've got four millimeter six millimeter and eight millimeter and I've got these little tierracast spacer beads I'm going to be using between it I'm going to be using a little magnetic clasp because we love our mind we do so easy for bracelets and then they're really something that's gonna make this stay together so if you notice the center point there's a little bit of give right here but overall the strands are staying nice and together you'll see that especially here too on the one that was a full two strand I'm using spacer bars and they come in different sizes and this here spacer bar is two space six millimeter beads and this one here is two space eight Miller millimeter beads and you'll see that at beadaholique.com we list that in the description so it takes the guesswork out of it you don't have to think well what size bead is gonna go with that so those are my basic supplies and for my tools I'm gonna be using a cutter this is a trial next one I am going to be using the desert on four and one because I am using the bigger crimp tube I want to have the bigger notch for this one and then a little pair of wubbers chain nose so those are my basic supplies create very very basic supplies nothing nothing too crazy I know I kept thinking did I forget no this is too simple yeah so we might have an interesting moment later all right beading wire we're gonna cut it I want two links that are about 15 inches long and always cut it with a pair of cutters not scissors because remember it is a steel wire there's one now you're not making a 15 inch bracelet I am NOT making a 15 inch bracelet what I am doing is I am allowing enough wire on either side to loop through that clasp and back down through that crimp bead and give me some wiggle room to work with so I always cut more I say you want to have at least three inches if not four inches aligned yeah so yeah when you are king let's say you want to make a 18 inch necklace so then you would want to give yourself at least 24 inches of wire I would say so yeah and then we actually have a little example we're going to show you guys later and to do with some of those leftover pieces of wire oh yes nematodes you're never Tessa Scott all right so now we're going to take our two ends and we're going to line them up and we're gonna put a bead stopper on them so this does exactly what it sounds like it stops your beads from falling off it's a little like accordion and I'm gonna put it a couple inches maybe like three inches from my end and for my case I actually want the cords together because I'm going to start my pattern by stringing both of these through the beads so I'm going to begin with I can either pick some times I had the crimp bead at the end I don't know you do am I I generally add my crimp bead at the end I mean it's you know you're gonna need it you could always add it here yeah I guess I'll try adding it here that this is funny does anyone else do that it's a very weird like no I just always will string my entire design and then I'll add the crimp bead at the end all right let's get some of these guys out doesn't make a very big hole and I'm standing out more than what obviously is the two needed for the crimping because I actually use these as just regular beads in the design that's a good little tip are just little gold tube beads same thing with the crimp bead cover if you can close them and just use them as a gold bead yeah all right so here why not we'll string a will string the crimp tube and we're stirring it through both of our wires okay and then you know what let me see cuz I notice I made a boo-boo on this bracelet did you look so I put a little glow spacer bead there but I didn't put it there so I'm gonna choose not to use a spacer B okay that wasn't hurting right with the Pearl yep starting right with the Pearl all right do you have a question while you're just getting started yeah Oh actually yes okay so we have a question from Kelly hi Kelly so she has a question as to why you didn't start with the clasp and we have a good today we were talking about this um if you make a mistake by if you secure it to the class what what Kelly is meaning is to start by I believe what she's meaning is to start by crimping it right to the class yeah so you eliminate the need for a bead stopper exactly which you can definitely do I don't do it because if I make a mistake like a mistake here and did not catch you can go ahead and fix it by just taking off the bead stopper and not having to cut your clasp off or undo your entire design especially if you're doing like a long necklace it would be kind of a shame to get 24 28 inches in of the stringing and then realize you made a mistake towards the beginning and have to it's like are you string everything your head off your clasp and waist beading wire so I always start with a beading a bead stopper just to kind of a low safeguard well I think also because you know what I'm designing sometimes I'm not entirely sure what I want it to look like it starts to take a new shape and I'm like oh you know I want to go back to the beginning and add more gold beads or you know in the in one of the examples that julie has here and it's this scalloped one you can see what this design is actually a little bit bigger but let's say it was a little bit smaller than the other ones uh and I found out that I just wanted to add a couple more pearls on either side just to give it a little quarter of an inch you know or a little half inch but I didn't want to add a whole unit there which is you know I'm gonna maybe say about two-inches you know so you can always kind of do that as well but if you've already added the clasp on one side you know you're kind of out a lot because now you gotta cut it off and try to redo it again yeah so so that's sort of why we generally don't you absolutely Kim it's not wrong to do it that way especially if you're very secure and you're just like oh yeah I think sometimes for me I just like to keep that a little open-ended in case I want to go back and add another pearl or something once I've gotten to actually see how long it's gonna be all right so it's definitely something that we do and great question though because it does seem it's actually my question why Lee why don't you and you like you said you can if you haven't it's not wrong to do it that way all right so if you notice what I've been doing so far is I've been building up my design and I've just been putting both strands a beading wire through the holes of the beads so they are you know they're together at this point and I'm almost ready to start to separate them out well it's nice to see that both strands of beating line are fitting through that four millimeter yes they do I will give you one little tip if sometimes with the the coating on the pearls it is a little bit there's like usually a smaller hole and a larger hole it's the same size but yeah because of the coating one side has a little bit larger hole and one side has a little bit smaller what you can do is well I always recommend going through the largest hole without using wire firstly and then if you need to you could just take like a head pin or a sewing needle or whatever and just poke through it it's never enclosed it's just not I don't think they really thought that a person would be putting two strands of beading wire through it I was gonna say it's a tight fit but it does fit and you just sort of find the the right side to go in through all right so we are almost ready to separate out one more of these pretty little spacer beads okay so now this is what I've got so far so we've started here with this single strand and now we're gonna break it apart and so I'm just gonna separate out my strands and start to string them simultaneously with the same pattern and because I wanted to do a nice tighter taper I used my crimp tubes as a bead smart yeah cuz it worked I tried the pearls and the pearls just were too wide it didn't I didn't taper properly so I'm just gonna do this and then add another pearl to each and I'm just doing it kind of back and forth one at a time and I love the little metal embellishment it really does kind of take it to the next level you know we did a whole great class all about bead caps and cones and you know kind of doing a side by side and actually I have that project I'll show you guys later but it's just nice to kind of see just that little extra metal embellishment that goes in there to elevate the design so that's sort of again just kind of taking it beyond the basics but I love this one strand to separating into two strands it's very cool yeah I kind of want to see like how could I even you know do these differently like could I do the three strand I mean I don't think I could get through the pearls but I could do a different do you know a different bead all right so here I'm ready to start using a spacer bar so fourth spacer bar that's about this little tiny tiny thin bar is and it basically does what it sounds it's spaces them out at even intervals and it keeps the the actual design kind of tight and together so your beads don't call go all over the place okay so just like that we've got a spacer bar on there and they're very discreet actually has another necklace example here that we can see in a little bit that uses these spacer bars too and there's something that I always forget exists like the spacer bar oh yeah I forget that they're an option and then I'll be reminded for some reason I'll be like oh yeah those are really handy and I do like how thin they are well we do also have some you know we were talking about the carrier beads but we also have these guys I'm just gonna kind of bring these up so that people don't have to go too far but these are actually kind of cool because you can get little beads that sit inside there but these are sort of the big Big Daddy spacer beads but you know again adding a little bit more metal to that but yeah there's another little example there absolutely alright so I'm ready to now add a new size of beads so if you are doing a tapering effect and look actually show this necklace to kind of the core theory behind tapering as you start small and then you get gradually bigger so you you look for incremental increases you don't want to increase all at once and so for this here I started on this tape I started with the smaller crimp tubes I went up to a four millimeter bead and now I'm going to go up to a six millimeter bead and once I've got my six millimeter bead I'm ready for another spacer bar now I'm actually going to use the eight millimeter spacer bar even though I just strung six millimeter beads so you can do that to you the description of what they're supposed to be like six millimeter eight millimeter is a recommendation and that means what will guaranteed fit that but you always go bigger you can go ahead and take a six millimeter bead and put it on an eight millimeter spacer bar if you want a little bit wider gap okay and we do have another question okay so the question is do you need to use a needle for some of the softer wire um I you know I haven't found the need for a needle on some of this wire I actually think it would be very fun it would be difficult to thread a needle onto a lot of the beading wire especially I mean even if it is really thin um yeah you know what I don't think that you really need to do that now if you have a thicker wire and you're having trouble getting your beads on what I always recommend is taking your flush cutters and cutting at an angle so that you're actually making a little point that can sometimes help if you're having trouble stringing on your beads but yeah I mean Julia do you have any thoughts about that I I don't think I would use a needle with a lot of the beading wire I think it's stiff enough even the thinnest ones I agree I don't think you really need a needle if you can kind of see on my finger this is this is a pretty stiff point yeah it's gonna go through your through your beads very nice and very easily and I feel like a needle I don't know how you put a needle on it you if you put a needle on it you would have to almost you know you put it through the eye of the needle and it doubles it and that's gonna create a kink and it's also going to be a lot thicker to go through your beads well I was gonna say one of my concerns for that would be that if you are using a really thin wire I have to assume that you've chosen small beads and because of that you wouldn't want to then double up the wire because you've chosen a thinner wire for that reason so that would sort of just be my I thought about that so no I I don't think you need to especially if you are using small tiny beads now if you're trying to pick up larger beads and your wire is too thin and you're having trouble doing that your wire might be too thin to sort of sustain those beads so consider that as well and that's a really good tip as as you're trying to choose what supplies you need for your project and you're thinking well what beading wire do I need what crimp tube do I need first and foremost think about what your design is and think about what weight are your beads if you have heavier beads you're going to want a larger diameter beading wire you know think about how long your necklace is gonna be think about all these different factors about your finished design and then you can kind of work backwards and I would say choose your beading wire first and then choose your crimp tube to match absolutely yeah you wouldn't kind of go the other way because the crimps are you know significantly less expensive than beading wire so you know and also that's where I recommend trying to have like a multi pack of the crimp tubes because sometimes you'll be working with the same wire but if you're gonna double it up you need a larger crimp tube but that way you don't have to buy a whole new thing of crimp tubes you buy the multi pack and then you're saying and you're good to go well and they go they stretch like yeah how many are in here but 250 of the 1.5 by 1.5 150 of the 2 by 2 and 75 of the 2.5 by 2.5 so that's gonna last like that yeah but you also get a pack of gold and a pack of silver and that way you're covered you know and one thing that I'll always do is sometimes I'll have like a little scrap of what I know is the beading wire that I have at home and I'll just quickly before I string any beads I'll quick do a loop do a crimp okay that's holding you know try to stress it a little bit make sure that it's really good and then you know that that's gonna work so you can always kind of sacrifice a crimp to you when you're when you're just starting oh yeah just to kind of test and if you have not cooked crimp tubes before it does take a little bit of practice oh yeah yeah it took me a little while to learn how to really do it and clean yeah so allow yourself that time and just say okay I'm gonna take these ten crimp beads crimp tubes and I'm just gonna practice and you just cut yourself a little bit of easing wire and you just practice crimping yeah and that's better than starting on your project for the first time and just trying to crimp it yeah after you've done all your stringing so just do a little bit of practice to begin with yeah and that's a good tip you know we all we all learned you know we all learn in somewhere so I have no shame in that at all all right so I am over halfway done with this bracelet right well you know what while you're doing that I'm going to show the other example here that I have because you you're kind of you've kind of gotten halfway there so this is actually a little choker I did and I used those same spacer beads as well so you can just kind of see them in there now you know you're not gonna see any other gold in there but just those little spacer beads and it actually creates a nice little tapered collar effect there and I have them going every couple of beads here every three or fourth bead and what's nice is I actually use it at the very end because my clasp is a double strand clasp so I used it to sort of give a little bit of structure there at the end so then I did my crimps and my crimp covers but you can just kind of see how that can help hold together a nice clasp at the back just like so so if you guys are curious about this this is the Emily choker so thank you I did this for a little little Bridal season so I want to do that kind of dusty rose that dusty pink but you can also you know this is again just a great example of using those spacer beads but when you kind of look at it from far away and I'll kind of put it back up here on the bust you don't quite notice those spaced reviews which is nice they're kind of hidden in there you kind of only notice if once you get really close up which is really nice so it just looks like there's just a nice structure to it and that way you know I like using these spacer beads and creating one single unit one single necklace because that way then you don't have all these different layers falling in and you know falling over each other so you have that nice it's gonna be nice and stable so I'm actually going to show you again in a minute here to do that braiding technique so you get that beautiful focal but you don't have all this multi strand business happening which is a good design as well I'm just saying you know for for something a little bit different you know you can braid them together to create like a really nice chunky look I think that look to something you see a lot of boutiques and you kind of know and you're like how do they do that so it looks neat and tidy so be really nice when you do that yeah all right I've done my focal and now I'm ready to bring it back down to where we've just got the single strand so you see that my two strands are still separate at this point and I beaded that hole focal and I've got my little crimp tubes right there and now I'm just literally bringing my strands back together and gonna feed them again through the single bead so we're just going to start again and we're gonna repeat so you'll often see in our instructions we say repeat your pattern or a mirror image from the halfway point and that's just what we mean it means you're just making sure that each side from the center point is identical but that's also why I another good tip that Kelly brought up is to have the front or the start and the end of the bracelet be the same so if you've gotten all the way to the end and you realize that it's too long you can you know get rid of a bead or add another beads so right and evenly get rid of on both sides exactly all right so we're getting there and one thing I'm doing as I'm doing is I'm just kind of adjusting I'm making sure I don't have any big gaps in my beading wire and nothing is kinked because sometimes if you are doing this especially if you do a design like the scallop here where you are kind of doing this like weaving in and out yeah you might have a little gap that you just need to kind of literally just wiggle well and you know we're gonna talk about this kind of as you get a little bit closer to the clasp of it making sure that it's not too tight but everything that is you know good and snug you know cuz we'll always say pull snug you know because you don't want it to be Lucy see but you also don't want it to be too tight so that your bracelet won't actually bend around your wrist I made that mistake when I first started doing this I was like oh great my strong bracelet that now is just a stick because it won't Bend and I do have an example if you'd like to show because I am fine to admit my my errors it's not that that step but this will here is a little stiffer than I would like because I did that I did not leave enough wiggle room if you look at my beads oh yes they kind of they kind of are a little I think of it stiff and that was just because I did not leave enough yeah and I've been ding Rou yeah yeah so I'll talk about that all excited when we're at the end of our project is a finishing touch and it's like oh well then I know that's not that's often a difficult thing to get right when you're doing a multiple strand bracelet like this now this is a strand reducer here at the end and it's it's difficult to do because you know that you've counted your beads but you know what you don't account for like the tiniest little fraction of a millimeter that might be off about one of the strands so you just kind of have to give it just that little extra love and just give it a little bit of breathing room and that can be kind of tough so yeah I have one bracelet I distinctly remember I don't know what beads I use I must have been like odd shape I actually had to crimp the second half of the crimp like the second half of the bracelet crimp as I was in a curved position Oh interesting because every time I laid it straight I had to redo it a couple times I could not leave you know right and I just there are either really large beads and they were bumping each other something was happening I actually had to crimp it hurt No so I was like okay maybe I'll just kind of bending it around yeah and we do have another question okay so Hannah and Tracy are asking if there's a limit to how heavy the necklaces are now I'm assuming you're probably referring to a little bit of the beading wire now like I was saying earlier if you look on the cover of a lot of this and this is of course listed in the product descriptions it'll tell you the breaking point now this one has a twenty six point nine pound breaking point and if you're wearing that necklace you've got to help you because you're probably gonna fall over humming with a 30 pound necklace but so but that's just kind of there to help guide you in terms of stress now we do have a couple of examples where Julie made this really long necklace with gemstones at the bottom yep since I'm sorry I'm with gem says at the bottom but what she did is she utilized the wood beads at the top to kind of combat that weight on this and also that that tassel is pretty pretty hefty down there at the bottom as well but that's a little tip for you guys so you can use some wood beads or some lighter seed beads even if you're using some gemstone beads and you don't want to do all gemstones and all metal because then it can be really heavy now in terms of choosing the right beading wire for that you can go a little bit heavier as long as it's gonna fit through the hole but I would recommend going for probably a 19 strand probably very similar to what you've got here but you can probably get away with a point zero to zero again depending on how big the holes of you know like a gemstone or even a pearl looking but you can actually do you know some pretty hefty pieces some some good gemstones and you don't have to make it lighter on yourself if you don't want to but yeah I think the indications on here will tell you that but again just go with you know like it'll tell you the the pound that it can handle like the breaking point and for many of them it's like it's over 20 pounds so you'd really have to yank on it pretty hard to break it because don't forget guys these are steel cables wrapped in rain I'll on coating so they're they're meant to withstand a lot now we're going to show you some thread protectors here and a little bit but that will also sort of help protect the wire from getting that wear on it because sometimes when you do the crimp it can actually cut the wire but we're going to show you guys how do not do that because that's often a common mistake that happens with I love stringing so speaking of clasping and crimping him let's see it happen alright so I finished my bracelet design and I am ready to crimp my crimp bead and add my clasp all right so we've tapered it down to basically it's a single strand but it's the two that are together still so you see those two strands are still holding them together we've separated out our magnetic clasp so we have half of the clasp here and it's got that handy little loop now I am not using a thread and wire protector I sure could have you could I don't have to yep and now I'm just going to take my wire and I'm gonna feed it back through that crimp bead both strands of it and let's see if I could do it on the black here so I'm just holding in place and bringing it down just a smaller loop now my crimp bead cover is gonna go over this crimp bead which is gonna add a little bit of width to it so I want to keep that in mind I don't want to make this loop super tiny I think I think that's actually pretty good on this one yeah it looks good yeah it might be a little big there we go I just don't want it too tight when I add that crimp bead cover so both so now we've got essentially four strands we got two exiting and two looping around and back and now I'm gonna use my plier and where can we see it best here you see this got a bunch of notches on here so I'm gonna be using this back notch first that looks like a V and then I'm gonna go up one notch and then do the fold-over part of the crimp so this one here is gonna help to make it mimic that shape it's gonna kind of crimp my mom what's a good word for it kind of fold fold yeah yeah so it's gonna kind of here we're just gonna put it right in here and we're gonna rest it in that very back notch and then we're just gonna squeeze and let me show you what it looks like now so it mimicked that v-shape mm-hm and now we're gonna go ahead and rotate it on its side and I want it in that notch that's next to it because this is a pretty large crimp bead it's 2.5 crimp tube excuse me my five by 2.5 and we're gonna squeeze and it basically just folded in on itself and you know we we got this question we actually get this a lot is how do you combat the magnetic clasp fortunately you just kinda you just wiggle your way in there and then you you know cuz once you kind of have your crimp plier in place you can get in but just before we move on from the 401 crimpers I just want to show you this is the back of the package so if you do get this you'll actually I feel like this is maybe a little bit easier to see than actually on the tool which is silly but so you have your crimping station and then it goes from three two and one and then it'll tell you that you have a nice chain nose plier at the top there as well but Julie used the three millimeter because she's using a 2.5 so in that case you always want to go up get the size so tightly so alright moving on alright just I'm gonna finish this side here to show you it and then we do have another question so let me just complete this one yeah task here so what I'm gonna do normally my preference if I can is to thread this through some adjacent beads I just like doing that I like how exhilarating security I can't do it in this instance so it's really one of those things I do it when I can sometimes I can't because I'm not gonna be able get two more strands through that little pearl so I'm just gonna trim it up close hello magnetic clasp all right now I'm ready for my crimp bead cover and I couldn't be cover is essentially an open bead so it's just like a bead that's open I'm gonna have the opening facing out I'm gonna hold this and slide it and it could be a little hard with magnetic clasp but I will fully admit that because the magnetic clasp wants to grab on to your tool but you kind of have a good grip there where you're sort of holding at both sides of it so I've got it over there and now I'm just gonna squeeze it together and what I like to do is I like to go from different angles to try to get a nice seamless look but there we go so now it just looks like a little bead right there very nice so now we let's answer the question yeah and then I can do the other side as well sounds good so Linda is asking if there are any must-haves for bead stringing must-have tools I'm gonna say those are unfortunate but you must have some type of crimping pliers yeah well let me kind of show these to you guys here so these are mostly just different sizes and here let me kind of clear a little space because I want you guys to be able to see the noses of these so we have the mighty crimper here and when you see it crimped together you can actually see that it's got that nice kidney bean-shaped to it and so you do exactly what Julie just did so you do the first part in that little kidney bean and then you crimp it over with that little section right there so these are the mighty crimper so these are going to be utilized when you're gonna have some big crimp tubes but then you also have this one here and hopefully you can see it but it's much smaller but it's the same version where you have that little kidney bean shape and then you have that nice little circle shape there as well but the reason I like the sarong foreign ones and you can kind of see it there we go is it has that nice little V which will kind of serve as your kidney shape but when you put it together you can see that there are three little distinct notches there and I'm gonna give these back to Joyce but they work fine just fine the same we also do you have the magical crimpers but all in all you'll need a pair of crimping pliers you will need a pair of flush cutters like we've been demonstrating here this is going to help you cut that wire do not use scissors it will ruin your scissors so you do need flush cutters and then I would recommend a pair of good pair of chain nose pliers as well you can use round nose pliers but those chain nose pliers are really going to kind of help you with those crimp covers and kind of getting anything where it needs to be there also if you find that your crimp crimping pliers the little end didn't give you quite the result you can always come in come in with a chain nose plier and just kind of pinch it together so chain nose plier flush cutters crimping pliers I'd say at least fills three and then optional guys add a fourth would be the little bead stopper yeah yeah he's a handy little tool and you know that packets like six or ten you get a lot of them yeah as you say they come in they come in packs of six these are the larger ones we do have smaller ones as well and we don't have them on our table and I'm sorry about that but these are the large ones and usually this is what you're going to want to use for stringing and you can actually use these little guys to separate strands if you're doing a mulch strand project and you have one that you just want to keep separated so you can use the little coils as little guidelines there as well so just a little extra tip about each Stoppers and these are these are a godsend yeah I don't know what I would do without my bead Stoppers I used to use tape actually and oh yeah but you know what tape would slide off like I used to scotch tape when I when I didn't know any better about bead Stoppers yeah but it would slide off so okay you made a bracelet a bracelet a bracelet I'm sorry so I finished the other side and so this is what we've got we got the little magnetic clasp we've got the crimp bead covers end up looking like little beads and then we have our bracelet and I did leave it where it was enough wiggle room so if you look here you can see like I can almost almost pull apart the beads and see just like a millimeter half a millimeter of beading wire barely that but it's just enough that the beads aren't pulled so tight right so they they can still move and but they aren't kept together these chandri's so they can move but they're still there's no big gaps I guess because don't forget guys at the end of the day you're gonna wear the jewelry you know like it looks nice on the table and hopefully you'll be selling it but you need it to be wearable because that's it's its job its purpose yeah I'm gonna use that one in the Tahitian is gorgeous yeah so yeah it really does look really nice with the gold but it would look like on I love that and if you want to make it smaller just take off a couple beads from each side nice so that not hard to do so I wouldn't mess with the center point in a design like this I would just take it off at the end yeah I was gonna say because you could very easily take off a four millimeter pearl from each side and that you know sometimes that's all the you know less space you need or more space you need if you want to add a four millimeter to each side absolutely alright so we're running a little over time here but I'm gonna do something kind of quick here so it's gonna be a lot of what Julie just showed you so I'm going to move a little faster but if you guys have questions of course please shout them out and just before I get into my project here we just kind of take me over the table now before we get into my project here don't forget guys that still have our giveaway going on and I'm gonna show you really really fast what that is so we have this beautiful bead board here and it's got a nice plastic cover on it because it's meant for travel so you can kind of see how that looks here we're giving you guys some beading wire some beads some crimp tubes and the two by two and lots of different finishes so you can choose your favorite and then we have the bead Stoppers and then we wanted to make sure that you guys had one of our favorite tools here which is these are on foreign land and crimping pliers all right so all you need to do is just leave a little comment here anywhere in the feed say where you're tuning in from or what your favorite stringing project is or I don't care you can tell me your kids names anything will enter you guys to win the giveaway today so we're gonna be announcing that winner at live in just a little bit all right all right all right so what I'm gonna do here is I'm gonna actually grab my project and this is what I was talking about where you can create a project where it's just three strands of beads that are all just strung and you can just see how very simple this pattern is I just use eight six and four so I kind of took a took a tip from Julie there with my sizing so eight six and four and then there's little true twos which are two millimeter beads in between there and that's all it is it's just a simple pattern of strung there's no scalloping there's no nothing but what I could then do is then take all three strands and braid them together and then kind of taper them at the end so I'm going to show you guys kind of what that looks like really quickly here so I'm not going to use or I'm sorry I'm going to use some of these closed jump rings here and these can actually be utilized as well so you don't have to bring all the strands together to do one at a get three strands through a crimp tube because I just wasn't going to work here so what I'm gonna do is I'm actually gonna remove the bead stopper from one of my projects here and I'm gonna slide on a crimp tube and then I'm gonna put it up and through one of my closed jump rings and back down through here at the end and that's a great tip a closed jump ring is so simple and readily available mhm but it does it makes a great strand reducer and you can find these ones that are in and have like a texture yeah these ones have a little little rope texture I just thought that was really really pretty alright so what I'm doing is because I am I can scooch these up later I'm not too worried about it I always do that on my first side because I don't want to have any extra wire or anything at the ebb at the other side excuse me alright so I have a little loop there and I'm gonna come in with mine surround foreign ones now there is in my opinion a right way to do this and Julie did it the right way is good it's where you have that little point facing down so you're crimping it down and it's just kind of a little gravity thing but also it allows you to kind of set it in your little notch there make sure it is nice and centered and you can kind of give a little look to both sides before you do your little crimp so i crimped my little V and then I just do my 90 degree rotation and bring it together and that's it alright so I have one done so this one I can actually string through the next adjacent bead before I trim it off sorry we're sharing tools today alright so just coming in and just trimming that off alright that's dead stab perfect okay so now before I this is again why I leave a little bit of slack there before I scooch everything up I want to add a little crimp cover now a rule of thumb in terms of sizing is you want to go at least one millimeter larger generally to cover your crimp tube so if you're using a two by two I recommend at least a three because the idea is to cover the crimp tube not to just sort of let it sit on top of it so just you know you can go bigger Julie did bigger and that's that's a good little little tip there as well alright so really look at what your design is and maybe you want a bigger element there or maybe you want a smaller one exactly know you're also using at least from here it looks like this have some texture to them - yeah sorry I like that I like the texture especially when you know like you know you have to consider that the beads are fairly simple you know they're just these are just check fire polished beads here and they're actually all a separate strands there we go get my wire out of the way and now what I'm gonna do is I'm gonna come to the other side of my meeting wire and I'm just gonna slide my bead stop down because I wanted to have just a little extra slack when I get to the other side all right so now I'm just gonna repeat that with the other two strands and as you're repeating that exact same technique I just want to show just some a variety of these little crimp bead covers so you see there's ones that are kind of sparkly and there's plain ones there's different finishes there's larger smaller so you really can match it to whatever your design is if you have a fancier design you can pick a fancier one if you have the more simplistic one you can pick a more simplistic one so there's a lot of choices when it comes to the crimp bead covers now that said if you have a piece of jewelry that say slim like this you can't just leave the crimp bead uncovered yeah so I've done that before too so I just had these little seed beads and noodle beads and I did not want something large there I did go ahead and use the thread and wire protector but I chose to use my crimp just leave my crimp bead uncovered so it's a preference it's a design choice the crimp bead covers are decorative and they do add a nice decorative touch but you don't have to use them but if you do choose to you have a lot of choices and you can match it to your design no yeah and that's that's a great great thing to keep in mind guys everything that we're doing here it's it's dealer's choice you know you don't have to do any of these extra steps that we're kind of showing you it's just sort of if you want to do something a little bit different or I don't know maybe you got bored with stringing you want to take it to the next level it's entirely up to you but I think that's what I love about stringing is that there's really no wrong way to do it but there are definitely some helpful tips and that's kind of that's why it's why we're here today exactly and again do you check out the projects at beadaholique.com where you can find everything you see here you can find all the supplies for sale and that's really going to show to share more tips because in the videos in the project descriptions we do try to impart any tips or needed little information so if you are patterning your design after something we've done before you might learn something there there that will help you along absolutely and one other thing I want to say about crimp covers is that you know because they do look like little beads you can actually add a couple of them if you end up having a gap which is something that I've had to do before so you can add an extra crimp to kind of fill up that little space in the back if you if you ever need to do that alright so I'm just doing the basic same technique but you can see that I've added all three strands there to my closed jump ring and this is just gonna kind of work as my little strand reducer so you can do that you don't have to but you can also do that but I just wanted them all to come together to one point alright I don't think that's gonna fit through that four millimeter nope nice try alright so coming in with that alright so the last thing that I'm gonna do here is I'm just gonna adjust my fate Stoppers there we go alright so now I'm gonna take my loop here and I'm gonna set this out you pick the longest project to do on this table so what I'm gonna do is I'm just gonna create a really traditional three strand braid so I'm just taking all three strands and I'm just gonna kind of braid them together now you can do a loose braid you can do a tight braid but again this is just this is also an example of you know you do want to start with the clasp at one side but just really simple I'm just braiding those three strands together and it's creating a nice sort of sparkly aspect to it we have another question we have to thank her question was can wire protectors be used as closed jump rings yes they can I had to think about how you know you'd still probably in this example here you'd still probably need some sort of jump ring to bring them back together but you could always use in an open jump ring for that but you know you can absolutely use closed jump rings because what it in essence does is it creates a loop and actually you can do that and I'll show you an example here in a second because otherwise you do need to use a crimp around a closed jump ring that actually ended up being fairly even all right so there is pretty fat there you go so I just want to answer this question really really fast all right so you can see here that what happened here was I used a wire protector to end so there's a crimp tube and then a wire protector so that's utilizing that closed jump ring but I still needed to use an open jump ring to attach that clasp in this example here I'm trying to think of I have an example where I did not do that okay all right so here's an example where I used that thread protector or wire protector to actually act as that closed jump ring on that lobster clasp now on this side I still need wanted to add an open jump ring so that my lobster could have something to attach to but this is an example where it does sort of serve as that closed jump ring so yes is the answer to that very simple question in my very long way I'm sorry and thank you all right so now I still have my little closed jump ring up here but what happened here was I actually didn't actually did a better job that I'd actually hoped to I kind of hoped to screw this up I'm sorry guys but I did the nice little braid here and this is I it's pretty stiff but I want to just kind of adjust it just to make sure that it's nice and even my braids pretty stiff but you can see that not all the ends are totally even so what I'm actually gonna do is now that I have my braid I'm just gonna take off a couple of these beads here and just set them aside now you can take off or you can add on but then in essence this side is just going to look exactly like this and then you can come on and you can add on a little lobster clasp and then on to the other side what I did is I took some smaller jump rings with those larger jump rings and I created a little chain I'm not going to do it here it's the same thing and I did write this full tutorial up so if you guys are curious about seeing how this bracelet is finished it is the mermaid lagoon necklace I just said bracelet take a bracelet necklace okay yesterday you played this and oh yeah like no it's 10:00 a.m. guys thinking that people might show up at 10:00 p.m. for our class tonight but we won't be your work but anyway so so that's another little example but again you can just see how simple it is these three strong pieces coming together in that braided fashion just to create something kind of new so pretty I love that look yeah yes you know it's just check fire polish beads and the graduated sizes and that's one thing and that I'm always looking for is how can I use the same gear in different sizes to create something brand new all right so before we kind of move on here I just want to kind of move some things for my table because I'm sure you guys are curious to see how these wire protectors work all right so let me see if I can if I picked the right size here okay so the wire protector is when you look at these they are sized by which thread or I'm sorry which wire will fit in them so you'll see it and it'll be sized by like you know point zero one eight point zero one zero point zero two yeah sizes but how these work has their little their little shoe moorings that just look like that and they have these little holes at the bottom so very simply you just take the wire and thread it up through one side and then you thread it up and over so that it comes down through the other side and then you can just slide it up there just like your little loop and you can see that it sits right in there and that will just sort of protect that wire from getting kinked and then you add your little crimp tube there to the end just to secure it so that's one way to to use these and again yes you can absolutely use them as closed jump rings but these are just a really nice little sort of finishing technique and I do want to show you because you recommended it when I was feeling challenged on this piece I could not get my toggle clasp to move freely but what how I was stringing it yeah you said will add a little thread and wire protector because it's gonna give you that gap mm-hm it's gonna let your toggle move and so I thought that was a really great tip that you had thank you that was good I wasn't having to recreate this over and over again because it was not moving work well and it looks like you do have to crimp covers there at the end I do I have to to extend that as well yep because if if I had beaded all the way up here to my toggle I could not get it into the toggle round piece of the clasp but because I have these and they're smaller than my would beads I was able to go ahead and use it like that and all he did was close that there's not another crimp bead hut hidden under there it's just a closed crimp bead cover yeah which is in essence I just a metal seed be it's just a metal seed bead absolutely so another good application for those crimp bead covers or not gonna be covered well that could be covers and so another little thing that you guys might be unfamiliar with actually these are really cool they're little bead spacers but they're called bead bumpers and the reason they do that is because they are little silicone spacers and they are so itty bitty I pulled out a couple here and we actually have some that are cubes but I have a little strand here and I just want to show this to you and I'm gonna try to lean over so the camera doesn't need to move but what happens is they're just these little spacers in here and I have them on a little wire here just to show you guys but when you get up really close you can just see that they kind of squished together so if you wanted to do something that sort of has the appearance of pearl knotting you can actually use the little bead bumper so you don't have to worry about knotting and then you can still just create a strong bracelet so just something else to consider and these are also great to use if you are using pearls or gemstones and you just need that little extra cushion there yeah so we have these in lots of different sizes and of course colors you know there's clear there's white there's black there's gold so so lots happening there alright and if we've missed everything anything you guys never let us know and Brian is watching those comments and those questions he's doing a great job for us so I know sometimes in these classes we get to talking and creating and then we forget to show something and then after the fact we go back when you answer questions on it but definitely feel free if there's something owners we haven't covered like I know we haven't covered the magical Grimm part yep so let's go ahead and take a look at what that is because this is another form of a crimping plier so I'm going to move this okay initially reach all right so the magical crimpers uh-huh this is actually really fun so I have an example here and Julie wants you actually okay okay so if you look up really close here is the crimp bead right there but it looks just like a round bead there is no seam which is interesting because let me see if this example shows the scene so this example okay so here you go you see that little seam line might be a little hard to see but because we didn't cover um I have one here you have one there you can see so you can kind of see that's good yeah so on so this is an uncovered crimp bead and you can see on the other side it has that nice little rounded but on this side it has that seam well with the magical crimper you don't have to worry about that and in the example I did here I actually used tiny little round gold beads so by using the magical crimper I could just continue that design so it doesn't look like there's a crimp there at the bottom so it is using these tubes but the magical crimper turns a tube into a bead yeah and around it but it is still a crimp bead so it still actually crimps the wire so it's just a round crimp bead to toriel video on that yes at beadaholique.com and on our youtube channel so if you're tuning in on facebook we do have a whole youtube channel with a ton of videos and one of them is that magical crimping plier yeah so i'll show you how to use that and you'll get a nice up-close look at kind of how that really forms that little little ball there all right should we look at our giveaway one more can i name away one more time as we are getting ready to choose a winner here so you saw them in action so we are giving you guys the xyron four in one crimpers we're giving you some beading wire to get started some lovely beads this is a great bead mix and a nice green and Lu we're giving you some crimp tubes and again these are the two by twos these that's kind of what I feel is a good stand inside you can in some different colors there we're giving you guys some bead Stoppers and then I just want to clear the items off of here so that I can show you guys have this lovely travelers on the go beading board so it has a nice plastic piece on the top and I wouldn't I don't want to take it out because I want it to come to you just like this but it's got this nice plastic on the top and it helps you sort of design your strong jewelry and it's got all these nice little compartments and components for your beads yeah so a very handy tool and it keeps your beads from rolling all over the place I think I ended up with a few beads I know I was like there's probably a few all right so we are good people one more to this yeah questions and then we will yeah and you know so if you guys are just tuning in now this will be the whole class will be available later today so you guys can always check back for that and we do these classes the first Friday of every month it's so fun we always have a new technique or a new you know it's a new season maybe last year we did some great Christmas jewelry at Halloween jewelry so just lots of different little things so if you guys have an idea for something that you like to see that we haven't done yet leave it in the comments because we will take that into consideration yeah well we're always trying to find new techniques and maybe there's something that we haven't heard of that you want to learn about will we'll learn and we'll teach you which is one of the best parts per job yes that the experiment to get everything in our mad be love all right so I think Brian has gone ahead and selected a winner the winner has always random just so you guys know yep all right say congratulations to Becky justice you are our winner of this wonderful giveaway so thank you so much for tuning in so all you need to do Becky is just email service at beadaholique.com and we will get your information so you can ship this out to you so congratulations to Becky justice thank you and we hope you have a wonderful weekend it's now October yes enjoy the pizza so thanks for joining us please do come back and see us again and so we'll be back on Tuesday with a beating break yeah and be sure to get all of these supplies and tools by heading over to beadaholique.com you'll see all the tutorials and everything that we talked about here today all right thanks so much for joining us guys and we'll be back very soon all right bye you

You recently viewed

Clear recently viewed