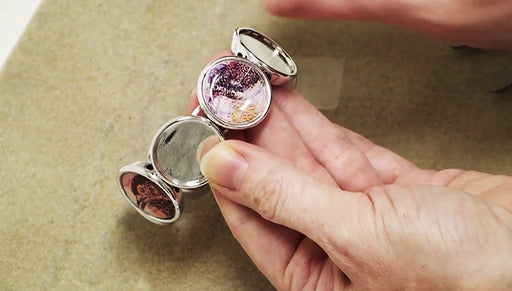
How to Make a Keepsake Photo Pendant

SKU VID-0072
Designer: Julie Bean
Learn how to make a keepsake photo pendant using a picture from your own personal collection. This tutorial offers tips on how to choose the right photo, what paper to use to make a copy of the photo, how to apply it to the magnifying glass cabochon and then set it into your bezel.
Audio Transcript
Note: This audio transcript is auto-generated and may not be completely accurate.
Hi. This is Julie for Beadaholique.com I'm going to show you how to make a wonderful personalized gift. A personalized necklace for yourself. What you're going to start with are these wonderful settings. These are bezels with a perfectly size glass cabochon. They come in a variety of shapes and sizes as you can see here. You have a heart, we've got this wonderful long rectangle, circles, ovals. You have a lot of variety in the shape and size of your necklace. I want to make the image to be a picture and so what I did was actually took some photographs. These are some childhood photos of mine. It's me and my brother and I just laid them on the bed of my home copier. I have a all-in-one printer at home. I just laid them flat out on the bed of the copier and this is what resulted. I'm using a heavier weight paper. So this is not normal printer paper. This is about a eighty pound cover stock. You can tell it's got some weight to it. I want to use a heavier paper because I don't want it to ripple when I apply the glues. If you add moisture, any type of moisture be it glue, water or anything to standard printer paper it's going to create a bit of a ripple effect. You can work around that. It's just a lot more difficult so I always find it easier just to start with a heavier paper. It's going to absurd the glues better and going to absorb the inks a little better as well. This particular paper that I have is actually linen textured. Personal preference. I kind of like having a little bit of a painter effect to my photos and having a little bit of linen grain in there creates almost like a painted effect. But totally up to you but I do you recommend a little bit heavier stock and you can buy such paper at like a scrapbooking store. You can buy it per sheet for under fifty cents if you don't want to buy a new pack. So that's what we're starting with and I put these on the bed of my copier in kind of every direction. I'm going to cut them My original pictures I'm putting aside. I don't want use them because I want to save them. Now I can look at all my pictures in an orientation that is correct and what I'm going to do is use the glass cabochon as a guide. So I'm just going to roll it over the pictures. See how it might look. Look at the different sizes. Just keep doing that until you find an image that you like and that you're happy with. I really liked the one of my brother. Not quite sure how old he is here but I think it's a really nice setting. So I'm going to take my diamond glaze first. In this project I'm actually going to be using two separate glues. I'm going to be using a Diamond Glaze to adhere the printed photo to the glass cabochon. Then we're gonna use Crafter's Pick which is a wonderful non-toxic super glue to apply the glass cabochon which will have the image already on it to the metal setting. So first off I'm going to use the Diamond Glaze. I'm going to a little bit on just to make sure it's flowing and it is. I can just wash that off. If you worked with Diamond Glaze before you know a little goes a long way. I'm going to put it directly onto the glass. That's all I'm going to need, just a few dots because it's going to spread it out nicely. Flip it over put it directly onto the picture and push. I'm going to apply a good deal of pressure on a flat surface to get out any air bubbles. I'm holding it into place. Once I've put it down, I don't wanna move it because that's going to smear the ink because I just used an jet printer. I might actually tear the papers. Be pretty accurate when you first lay it down. Now if you do you get any diamond glaze that comes out the edges and maybe get onto the top surface of the glass, a really handy trick is to use nail polish remover on a q tip. You're not going to be able to wipe that away just with water so you'll just have to use the nail polish remover but that's going to take it right up. I don't have my image sealed and really don't find that I need to. If you're using photo paper, be a bit cautious. You want to do a test run. I have had some photo paper that when it was printed on an ink jet printer actually did smear quite a bit. The ink ran. So just be careful of that. I'm just holding this in place. I really want to create nice tight bond. I'm going to let this dry for about ten to fifteen minutes and then I'm gonna come back and finish up my necklace. I've waited about fifteen minutes. Diamond Glaze dries really quickly especially when you apply it sparingly. Now what I want to do is I want to cut out my image. My brother looks quite dapper there. So I'm going to carefully cut around the edge of the glass cabochon. I'm going to rough cut it a little bit first. It's a little easier not having all that paper to contend with. There we go. We've got him cut out. Now we just need to put it into the setting. You see how that's going to look. You've probably been able to tell, if you've watched some my other videos and I a big one to just use my fingers. If you wanna use a paintbrush that's great. If you do use your fingers just make sure you wash your hands quickly afterwards. You don't want a a ton of this on your fingers. I'm going to apply the glue directly to the back to of my image. So I want to use enough glue to get the image and the tile to adhere to my bezel. I don't want to over do it because I don't want the glue to warp my paper in anyway. So I'm going to the edge of the image but I'm not using it in such excess that it's going to cause any warping. So you can kind of see how much I have on there. Now I'm going to take it, put it into my setting. I've got some glue on my fingers. I'm going to wipe that away. Press it into place. I'm going to hold it there again for a couple minutes to create a nice bond. So we've waited a couple minutes and it's good enough now. It is dry enough that you can you know maneuver it. Removed your finger from pressing it down. But we're going to wait a couple hours for it to actually dry completely before we wanna incorporate it into a necklace or string it onto a chain. Go to Beadaholique.com for all of your beading supply needs!

You recently viewed

Clear recently viewed