How to Make the Sunburst Bracelet using Toho Demi Round Seed Beads

SKU VID-1077
Designer: Julie Bean
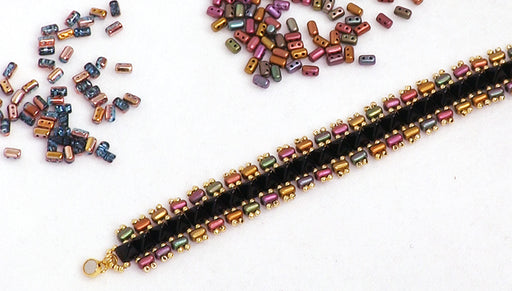
In this video learn how to bead weave SuperDuo and MiniDuo 2-hole beads together with Toho Demi Round seed beads to create a sunburst design. The bracelet also features Austrian crystal faux pearls and an entirely beaded clasp.

The brand name for the crystals shown in this video is no longer available. High quality Austrian crystals are now available under the PRESTIGE™ Crystal Components line.

Audio Transcript
Note: This audio transcript is auto-generated and may not be completely accurate.
Hi, this is Julie with beadaholique.com and i'm going to show you the backside - this was a really fun project to come up with and what inspired it was Touhou Demi round beads so those are these little guys right here and they're in a couple different sizes so what I've done and I just want to show you real quick before I get into the bracelet design and construction is these little Demi rounds so they come in eleven O size and they come in an eight-oh size and they're a nice uniform Toho bead but they're much narrower and profile than the traditional ones that you're used to so if you want to look at the profile here you see is a very nice little slice and they do come in a lot of finishes this is just a small sampling but there's mat there's irises there's metallics there's a lot of really fun colors and for this particular project I've picked two of those colors and let me show you here this is going to be the color scheme for the project we're going to be doing here I did a little sample swatch for the Toho dummy rounds we're going to be using a doe size in higher metallic amethyst you see there's actually a lot of color at play there I like that a lot then we're also going to be using the eleven o size which is the smallest and this is gold lined rainbow luster now what we're going to be pairing with these guys are some Rula bees so they're nice little Solyndra canned there are two holes this is jet bronze luster we're going to be using super duos in metallic pink suede mini duos which are basically just a super small little super duo and those are going to be in chalk light green luster and then we're going to be using two sizes of Swarovski faux pearls both in rose gold a four millimeter and an eight millimeter so I kind of love it that this bracelet basically uses three different types of beads but different sizes of them which is fun so let's begin I'm using a needle so besides the needle the only other tool you're going to need is a pair of scissors and I've threaded on to it some fireline thread and smoke six feet of it si Oh point zero zero five and there is no bead stopper so for this design we're not using a bead stopper to begin we're going to be making one of these clusters so let me show you this so think of this as a cluster and if you look on the back side we're going to begin by making the interior part of the cluster so I'm going to put that right there so we can reference it so we're going to place onto our needle two of the eleven Oh Demi round followed by a super duo two more Demi rounds another super duo two more the Demi rounds another super duo two more Demi rounds another super duo two more Demi rounds another super duo two more Demi rounds one more super duo so what you want is you want to have six super duos with two of the eleven Oh Demi rounds between each of them once you have that on your needle go ahead and pull it down towards the end of your thread and you want to leave a tail of a good 12 inches because you're going to go back and use that tail to make the closure part of your bracelet the clasp so grab this you're going to tie an overhand knot so that you make a loop and that pulls them all together now we're going to want to tie another knot so go through that loop so make another loop go through it here we go go through it once and go through it a second time so we're tying a surgeon's knot at this point and pull that down so it's nice and tight so we just made the interior part of our first round so now we need to make the exterior part so what we're going to do is we need to jump up to the second hole of the super duo so what you want to make sure is you are exiting a super duo if you weren't exiting a super duo when you made your knot you would just work your thread right over here and be coming out this one here but we happen to be doing that so go ahead jump up to the second hole of the super duo and you see there's a little discrete thread bridge there don't worry about it you're not going to even notice it and you're going to go ahead now and pick up one of the 1100 of the deme rounds and a Rula bead and then another of your eleven o deme rounds and you're going to go through and adjacent super duo and pull now if you look at the outside here of the sample what's making that stop sunburst design are the little mini duo's shooting out from the edges so we're going to pick up an 800 dem around a mini duo and another eight oh dami rounds you see that the mini duo is really sandwiched between the two 800 demi rounds and now you're just going to go through another super duo again the top hole and you're going to repeat that same sequence again so sandwich another little mini duo and go through your super duo so for this particular pattern you're always going to have six super duos you're going to have a rule Abid on each side so it's nice and even and then up top on each side of the rule --is you're going to have two mini duos so we're ready to add another rule a-- at this point so the rule is are sandwiched between two eleven o dem around so you've got the two eleven o dummy rounds and you've got the Rula and you go through a super duo okay so now we just need to repeat this sequence on this side so let's go ahead and sandwich another mini duo between the a dough Demi rounds and repeat okay now at this point you want to go through not only the super duo but you want to go through the little 11 Oh Demi round and the Rula again too so you want to be exiting a Rula this thread here just remember that was our tale that we're leaving so you just want to make sure it kind of stays out of the way at this point we're not going to need to revisit it until the very end alright so this is what we have and now we need to be able to do the top embellishment at this point so we need to go ahead and jump up to the second hole of the Rula beads so here we are we're exiting it just use your needle go up to the second hole and pull okay so for the top embellishment you're going to go ahead and you're going to add one two three of the eleven Oh Demi rounds one of the eight oh one Saurav ski pearl another a toe Demi round and three more of the eleven those go ahead and pull those down and they're going to rest on top of your sunburst so we're going to stretch our thread across and then we're actually going to almost do like a crisscross here so instead of just going straight across like that we want to cross over the middle and go up the Rula in this direction here so it's diagonal so now to do the other part of this top embellishment we're going to add three more of the eleven OHS and now we're just going to go through the eight oh the Pearl and the eight oh that's already there pull and now we just need to add three more eleven Oh Demi routes and go up through our ruler in this direction so you did crisscross both of your threads just mix it a little bit more secure and we have our first sunburst cluster so to do the second one is actually a little bit of a different sequence than the first one so the first one we started with the inside round now the second one let me show you we need to step down to the bottom hole the lower hole of the Rula so right now we're exiting a top hole because we did the embellishment so to get down below you're just going to go ahead and create a little thread bridge on the side of your ruler and now you're suddenly at the bottom again which is perfect but if you look at how you're oriented the Rula beads are connected to the outside row not the inside so you're now going to build the outside first and this is going to be the exact same pattern you're going to follow for all subsequent clusters so let me show you what you're going to do you're going to go ahead and you're going to pick up 111 oh we're just building this outside here so then the eleven o is going to be followed by a super duo which is followed by an 8 o of your Demi rounds and then we need oooooo because again we're sandwiching those mini duos and then another super duo another little sandwich of your mini duo another super duo and then you're going to do a little 1100 of the deme round and now you're ready for another rule Abid so we've made one half of the outer edge of our cluster let me pull that down so you can see what that's going to look like and if your thread ever does this sometimes it just gets a little tangled the best way to undo that just take your needle and kind of work it through there you go sometimes that happens when you're working with a little bit of a longer length of thread so to show you what we've got let me just put these towards the center so they're not going to stay that way that might give you a better visual so this is our first half so we have those mini duos radiating out like a sunburst and we're going to have three of the six super dough's that we need so we're done one half of it so go ahead and you're going to mimic the same pattern on the other side so we're going to start with a 11 oh dem around a super duo let's go ahead and make a little sandwich with our mini duo's again the eight OSB two on either side and then a super duo no they're little mini duo sandwich another of your super duo so there's three super duos which is what we need and one more of your little eleven oh and now you're going to go through the Rula bead that you originally exited go all the way through it there we are and now what we need to do is we need to go ahead and pull all of our super duos together in the center connecting them with two of these little Demi rounds between each of them so we need to work our needle and thread so that we're exiting a super duo there we go you just work it to the nearest super duel and now we need to be on the inside so we're going to just jump up to the second hole and at this point just make sure your tension is good so your beads aren't too loose okay so now we're going to connect all the Super Joe's together with two of the little demi rounds between them so you just have to go ahead and find that second hole of the nearest super duo and pull through it there's two more little demi rounds try to do this easiest way for you to see on camera because you're going to be using the same pattern for all your clusters you see how that just pulls them together okay so when you get to the Rula just pretend like it's not even there because you don't want to accidentally pass through its hole so just scoot it out of the way and keep connecting your super deuce okay just one more little sequence of two of the deme rounds okay so your base cluster is finished so now we need to do the top coat embellishment again so what we're going to do is we are exiting the super duo right here we're going to create a little thread bridge and just jump over to the top hole because we need to get on the outside edge again so I went through the superdude and I went through the bead next to it and I want to make my way to this rule Abid over here because that's going to help me keep my needle and thread properly oriented so I'm just going to work through my bead work until I get to the Rula and I want to actually go through the ruler and exit it so now I need to step up to the top so I'm just going to put my needle through the top hole and create that little side thread bridge okay now we're ready to do the top embellishment and it's going to be the same sequence as before so we've got three of the little leba no dummy rounds and eight o dem around let me pull over a swathes B pearl another of your little 8 o deme rounds three more of the eleven o deme rounds and again we're going to crisscross so instead of just going straight across we're going to go out a diagonal there we go now we're going to pick up three more the eleven owes and we already have the eight oh the Pearl and the 8 o in place we're just going to go through them and pull now we need three more have the little eleven Oh Demi rounds I'm going to go through the Rula in this direction here and we have two complete units now we just want to get our thread down to the base row again and we will then be ready to start our next cluster and it will be the absolute exact same pattern as what you did for this cluster here so you're just going to keep doing that until you have your desired length and let me show you how long the sample bracelet measures to give you an example or at least a reference point of how many units you're going to want to build for your size so if we put this against the ruler and you got to remember that the little bead goes into the loop so that takes up some space if we put this down here you'll see that by the time the bead is in here this is about a seven and a half inch bracelet and that equals one two three four five six seven eight nine ten eleven twelve clusters for a seven and a half inch bracelet each cluster itself measures a little over half an inch so here's two you can see is extending a little bit beyond the one inch mark for clusters is about two and a quarter inches so you can't quite say that each cluster is a half an inch is just a little bit more that than that but hopefully that gives you some idea of how many clusters you'll want to build and you'll have plenty of beads to make a much longer bracelet than what you see here if that's what you desire so I'm going to go off-camera and I'm going to do all my clusters and then I'll come back on and I'm going to show you how to do the clasp closure all in beads I kind of love it those all in beads I like bracelets like that so go ahead and build your clusters too and then we'll come back we'll make the clasp together okay I'm back but I have not finished all the clusters that I want to do and that's because I ran out of thread so I like working with six feet of thread that's my comfort zone I find if I do any more than that it gets tangled and ends up in a little bit more frustration that need be it's really easy to add more thread in a bead weaving pattern and I want to show you how to do that now and then I'll continue with the rest of my clusters so I have about this much thread left I could have pushed it and probably made one full extra cluster but I know I would have ran out of thread and needed to add more anyways so I like to end it at a comfortable length where I'm not struggling with the needle not having much wiggle room I also like to add it or end it in this particular pattern at a complete cluster so my thread is exiting where it should be as if I was just going to continue beating but instead of continuing to bead I'm going to go ahead and work my thread back into my existing bead work and then I'm going to tie some discreet knots so I'm just slipping my needle under a thread bridge making a little loop and pulling my needle through the loop and pulling tight and let me do another one right there at the same spot now I'm going to work it in a little further we do have another video showing you how to tie off and add more thread it can be a little bit confusing because that's at a that's showing how to do it with a different bead weaving stitch so I thought this would be helpful if you do run off thread if you're comfortable working with more thread go ahead and work with ten or eleven feet of thread to be able to do this bracelet in one swoop but as you'll see here it's really easy to just add more thread alright so I'm just tying little discreet knots following all my original thread paths and after I've done about three or four I'm going to be confident that the thread is not going to pull out you just do one more through the loop through the loop and then work your tail in a little bit and then let's just trim off this tail okay so our original thread has been worked in now we need to add a new thread so I've cut myself five additional feet and I'm going to go ahead and thread my needle on and if you'll remember we were exiting originally right here so that's what our goal is so we want to get back to basically where we left off so to do that I'm going to go right here go through a bead and I don't have to worry about having a very long tail here because I'm going to tie my knot as I go so again I'm just going under the thread bridge because we're working with a little bit longer length here it can be a little hard so you don't know what this is what you want to be watching out for you see how that loop is now kind of going over some beads you don't want it to do that so just help it along so that it doesn't catch on any of your beads do another knot right there work my way in tug on it as you go make sure it's nice and secure and these knots really just disappear into your beads you're not going to see them and I feel really good about that so now I'm exiting where I wanted to be extinct all along and pull and give it a good tug make sure it's not going to go anywhere now you can go back and look that tail really cinched up there that's because I was pulling it as I went I'm just going to trim it off and it's as if we never had to add another thread and we're right where we want to be so now I'm just going to continue with my clusters and I'm going to have plenty of thread to work with I'm not going to have to worry about it so now I will finish in a cluster so I got one two three four five six seven eight nine I'm going to do three more and then I will show you how to complete the glass portion I finished all my clusters and you can see I do have plenty of thread now to go ahead and complete my clasp let me show you the clasp but we're going to do so we're going to do this little bead and loop one and so the way that this is going to work is the bead goes through the loop and it pulls and that's how it closes and then you just push it back through the loop to undo it so we're going to make the loop part first and so here we have our string exiting where it would have exited for another cluster and that's great and we're just going to be using the deme toe hose right now the deme round we're going to begin with three of the larger size and slide that down followed by six of the eleven oh so I've got six go ahead slide that down then we're going to do fifteen of the large one so one two three four five six seven eight nine ten eleven twelve thirteen fourteen and fifteen and then we're going to do six more of the little guys there's five and six and now we're going to go back through one of the large deme rounds over here and so we've made a loop and now we're going to pick up two more of a toes and we're going to go through the bottom hole of our Rula and several beads next to it so I just shot my needle all the way through and pull and then what you want to do is you want to just help this with the tension to make sure it looks right and there we have our loop so at this point we are going to work our thread in a little bit more keeping an eye on that loop and now we're going to go ahead and tie some knots and work your thread in a little bit more so you always want to retrace your thread path you don't ever want to jump over a bead or go in a different direction than what you did previously that way your knots are always nice and discreet so I dropped my needle so when I pick it up I want to just see what I did here if I accidentally tied a knot to begin with there we go and because I have a lot of extra thread if you remember earlier in the video I add in an extra five feet I probably could have got away gotten away with adding extra three feet so at this point I know I'm not going to need that much I can just trim off the extra so it makes tying my knots a little bit easier and I'm also looking at this from the back because it's easier to see where I want to be without that top embellishment you do want to make sure that this part is really good and secure because this is actually tying off the main thread of your bracelet but is also tying off the clasp part and that's going to get more aware and more tugging on it so this is really important that you tie quite a few knots here because you just don't want this pulling out okay you just go a little bit further in okay and now I can cut this off okay so that side is now done I do want to show you something real quick on the sample piece I did you'll see that I actually used two colors here of the larger eight o tuhoe deme rounds I didn't do that on this one so I think it looks just as nice this would have required purchasing another tube of these size eight Oh dummy rounds just to get that little section I didn't really think that was necessary so it will look just fine with the one color but if you feel like doing it or you have some of them around feel free to add extra colors in there let's go ahead and do the other side now so we can finish off this bracelet so I have my tail and I'm going to take my needle and I'm going to thread it on here and then I'm going to pick up well actually I'm not going to pick up anything yet because this was the original knot we had tied when we first started so what I need to do is I need to work this thread so it's exiting the Rula either on this side or this side it doesn't matter so let's go ahead and go through one of our super duos and let's jump up and go through its top hole and then start tracing our thread path again so now we're at least on the outside edge work it all the way through that's the nice thing about bead weaving you just want to figure out where it is you actually want to exit and then work your way there okay so now we are ready to go ahead and add 1 2 3 of the Eidos and then we're going to add actually I want to add for the a toes and then I'm going to add my nice big 8 millimeter Swarovski pearl and then I'm going to add one more little 11 oh that 1100 is going to act as a stopper for me so now I'm just going to loop back and go through the 8 Oh pearl I mean I go through the eight millimeter pearl and two of the a toad demi rounds and pull now I want to pull pretty snug so that's resting right up there and I'm going to thread on two more beads and these are my last two beads of this entire project and go through the rule and then make sure that this is sitting properly there we go so that's that part of my class that's the little ball part I'm going to tie a knot pull it really nice and tight tie another knot okay and then work around the outside just tying your nice little discreet knots we are almost done with this bracelet I'm going to flip it upside down so I can see a little bit more clearly the underside beads which are the ones I'm tracing my way back through okay okay I'm going to just trim this off and we are done with our color variation so let me show you the two bracelets that are now finished and I do want to give you some little design tips a little bit more information right now so that is how you build these bracelets and they're really fun I like making these so this is how many beads you have left over so these were full tubes when they started except for this one I would already use some of these guys on this first bracelet and you can see we have these left over here so in terms of this deme rounds you're going to have a lot left over so you're gonna be able to make multiple projects with them if you wanted to make oh you'll also of course have a lot of the rulers a lot of those now if you wanted to make a second bracelet you could just go ahead and purchase some more the super duos and the mini duos because you're going to need more of each of those or you can mix up their colors and just try a different color super duo and mini duo you'll also have extra pearls I don't have the pearl bags and here we get quite a few pearls so you're going to have a lot of those left over too now if you're picking out colors let me kind of walk you through how I pick the colors in terms of the process because this does use more different shaped beads than a lot of our projects too so what I picked first was my super duo because that's going to be really the main anchoring color in the sunburst and then I picked an accent mini duo so then I picked this one from there I picked my demi rounds so once I had this color picked out I picked up my demi rounds and my Rula and then the very last beads I picked out were the pearls and I just didn't even worry about what color this one was because I knew it was just going to be the same color as these I really worried only about the four millimeter pearls and strangely enough they're really I think one of the most important components in the design they really pull it together so you see this really vibrant this petrol pearl color this nice blue and then we have the rose gold and it's kind of an unexpected pop and that's what both of those ended up doing in this design so that's just a little bit of information how you might go about picking out different colors there's so many of these wonderful beads to pick from there's a lot of color combinations that you can come up with and have fun with so again this is called the sunburst bracelet and there's going to be the full ingredient list for it on beadaholique.com and we also have other tutorials showing how to use super duos showing how to use these Demi Toho's as well so there's a lot of other video tutorials and project ideas and inspiration available for you at beadaholique.com you

You recently viewed

Clear recently viewed