How to Make the Floraline Necklace, Earring, and Bracelet Set

SKU VID-1231
Designer: Alexandra Smith
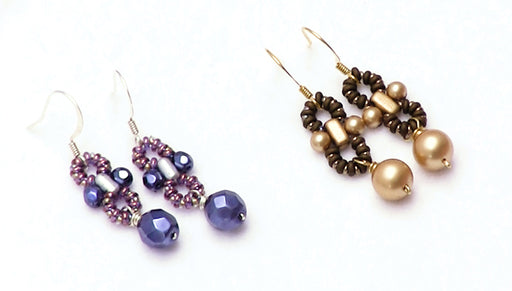
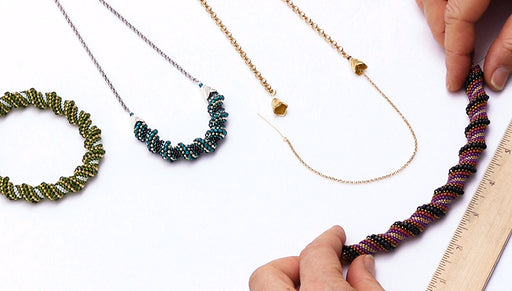
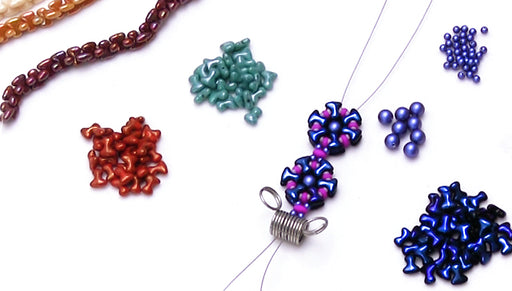
In this video, you will see how to create the Floraline Necklace, Earring and Bracelet set by first constructing individual beaded flower units, then fringing them with 11/0 Demi Round seed beads, and attaching the appropriate findings. In the case of the bracelet, learn how to connect the flower units into a line using 2-hole beads, and finish it off with a hand beaded loop clasp.
FEATURED IN THIS VIDEO
Audio Transcript
Note: This audio transcript is auto-generated and may not be completely accurate.
hi this is Alexandra with beadaholique and to day I'm excited to show you how to make the floor lined necklace bracelet and earring set you can see here I've created the nightshades version and in the video we're going to put together the rustic version of the floral line set so for this bracelet it uses some mini duo checklist vinicio's some checkmates to whole brick beads Toho beads in Demi round shape in the sizes of 8 and 11 oh and I have some Swarovski pearls and what we'll do first is just create the seventh unit of this little flower shape so to begin weaving the flower we're going to alternate eight of the a Toto's with eight of the Czech community lows once I get them strung on I'll bring the two ends of the thread around and tie my knot and then weave the pearl into the center tink Evan and one more so it's a real simple flower weaver rotation after the pearls in there and we come up around the outside and weave on our 11 oz should have a nice tight knot in here I'll reinforce it I'm going to go through my tail and get my formula made of pearl string it down into the middle and I figure out where that halfway point is other side of the flower I'm going to pull the thread around and tickle back through the bead you just do that a couple times to make a nice secure setting all right we're not through and now I'm ready to come up through the second hole of my mini duo who come here I'm going to string on an 11 Oh an eight-oh in another 11 oh and come through my next menu duo 1108 oh and eleven oh you continue around the outside real simple when I've got my last little section here to fill when tiny round beads come through that left mini duo and now I'm ready to tie it off Moyes if you say so I'm going to come through and do another not for myself all right so the bracelet takes seven of these and once we've got them complete then we're ready to connect by sewing the edges with the 11 o dem around just for that process the way we begin is we're going to take a new section of fire line up about three feet and we set our needle and we'll begin by creating one side of our clasp so I'm going to take start with this end by actually taking one of my brick beads through one hole of that to OB you can come up and I'll leave a tail of a couple of inches and then I'm going to fit on 3/8 o deme round and then my 10 millimeter pearl and 1102 oh ho and I'm going to double back through my pearl through the a toes and then I'm going to come through the other side of that brick bead like so not secures my fire line for adding on each of these in turn in the way that's going to go is starting on one side I'm going to string on one 800m around 211 oh then around an extra and then we're going to come through here's my entry point you're going to double underneath one of these sections of Demi round beads that are coming around the outside of my flower and just string it on like so and which I have that on and come around my first petal and I want to fill that little space with 411 O's again I'm going to double underneath thread my needle through those three Demi rounds that are in between the mini duo's and pull it tight and again thread on for 11 O's underneath back through those denny rounds so I'm filling out my petals I'm going to do three of those once I filled three sections doubling through one more time now I'm ready to create my link to the next flower and the way I'm going to do that is by threading on to eleven O's after I've passed through my last section on the outside of my flower to eleven O's and then an eight-oh and then a brick bead okay this is what it's looking like now image is a mirror image of that on the other side by taking an 802 11 O's and now I'm ready to start into my next flower we come under those three Denny round on the outside of my flower and begin again with four eleven own through I'd any rounds for more eleven O's through my Demi round my third section picks it off and now I'm ready to add my next flower and I'm going to continue all the way along filling it to the end and then we're going to create the other side of our clasp and weave back down the other side and then we'll tie it off with the tail that we left right here so I'll go ahead and add these on do one more hair to show you a brick bead another 8:02 more 11 o's and entering at any point along these flowers just as long as I must be edge of one of my sections of denny rounds and I go to begin my sections of 411 O's between each so I'll go ahead and do this side come all the way to the end and we'll create our loop so I've completed weaving half the bracelet and I'm ready to create the second portion of my class before moving down the other side so to do that I'm going to once I've come out my last section of deme round I'm going to put on two more eleven O's one more eight oh and another brick bead just as I was in between this time I'm going to create this loop portion by taking on to a toes and then eight eleven O's mm-hmm and then 14 of a Eidos 813 and then eight more of the 11 owes this is just enough speed to create the proper sized loop for this 8 millimeter bead I wanted to clarify that that is an 8 millimeter bead I believe I misspoke and called it 10 but I checked with my know of the millimeter gauge and it's 8 2 3 6 7 8 all right and once I've got those left a dilemma notes on I'm going to double back through my to a toe toes next to the 2 hole bead and then once I've gotten through those and doubling back through the second hole of my brick bead I want to make sure it's all tight by checking pulling down against what I've woven tighten up that loop and once it's secure then I'm ready to move back down the other side so I'm going to do the same thing on the second side of that brick be take on an 802 11 OHS and begin moving back down the other side of my flower by threading right into the section of deme rounds on the other side of that first petal the mini dual petal and then begin with my four 11 O's in between each section just as I did before so I'm going to move down all along this side and you get through the first flower so I can get into that section and we'll meet up at the end here couple design tips as I'm thinking of them I always like to check both holes of my mini duo's or any two hole bead or multi hole bead for that matter just to make sure that they're open because that are once in a while there will be a little piece of glass in there or the holes not quite drilled through it's always a bummer to have to undo your weaving to take that into account so just make sure your holes are open alright so I'm down I've done three sections and I'm ready to come into the second hole of my brick bead for the connection and take on to eleven OHS and one a toe come through that hole and then do the neuro image of that with one a toe and two eleven O's and begin into the second half of my will awesome thereby coming through my venue round go pulled around the side there there we go all right so I'm going to continue all along the edge this side of the bracelet and then meet up with you when I'm ready to tie it off finishing lemma section look for beads and give it any round coming up now and I'm ready to add my last couple of beads before tying off so I've got two eleven OHS and one more eight oh and I'm going to eat up my two ends here tie myself a double knot twenty-four security what I always like to do is actually double back up through the end portion of my class just to reinforce that fire line that gets so much use bring my needle up double back through that little eleven Oh at the end and that's in my beads and send my needle through the second hole of my brick beads and creating a second little knot here and will be the bracelet so the process is the exact same for the earring to make the flower the only difference is going to be the only tail hair complete our bracelet so the only difference for the ear ring is the portion where it comes up to attach on to the ear hook and so I can demonstrate that for you and that will also answer the question of how the necklace is done now the difference with the necklace is that there are a couple of extra many tools to come around that more sizable bead in the center but otherwise it's the same process of weaving and sewing the bead in the middle coming up through the second hole of the mini duo and around the edge so I'm going to sew up the ear ring and then demonstrate the attachment okay so as you see here I've spread it on all of my little dummy rounds around the edges and I have my last four strung on and at this point what I'm going to do is double back through my section 3 like I have before to create my last covered petal and at this point I'm going to take size of my 11 o's onto my needle and 1 800 creating the top attachment now I'm going to double back over the a toe and through 4 of my 11 o's to 3 full if I'm leaving one that's flat down out of the needle I'm also going to bring on one more I've added on the last of my 11 OHS including this one little loose one after I've double back through four I've added one on I'm going to re-enter my needle again into my little section of three like I've been doing and when I pull my thread tight in the top portion is going to come straight off and that will be how our earring hangs so from here I'm ready to tie off my thread between my 11 ohms once around twice and I'm going to tuck it in tuck it in and clip I'll be ready to attach the ear wire get my thread snips and take my flat pliers turn the loop off to the side turn it back in flush against itself and then we have our little earring so it's a floor line step it at such a good time making needs all these beads and project bundles are available at beadaholique.com thanks for watching you

You recently viewed

Clear recently viewed