
|
The Beadsmith Jeweller's Micro Pliers Chain Nose Flat Nose SKU: XTL-5511 $8.45 |

|
Solid Steel Metal Ring Sizing Mandrel 1-15 Wire Wrapping Tool SKU: XTL-0153 $20.99 |

|
Beadalon Beading Mats - Prevent Bead Rolling 12 x 9 Inch (Set of 3) SKU: XTL-9930 $3.99 |
Related Videos


How to Make a Bead with Crystal Clay and Bead Caps
In this video tutorial, see how to easily make a bead using Crystal Clay (2-part epoxy clay), 2 bead caps, and some Sparkle Dust mica powder. This ...
View full details

How to Make a Knotted Round Braid Anchor Bracelet
In this video, learn how to make a knotted round braid bracelet with an anchor clasp.
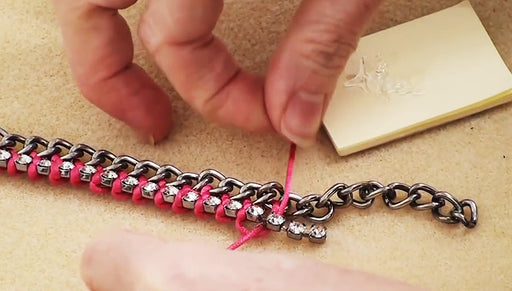
How to Tie Rhinestone Cup Chain onto Curb Chain
In this video tutorial, see how to tie/knot rhinestone cup chain onto a curb chain. This trendy technique is very easy to do. In the video see how ...
View full detailsCustomer Reviews
Based on 1 review
Write a review