
|
TierraCast Brass Oxide Finish Pewter Anchor Charm 19.5mm (2 Pieces) SKU: PND-7740 $2.55 |

|
TierraCast Brass Oxide Finish Pewter Anchor Pendant 27mm (1) SKU: PND-7737 $2.69 |

|
The Beadsmith Medium Brown Faux Leather Suede Beading Cord 9Ft (3 Yd) Spool SKU: XCR-43102 $4.99 |

|
The Beadsmith Black Faux Leather Suede Beading Cord 9Ft (3 Yd) Spool SKU: XCR-43100 $4.99 |

|
Griffin Silk Beading Cord & Needle Size 6 White SKU: XCR-9601 $2.79 |

|
Waxed Cotton Cord 1mm Round - Light Brown (5 Meters/16.5 Feet) SKU: XCR-4313 $2.99 |

|
Antiqued Brass Large Capsule Bead Caps 8x8mm (10 pcs) SKU: BMB-6000 $3.39 |

|
E6000 Industrial Strength Glue Adhesive (2 Oz) SKU: XTL-1052 $9.95 |

|
Henriettas Gum Arabic Glue for Beading/Quilting/Crafting Knots SKU: XCR-9803 $8.99 |

|
Fiskars 5 Precision Tip Scissors - Super Sharp SKU: XTL-5700 $7.45 |

|
Xuron Jeweler's Super Fine Pliers Chain Nose Flat Nose SKU: XTL-5450 $25.99 |

|
Beadalon Large Beading Mats - Prevent Bead Rolling 13 X 18 Inch (Set of 2) SKU: XTL-9935 $6.75 |
Related Videos

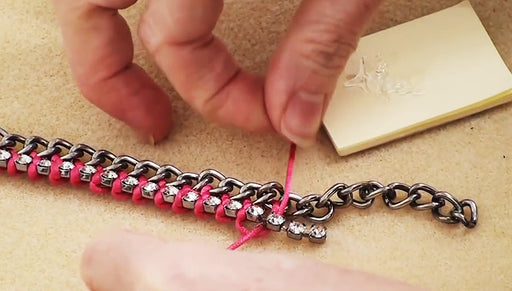
How to Tie Rhinestone Cup Chain onto Curb Chain
In this video tutorial, see how to tie/knot rhinestone cup chain onto a curb chain. This trendy technique is very easy to do. In the video see how ...
View full details

How to Make Brick Stitch and Fringe Beaded Earrings
In this video, learn how to bead weave classic Native American style earrings in brick stitch with fringe using bugle beads and seed beads.
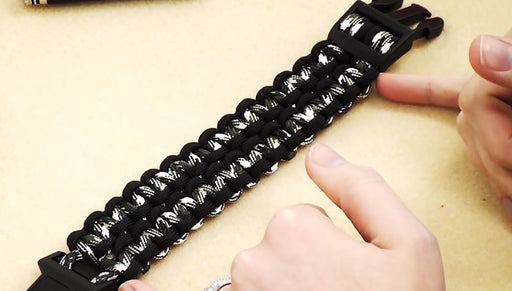
How to Make a Wide (Double) Cobra Paracord Bracelet
In this video, learn how to make a wide or double cobra paracord bracelet, which is two small cobra braids side by side.