Audio Transcript
Note: This audio transcript is auto-generated and may not be completely accurate.
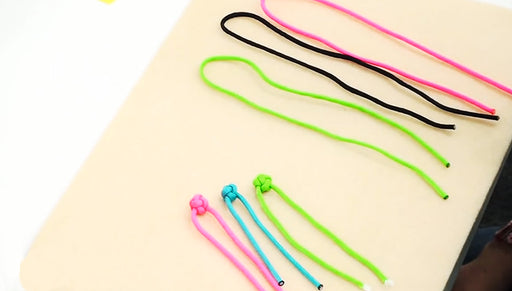
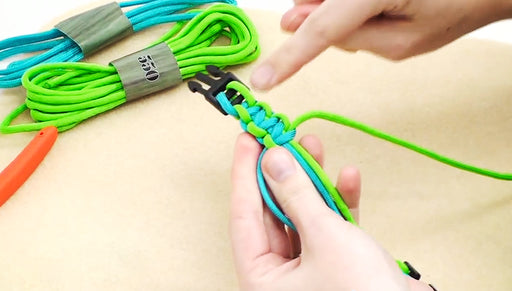
Hi! This is Megan with Beadaholique.com and I'm going to show you how to make a wide or a double cobra paracord bracelet As you can see if you're familiar with what the basic cobra looks like, this is just two of those side by side and they only have one cord down the center. So they are a little thinner so for this braid I'm going to use a wider plastic buckle. I'm using a one-inch wide buckle and I'm going to make this for a man and so I made it longer. A standard man's bracelet is eight inches that's standard wrist measurement, so I went ahead and figured my buckle length on these one-inch buckles is about two and a half to two and three quarters of an inch it's kinda hard to measure with the curve so you're going to take your wrist measurement and add an inch because it's thick so you need a little bit of extra room set if you have an eight inch wrist, you want a nine-inch bracelet but then you're going to take the buckle measurement out of that so instead of having nine inches of braid you're gonna have nine minus two and three quarter which is about six and a quarter it's a little bit math to figure out exactly how long you want your braid to be you can also try just trying it on when you get to that point I'm going to go ahead and use about eight feet of one color and two eight feet of the other color on this example I used two lengths of the camouflage and one length of the black so I'm going to do another one now that has two lengths of black and one length of grey that general of thumb is to use about a foot of paracord on each strand for each inch of braiding I like to to go a little bit more than that. I like to use about a foot for each inch of bracelet you want I'm doing eight feet I've found that even if you have a little bit leftover it's better than running out so go ahead and find the middle of all three of your lengths these buckles have the man end has a double loop it doesn't have one it has two in order to get the knots to sit nicely underneath you want to make sure that you have the part where the lark's head knot crosses over facing away from the buckle I'm going to go ahead and knot these all onto here with the lark's head knot separately so grab one of the cords which ever one you have two colors of and bring it through the top opening up from underneath if you can't quite get it through you can use chain nose pliers and then pull the loop back down through the lower opening pull the end through to create a lark's head knot next your gonna put in the string that you have just one half whatever your complimentary color is just pull it up through the top opening back down tie the lark's head knot pull these nice since snug you need to make room for a third strand in there push these down make some room put your last cord into the space just like before you're gonna bring it back down and make a lark's head knot give these all a nice pull, make them really tight they should just sit back underneath the bar here on the buckle so once you have your three cords knotted into all six lengths coming out here you're going to split the center grey cord and have that go off onto the right group and that go off to the left group do two knots here the macrame square knot is what you use to do the cobra pattern and we have a video actually on shambhala bracelets but its just to show macrame square knotting so it's the shambhala bracelet part one macrame square knotting if you're not familiar with square knots it's good to get that down so first we're going to take our left cord and go over the center cord take the grey cord and pull it over that left cord under the middle and up through the loop go to your right group and you're going to mirror that. Take your left cord underneath bring the right cord under the grey cord over the middle and down through and now you can see here that your black cords are wanting to cross already so that's fine we want them to cross, that's how you're going to keep your two braids together instead of being separate so I'm gonna bring the left cord over the top of the right cord and you want to keep that consistent as you work so that you have a nice even consistent little group of crossovers at the back to the left going to take the grey cord under the center the black cord under the grey over the center down through the loop take the black cord over the center the grey over under and through and now I'm just going to finish those square knots and that will give me since I don't cross these over again I'm just gonna do every other knot will cross over basically when it's a black cord in the center they will cross, when it's grey cord in the center they will not and that will give you a nice double line all the way down the middle for the left hand knot continue with your square knots which means you alternate which cord is on top so that it doesn't twist the right one goes under take the left of the center cord and take it over to the right take your cord under the center under over and through and this side over the center over under and through since I have grey in the center I'm going to keep them on the same side. I'm not going to cross them on the left side I'm going to take the left cord over under and through your second knot I'm going to start with under now you have your black cord in the center you are going to cross them over and take the left over the right continue to knot this way you can see when you get a few done if you have two nice cobra braids side by side, on the back you can see the little excess on the black cords crossover and that's what keeps it together so you're going to go ahead and the number that you figured out in the beginning for how many inches you need you're knotting to be you're going to go finish that for my purposes I need it to be six and a quarter to make a bracelet for standard men's eight inch wrist I'm just gonna finish that up you go ahead and braid almost as much as you want your full length to be so I am leaving myself about an inch and a half at the bottom here I'm trying to replicate this size here this is about six and a half inches of braiding and so you can see here that I've stopped about an inch and a half left what we need to do is attach your second half of the clasp and the reason you don't do this at the beginning like you do with a lot of other paracord bracelets because it's easier to do this kind of knotting without the ends attached because you have to weave through the middle so just take our center cord put it through here right down the center go and flip the whole thing over and give yourself enough slack for the rest of the braid that you need. If you need another inch and a half of braid go ahead and give yourself another inch and a half If you have a ruler or something else, I'm just going to go ahead and mine up to this time one because that's the length that I want and then next you're going to cut the center cords right about at where your braiding stops and we're going to fuse these ends onto the cord here and we wanna do it up a little further so that there is room for them to get it knotted over which is what makes that bond nice and strong it is a little tricky to fuse the cord to itself we're going to just go ahead and start with one side first and cutting it to that length gives you a good way to check and make sure that you're holding it in the right spot when you melt it you are gonna lose a little bit of length off of it though though so once you've got in the right place right make sure you don't move it around too much again you're gonna want to use just a cheap plastic lighter. You don't want one with shrink wrap on the sides and you make sure that you're not going to be sad if it gets wrecked push it down onto itself with the side of the lighter, just be careful that will burn you like crazy, it's very hot and if it doesn't stick the first time that's alright, one way that's helpful is to try to go ahead and not have your finger right there melt this side a little bit, that can be helpful don't melt all the way through it or else you won't have cord to knot on what's really going to hold it is the knotting that goes over the top so as long as you can keep it in place it's probably good enough so once you have that side fused, go ahead and repeat that on the other side and make sure that you keep it even if you don't have it crooked the buckle won't sit straight so and we're going to go ahead and flip our work back over it and you're going to continue you're knotting right over your stands which is doubled up as they are just like before you're going to do your knotting but you need to now pull strands between here which is why we waited until we're closer to the end so once you've done the rest of this knotting it should be pretty easy to do this part even though technically it gets a little bit more difficult but you should understand that the way it works well enough to not get confused by having those attached right there crossover so I think there's room for about one more right in here is where it can get really tricky and you can move you're knots up and down a little bit. What you're doing is separating them or compacting so if it seems like it's not going to fit another whole knot there, you can more it up and down the more you push them up the more sturdy it's gonna be but if you want to show an interesting color or something like that you can also pull them down I'm going to try and fit one more in there and now I'm going to pull these center strands both to the back because it's hard to fuse down the middle without hitting the rest of your strands let's go ahead and pull those center strings both to the back and we'll go ahead and fuse the ends on the outside first said just like with the standard cobra bracelet it's pretty much like most paracord bracelets snip the ends right off leave yourself a little bit about maybe between an eighth of an inch and a quarter of an inch somewhere in there take your lighter and at the end and all that extra that you left yourself go ahead and wait for that to get all melty, you can see it happen when it's really good looking, take the side of the lighter squish it on there if it's messy that's not a big deal clip it with scissors or flush cutters and trim them off you do want to spread out that's gonna keep it from popping back through if it's scratchy or uneven you can melt it a little bit smooth that do that for both on the outside ends if you hold it in place while it cools I found that it gives you a little bit of smoother end now we just need to finish off these back pieces here and just the same way trim it down and then try to angle the buckle away. You don't want to melt the buckle try not to hit a lot of the other cord. Try to just melt it right where your ends are. This is tricky this is a tricky thing to do it's okay if you get a little bit of the cords it's really hard to show you the angle right just try to get the two ends fused see you get a little bit on here too this is backside of the bracelet, the important part is not to go all the way through and weaken your cords and also to make sure that you really get a good nice fuse on there. So those aren't going anywhere it doesn't show on the frontside you can see that's all done that's how you make a wide or double paracord bracelet.