How to Make a Meditation Bracelet with Aromatic Wood Beads and a Gemstone Guru Bead

SKU VID-1322
Designer: Kat Silvia
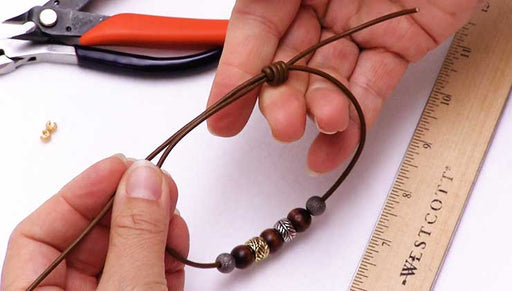
In this video you will learn how to make a mediation bracelet using aromatic cedar wood beads and a green aventurine guru bead. This simple project can be easily modified to suit your favorite gemstones and personal style.
Audio Transcript
Note: This audio transcript is auto-generated and may not be completely accurate.
Hi, this is Kat with beadaholique.com stone guru bead so the guru bead is actually this little piece right here and it comes in two different parts and you can kind of see if I slide it apart there it has the Guru be here that has that little T shape you can sort of see how the cords are coming in there and then this is your tower bead so this will help sort of keep both of your cords together at the bottom now to flip it over your wrist you just sort of pull it apart there and to bring it back you just sort of pull the two little ends now once it's on your wrist you can tie a little knot at the top there and scooch it up that way it will stay nicely on the wrist but until then you can just sort of leave it open like so now these are aromatic wood beads but I'm going to be using today and these are the eight millimeters but today I'm going to be showing you one with the ten millimeters and these have a beautiful cedar wood scent so it's really just lovely and it's very light it's not overpowering so that's sort of one of the nice things about these wood beads here and I'm just using some little gold spacers just to kind of give it a little bit of an embellishment so it's a little variation on the one I have over here and I'm going to be using a different color of guru bead now speaking of some of the variations that you can do with this we have some 10 millimeter gemstone beads and with any gemstone bead or wood bead or whatever bead that you're working with make sure that whatever cord you're using is going to fit easily through the center of the hole so you might have to adjust what cord you use just just to kind of give you a gauge today I'm going to be using the lovely knots in the one millimeter size you can also use s lon pearl cotton many of the other types of things that we have here at beadaholique.com of those aromatic wood beads to use as guru beads in 6 8 and 10 millimeter and then I have a couple other guru beads here that are those beautiful gemstones so if you're all set we're go ahead and get started and the only tools that you're going to need is you're going to need a twisted wire needle a pair of tweezers and I'm going to be using a pair of flush cutters you can also use scissors if you like and a pair of chain nose pliers to help you out so I have three feet of my knotting cord already pre-cut here so I'm just going to go ahead and dive in so we can get started and what I'm going to do first is I am going to string on my twisted wire needle onto one end here there we go and just slip it down about eight inches or so alright so now what I'm going to do is I'm going to go up through the tower bead here and just go ahead and slide that all the way down and you're going to want to leave a tail of a few inches there and then I'm going to flip on my guru bead now you'll need to find the bottom hole there and you can see that the other holes go side to side so what I'm going to do is I'm actually going to take my twisted wire needle and just kind of Bend the end of it because I need to direct it to the right hole or in this case actually to the left hole I'm just going to try to kind of get it in there and you can do this without the needle if you prefer you can try to get the cord through there but I like the needle it just kind of helps guide it through so now I'm just going to slide that down until it meets the tower bead and you have a couple of options at this point you can move it all the way down so you have about a two inch tail and tie these little knots here or you can leave it and just kind of adjust it at the end but I'm going to go ahead and do my knotting right now so let me just move that out of the way so what I'm going to do is I'm just going to tie a single overhand knot and it's about a half an inch or so from detail I'm going to pull that tight and I'm just going to repeat that by tying another overhand knot and here's where you're going to use your chain nose pliers you can just kind of pinch that end and give it a nice little tug make sure it's a nice strong little knot there all right so now just adjusting my guru beads again because I want just about two inches or so you really don't need more than that because you have to know that you're going to have two inches on this size you'll be able to open this up four inches so that it'll fit around your wrist and then you'll have these little guys just kind of dangling so you don't want to make them too long so the first part is that I'm going to move up towards my guru bead and I need to place the mat right there and to do that you're just going to take your cord wrap it around two fingers and behind and you're just going to pull it through and this is just an overhand knot but before you finish it take your tweezers and go in to the space and you're just going to pinch the space where you want that not to be now this is your time to kind of judge and just make sure that your length is correct and I want my knot to solve right there so I'm just going to tighten and then when it gets close to the little pliers there or the tweezers excuse me you're just going to tighten it down so now our guru bead is all set to go so I have my first knot so now I'm going to begin at my pattern here and again just moving to that twisted wire needle all right there we go just going to take my wood bead slide that on and this is again where you can use your pliers just kind of help you through some of these wood beads have some cores and you'll see them start to kind of come through there you can also use a bead core if you like we do have a video showing you how to use that just to make sure that your beads kind of slide through and this is just the same technique that goes all the way around just doing that nodding in between and pushing that knot down towards that bead so you get a nice result all right now these are meditation style beads or I'm sorry style bracelets so you can use them for that purpose or they're just a very beautiful little style and I like adding this little embellishment with either a gemstone or some sort of metallic bead I think it just kind of adds a nice little nice little touch to it all right so here is the basic technique and we're just going to be working all the way around my little pattern here and I'm just going to be adding one would be and one gold spacer bead so I'm going to continue to rest here and then I will be back to show you just exactly how it finishes all right so I'm just finishing up my last couple of beads here and this is my last wood bead so I'm just going to string that on pull it down again just kind of using my pliers just to help it along there we go and I'm going to tie one more knot here all right there we go so that is my bracelet here and now I want to go through the Guru bead going through the opposite hole here and now I need to go down and make sure it goes south there so I'm going to kind of just curve my needle a little bit and it helps to move your original cord out of the way so you can just kind of wiggle it and there we go and out it comes alright so now what you want to do here is you want to pull it all the way so that it's nice and tight and then you're going to put your needle through the tower bead here pull that down put up to the beads there we go and now you're going to want to make that not match about in the same spot as the other one just so that it is nice and even so I'm just going to take and do and overcome that and before you pull it tight this is your opportunity to kind of wiggle it so that it matches the links there and that's pretty good so I'm going to give it a nice little tug and now that I know where that knot is I'm just going to repeat that one more time and this is just like I said a simple overhand knot and just going to pull that nice and tight alright so there we are and I'm just going to clip my ends here using my flush cutters like I said you can also use scissors and you can see how much cord I have left over it's at least a foot I like to try to have at least a little bit of extra but you never know when you're going to be nodding based on the size of your beads and whatnot so just make sure that you always have a little extra so that was three feet of cord and this makes about a six inch bracelet here so now I can put that on my wrist and close it up by using my little just ring so that is how to make a meditation style Brae but and you can find all of these supplies on even more at beadaholique.com you

You recently viewed

Clear recently viewed