|
TierraCast Pewter Toggle Clasps, Hammertone Ellipse 16mm, Black Finish (1 Set) SKU: FCL-7701 $3.75 |

|
The Beadsmith Jeweller's Micro Pliers Bentnose Bent Nose SKU: XTL-5512 $8.49 |

|
The Beadsmith Jeweller's Micro Pliers Chain Nose Flat Nose SKU: XTL-5511 $8.45 |
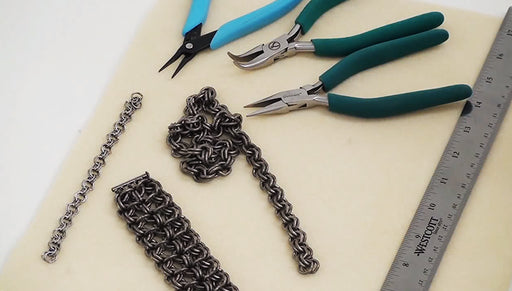
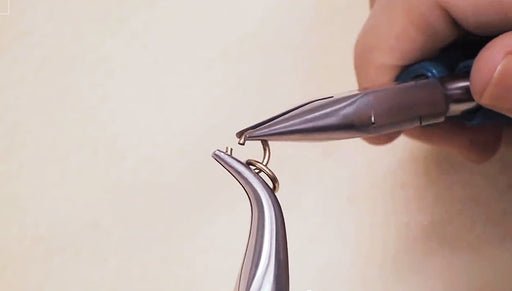
Hi. This is Andrea from Beadaholique.com. In this video I'm going to teach you another chain maille weave and this one is called round maille or sometimes it's referred to as european 4-in-1 in the round. For this project you are going to need two packets of chain maille. These are made by Artistic Wire and the size that you need is eighteen gauge with an inner diameter of eleven sixty fourth of an inch. You're going to need two colors. One package of each. I chose black and gold for the example that I'm going to make here. The one that I have on the table already completed is black and copper. You can use any color combination you'd like for this. So you're going to need one package of each color and you're also going to need one toggle clasp. I have Tierracast black finish toggle clasp right there. As far as tools go you're going to need just to pairs of chain nose pliers or bent nose pliers or one pair of each like I have here. So as with all chain maille weaves you wanna start with the majority of your rings either open or closed whatever the weave calls for. This one determines your rings should be most of them open with three of them, the three beginning rings closed. So the rings come partially open. So to close them just want to give it a little twist and until the two ends lineup. To open them twist the opposite way until it's open about an eighth of an inch. I have quite a few of each color open. Then I have my three close ones. I'm going to with these. What I want to do is I want to link each of the closed rings together with a gold jump ring. So what I'm going to do is I'm going to take my gold jump ring and I'm going to pickup two of the closed black jump rings and close that jump ring. Now I have this kind of configuration I'm going to take another gold jump ring and hook that to one of the black jump rings. I'm going to add the last black jump ring to that same gold open jump ring and close it. Now as you can see I've got a little chain going with alternating colors. What I want to do is I want to make sure that the jump rings are going in the same direction so all of the black jump rings are facing the same way and all of the gold rings are facing the same way. I'm going to join the last two black jump rings with a single gold jump ring. I also want to make sure that this is facing the same direction as the rest of them. So what I've done here is I made kind of a ring or triangle of the jump rings. As you can see I have my little circulate of rings so that all the gold ones are facing in and all of the black ones are facing out. What I'm going to do here is I'm going to pick up an open gold jump ring and I'm going to join two of these black jump rings that are pointing outward. I'm going to grab two of them and close them. Now I want you to keep in mind that beginning any chain maille weave is the most difficult part. Just keep your calm through this process. I know sometimes it can get really confusing in the beginning but it gets much easier once you get the hang of it. I've started many a chain maille weave where I just wanted to throw out across the room and screamed my head off but if you're persistence and patient. You will be able to get it So I'm going to take another gold jump ring and I'm going to join the next two set, the next two black jump rings and the round. Close that one. Now as you can see I have one more grouping of two black jump rings that I need to join. Scoop those up like that and close. So basically you could start out with two gold jump rings in between each black jump ring. I kind of find it easier to do it this way because it helps you form the pattern early on. Now as a side note we do you have two really great booklets. One called the basics of chain maille and one called advanced chain maille. This weave is not in either of them but I find that it's a really handy weave to learn before you go on to the other round maille weave such as turkish round or byzantine. Another little note is that one of the weaves that we will be teaching you is a very common one called european 4-in-1 and it's a flat weave and since this is just a round version of that a lot of people like to make the flat weave and then just double it over and join that. That also makes a round weave. I learned this way so it's easier for me to do it this way but once you learn european 4-in-1 and you want to try it the other way that is a fine way to do it as well. So now what we have here is we have the circulate of black jump rings joined by gold jump rings. The last round that we did we joined the outside of the black jump rings but what I want to point out to you right here is that the inside of each gold ring, the one on the inside of the circle, those are the ones that we are going to grab next. We're going to do that with black jump rings since we used gold last time. I'm going to take a black gold jump ring and scoop up two of the gold jump rings on the inside. I'm going to drop my formation here just for a minute to close this. I'm going to try to pick it up where we left off. So now I'm going to take another black jump ring and join those two. You're just going around the inside of the circle and joining the three jump rings. Now we have one more to do. I'm going to join that one to that one. Scoop up those last two there and one right there and close those. So now what we have looks like this. Now you can see the inside of the black jump rings but what we want is we want to move back to the outside. So I'm going to fold those up, the outside rings kind of like petals on a flower. Fold them up and that's what we're going to join with the gold jump rings. So pretty quickly with this weave you're going to notice a pattern. You're going to go outside inside outside inside just back and forth. So right now I'm grabing the outside of the rings. Another one right there and there. Join those two. Give that a little twist to close it and we've got one more set to join here like that. So here we are back to the gold and the black on the inside and what I'm looking at now and since I've just join the outside rings so I'm going to join inside. So I'm going to take some black rings and join those gold rings on the inside. When I'm doing this week really I'm just thinking inside outside inside outside. So this is inside. Scoop those up. One more on the inside. And now those three black jump rings we're going to fold them up like petals and join the outside again. I'm going to stop for a minute here. I'm going to show you what it's starting to look like. As you can see you're already seeing a pattern. So before what was a jumbled mess is now starting to look pretty nice. Since we're on the gold round you know that we're going to pick up the inside next. I'm going to go ahead and do that but I'm just gonna go ahead and finish the rounds until I get a bracelet long enough to fit my wrist and to measure this bracelet I'm going to put this down for a moment. What you want basically is for the actual links of the chain maille to fit your wrist exactly and then that should be enough allowance for a clasp. I'm going to go ahead and finish this bracelet and then I'll show you how to add the clasp. Okay so as you can see and the entire length of the bracelet is done now. All there is left to do is add a clasp. Now since this pattern ends with a round of three jump rings we need to narrow that down to two because you can't thread a single job bring through three jump rings. So what I'm going to do is here I have three black jump rings in a circle. I'm going to take a open gold jump ring thread it through two of them and give that a close. And then pick up that third one. I'm just going to go through the next two. I'm going to skip that third side there. Now I have two and that can be narrowed down to just one. So I'm going to take one more gold ring I'm going to thread it through both of those. I'm going to add one half of my clasp. And just as a precautionary measure I would suggest buying two packages of each. I know I said this bracelet only requires one packet of each but there relatively inexpensive and just in case there are some that you need to call out some jump rings that aren't perfect or in case you make a mistake it's really handy to have extras. So I ended up going and getting another packet of the gold and you know it wouldn't hurt to get another packet of each. So that's one end and I'm just going to do the same thing on the other end. I'm going to use all gold here since I have more gold than I have black. You have a completed round maille bracelet. So I hope you enjoyed this video and I hope you learned a lot. Have fun playing with this weave. It's a really fun one and you can make a lot of other things out of this. Just play around with it. Play with the different colors and experiment with different sizes. Have a lot of fun. Thanks for watching. Go to Beadaholique.com for all of your beading supplies needs!
Related Videos


How to Create Faux Chain Maille
In this video learn how to create the look of chain maille without the time-intensive labor or having to learn about aspect ratios. Simply use a ro...
View full details

How To Open and Close Jump Rings
Learn the proper technique for opening and closing jump rings.


How To Use Beadsmith's Jump Ring Opener
Beadaholique's Andrea shows us a new and easy way the open and close jump rings. Open and close jump rings with ease and free up a hand! With this ...
View full details