How to Bead Weave the Scarborough Necklace with 3-Hole Cali Beads and Austrian Crystal Bicones

SKU VID-1241
Designer: Rachel Zaimont
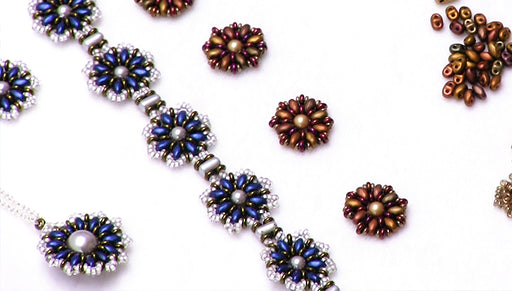
In this video you will learn to make the Scarborough Necklace from start to finish, using a variation of Right Angle Weave to create the beaded, wreath-like focal with 3-hole Czech glass Cali beads, Czech glass mushroom beads and Austrian crystal bicones. You'll also learn more about the Cali beads' unique shape and lustrous colors.

The brand name for the crystals shown in this video is no longer available. High quality Austrian crystals are now available under the PRESTIGE™ Crystal Components line.

Audio Transcript
Note: This audio transcript is auto-generated and may not be completely accurate.
hi this is Rachel with PETA Holly and in this video I'm going to show you how to make the Scarborough necklace this is a bead woven necklace and it incorporates three whole Cali beads swarovski crystal bicones and Czech glass mushroom beads along the outside and it has a built in jump ring here so you can easily hang a chain the form you get started I just want to show you a little bit more about these Cali beads because they're really cool this is a check last three whole bead and as you can see it's plump in the middle and tapered on the ends and it's about four millimeters by eight millimeters with a three millimeter side here so they're great for bead weaving or multi strand projects as a spacer between beads really cool and versatile so as you can see they come in a lot of different colors and finishes starting over here we have Capri gold and peach luster and over here we have purple Vega iris this is what I used in the project over here and up here we have a white travertine blue and just a range of really pretty colors that match a lot of our other Czech glass beads that we have available so today we're going to make a color variation of this necklace and for that you'll need some Cali beads in this opaque light blue luster color it's kind of minty it also needs some stress key crystals three millimeter bicones and crystal metallic sunshine and some Czech West mushroom beads and crystal slipper it you'll need a closed jump ring I have one in gold and a finished chain necklace to hang the piece when you're done and for the sewing I've gone ahead and cut about five feet of fire line in smoke and threaded a size twelve beading needle and you'll also need some thread snips so let's get started so the first thing you want to do is pick up your needle and string one Cali B by one of the end holes one crystal bicone and one Cali bead and you'll slide these down almost to the end of your thread leaving a bit of a tail a couple inches and now you will just bend your thread so the two Cali beads are sitting on top of each other like so and pick up another bicone and so through the initial hole of that first Cali bead you picked up crossing your thread tail okay and now we're going to make a little knot for security turn it to catch a crystal there okay and now we're just going to keep sewing around this little circle we made and if you notice if you're familiar with right angle weave what we're doing right now is very similar to right angle weave so now I'm sewing back through the hole of that second Cali bead I picked up as well as the second bicone that I picked up and now over here I'm going to pick up another Cali bead by the end hole another bicone and another Cali bead and slide those down then the thread so the two Cali beads are basically sitting on top of each other and now you can see if this is another unit very much like right angle weave so now we're going to sew through that middle bicone there that connects these two units that we're building back through this Cali be just around the circle exactly like you do with right angle weave and we have a video on how to do basic right angle weave if you want to have a refresher and I'm going to sew back up through the bicone on the end so you can see what we're doing here is creating these units that look like right angle weave from the top but you're creating this double-decker stack of Cali beads here that are sewn up along one end and you're just going to keep on going and doing that so one Cali bead one bicone and one Cali bead slide this down so you can see them falling into place fill your thread around so they're laying on top of each other and sew up through this bicone from the previous unit that connects them all right and then just keep going around the circle so through the top hole of this Cali beat on the end and through the bicone on the end and you're just going to keep repeating this you're actually going to keep going sewing around in little circles adding more and more Cali bead and bicone units until you have a double-decker stack that is 14 beads long so right now this back is three beads long and you want a long strip because we're going to leave it around the circle like in this piece this is the initial strip and we just turned it around the circle so keep going here until your strip of woven beads is 14 beads long you'll use 28 Cali beads total and I'll see you back here when you're at that point okay so now your strip of Cali beads is 14 beads long and at this point we're going to take this piece and close it up into a circle so just bring the two ends around like so and you're going to complete a partial right angle weave unit here to close these up so we have bicones on both of the ends of the piece so what you're going to do is pick up one Cali bead by the end hole and sew up through the bicone on the other end of the piece and now you're going to add the second cally bead of this last end unit here so now try to do this in a way that where you can see so now also down through the bicone on the second end of the piece and what we did is we just created a right angle weave unit using the two by cones that already existed on the two ends of your strip we just closed it up into a circle so now I'm going to keep sewing around through this less unit that we just created to reinforce it through the cally bead up through this by comb through the Kelly bit on the other side and I'm going to make a little security not just to make sure that this is nice and put together okay so now your piece is closed up into a circle and it's a very floppy circle because only one side is closed up with these bicones so what we're going to do now is we're going to sew to the other side of the circle so I just sew it into the next cally be it over I'm going to sew through its middle hole and then out through the third hole on the other end of that bead and now I'm going to flip our little beaded wheel over and yes it is very floppy we're going to fix that alright so over here our thread is coming out this end hole of a cally bead on the outside of the wheel so in order to create the same kind of units on this side of the wheel what I'm going to do is pick up one bicone so through the cally bead on the inside of the wheel and pick up another bicone and back through the cally bead on the top of the wheel so now we just created a unit that looks just like the right angle weave units that we did on the first side of this circular piece I'm going to sew back through just bicone on the end again and now I'm going to grip the next two cally beads over on the circle I'm going to sew through the inner bottom hole and this last bicone we added that's half of this unit here so we're just going to pick up one bicone on the other side so through the Kelly bead on the top and then keep going around the circle back through this initial bicone get the thread tail out of the way Jack's your de Cali bead on the bottom and back up through this last bicone that we added so now you can see that we're just closing up the circle I'll do one more just to keep showing you so coming out through this bicone we just added we're going to sew through the Cali bead next door pick up a bicone sew through the bottom Cali bead just tightening that unit up and then keep selling around to the circle back up through the anchoring bicone through the Kelly bead on top of the wheel back through the bicone that we just added all right so you're just going to keep doing that all the way around the circle just keep lining up the next unit of Kali beads and creating these little units just sewing them together using bicones and that's going to give this wheel a good tight structure no more cally beads flopping around waiting for a home so just keep going around the circle and doing that closing up each of these subsequent units with bicone and continuing this right angle weave pattern on this side of the wheel and I'll see you back here when you've completed your wheel now I'm almost done sewing up the second side of my wheel and I just want to show you the last stitch gets a little bit different so for the last stitch I'm going to not add a new bicone I'm going to incorporate this first bicone on the end of the row there so I'm going to sew through that bicone line up my cally beads and treat this as its own unit so I'm just going to sew through the inner cally bead tighten that up my throat got a little bit caught so I'll just and catch the thread and now sew through the last bicone that we had added before we got to this end unit and now it's all sewn up into a unit so I'm going to keep sewing around one more time just for security back to the top cally bead through the first bicone that we added on the side through the inner cally bead and up through this bicone creating a little right angle weave circle alright and this completes both sides of our cally bead and crystal wheel so the next thing we're going to do is if you notice this is a three hole bead and the middle hole is still lonely so we have to do something with that so after I get my star tail out of the way so now our thread is coming up through one of these by combs so I'm going to sew through the adjacent hole of the Cali bead right next to it and now I'm going to sew into the middle hole of the same cally bead changing direction and now that we're here we're going to start adding Czech glass mushroom beads between each of the double-decker stacks of Cali beads all along this wheel so I'm going to pick up one mushroom bead and just sew into the next middle hole of that adjacent Cali bead and this mushroom just snapped into place it fits really perfectly between these rows of Cali beads here so I'm going to do that again because a mushroom and so into the middle hole of the next Cali bead make sure it's not twisted and I'm going to keep doing this almost all the way around so this is the easy part you're basically just sewing around in a circle adding these mushroom beads and the mushroom beads will fit very nicely into the little spaces created between the Calabi so just keep sewing around until you get almost to the end and I'll show you what to do for the last step I like this crystal slipper at color because it has some really pretty vibrant violet and blue tones in there and also a hint of gold which i think is picked up by the crystal metallic sunshine bicones so just keep going turning the piece as you go and the mushroom beads are just filling out that space left between the specs of Kali bead alright one more and it'll get to the last space okay now we've gone almost all the way around except for this last opening here and this is where you're going to add your closed jump ring so you can hang the piece so just as I was stringing unless your beading glitch I'm just going to pick up one closed jump ring and sew into the middle hole of this next Kali bead just going to treat it like another bead and pull tight so it sits nice and snug in there and I'm going to reinforce this so I'm just going to sew around through my beadwork I'll go back through the top hole of the Kali lead through this bicone at this point you're just adding a little extra a few extra thread paths for strength let's tear this bicone and through the middle holes of these two cally beads and the jump ring again and my thread caught the mushroom bead here so why not also through that to make it a really long security pass and I'll go through this next Kelly bead and the middle come back out the end hole and over here I'll make a security nut and then I'm going to sew down through this bicone and into this next Kelly bead at this point I'm just freestyling to tie off my thread ends you can do this however you want so over here I'm just going to snip off this thread tail next I just stir my needle on my other thread tail and I'm just very quickly going to also tie this off so I'll just go through a few beads if I ride home I would make more of a production of it but for the sake of time I'm just going to trim this thread right here and call this piece done so here is your beaded wheel using the Kelly beads kirovsky crystals and mushroom beads and the next thing you're going to do is very easy just take a finished chain necklace and open it up and you're just going to feed the non-class end through this gold jump ring that you attach to the piece so just run it through the jump ring fits nice and easy and now you have your beaded focal on your chain and that is how to make the Scarborough necklace using three volt Cali beads mushroom beads and bicones you can find all of these supplies at beadaholique.com thanks for watching you

You recently viewed

Clear recently viewed