How to Bead Embroider a Picot Edge

SKU VID-0110
Designer: Julie Bean
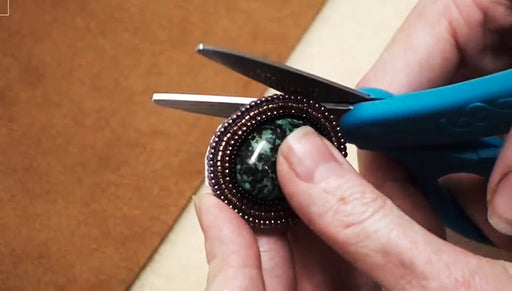
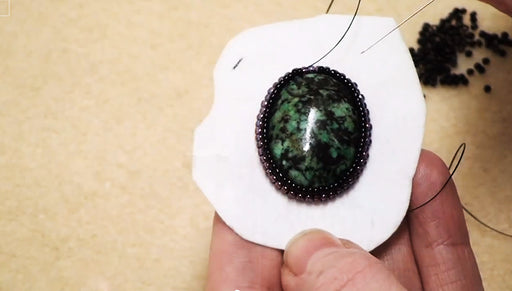
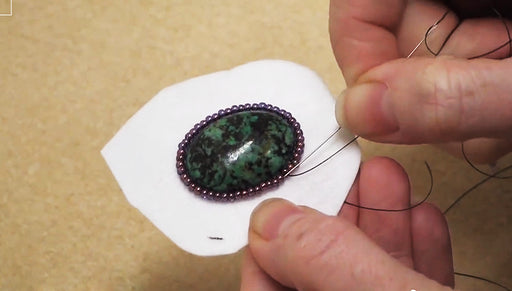
Learn how to add a decorative picot edge to bead embroidery. This finishing touch hides the area where you foundation and backing meet and allows you to beautifully stitch the two layers together. You can also use simply as a decorative element. A great stitch to know for bead embroidery.
Audio Transcript
Note: This audio transcript is auto-generated and may not be completely accurate.
Hi my name is Julie with Beadaholique.com Today I'm going to show you how to bead embroider a pico edge. here we have project where we've taken a cabochon and we've done some bead embroidery around it and then we've already gone ahead and mounted it onto ultra suede. So now we just need to finish it, we need to cover up this edge where the foundation and the ultra suede are sandwiched together. I wanted do a pico edge. That's one way of doing it. For that I'm going to need to repeat some of the beads I have already stitched. You could do different beads but I think it actually looks very nice to have it have a cohesive feeling to use some of the beads already used in the piece. So to decide which beads you want to use, it's totally personal preference. Since I just ended in purple I think I mean I want to do some gold and then since I just have the black right here I'm going do some black as well. The black beads are actually are a bit smaller than the gold which I think will add an interesting element as well. The amount of thread you're going to need is going to be dependent of course on how big of a piece you're doing and how far around you have to go. For this guy here I'm going to need about four feet. So to begin pick up one bead with my beading needle. I have not tied a knot at the end of my beading thread and you'll see why in the end. I'm going to want to go ahead and insert my needle between two of the beads on the outer edge my beadwork and push it I don't quite want it that far I'm going to push it all the way through pull your thread through make sure you leave a tail about eight inches because you're going to need to thread a needle on that in the final step. So I just I just pulled my thread so it's no longer sticking upright. I don't want it sticking like this. I want it pulled over to the side. Now go through that bead and I want it to be coming straight out from my cabochon. So I don't want it pointed down or up I want it coming straight out. Now what I'm gonna do is pick up another bead and this one I'm going to use a black bead and another gold and I'm gonna go back through the topside so it's underneath topside. I'm going to move over about the width of a bead of one of my gold beads and go down through the foundation and ultra suede pull Again I want this to be along the edge. And now I'm going to go back up through the gold bead and we have our first pico edge. So now I'm going to repeat that same process. Pick up a black bead and a gold bead kind of go under that last row of beading go through both layers pull and go up through the gold bead and pull. You want to make sure it's sitting along the edge. I'm going to do a couple more. You can see how that's starting to look. You just want to go all the way around the edge. If you happen to make a mistake don't your needle back through go ahead take your needle off of your thread and pull your thread out then rethread your needle. So continue going all the way around until you comeback to where you started. I've almost finished beading along the exterior of the cabochon. You can see I just have a little gap I'm going to fill in here and this is what it looks like so far. You can see the stitching on the back. I've tried to keep this as uniform as possible. I'm going to complete the last couple stitches here and then I'm going to show you how to tie it off. So pickup a black bead and a gold bead in my case. Whatever pattern you're doing. Pick up your beads accordingly for your pico edge and pull through both layers of the foundation and the backing and then cut through that gold bead again pull It's a repetitive motion. I actually find this very soothing much like knitting or crocheting. So this looks like it's going to be my last bead so I don't think I can get another gold bead in that gap but let's take a look when it's done. So my ends meet So now to finish this I need one more black bead so that it has a nice uniform edge and pick up a black bead. Instead of adding another gold bead I'm going to go down through the gold bead I first strung. I actually want to try catch some of the backing in there as well and pull so it completes my pico edge. I've got this tail which is the original tail when I first started beading and what you can do is if you don't have a second needle you can take your needle off of the string right now. You're going to string it onto this tail end. If you have a second needle it's just as easy to go ahead and just thread that needle. Now I want to go through the black bead and the gold bead and my backing it didn't catch enough of the backing there. Pull through So now you can see I've got a completed edge. I'm adjusting and making sure I like how it looks. From the topside it looks good. I've got two tales coming out of the backing. My needle slipped off but want to keep it on if you can. I'm just gonna tie a knot Tie a simple knot go back do a surgeons knot Tie my knot just going through once coming through again not trying to hold on to needle and just pulling down. Now there is this is one way to keep that needle on you can just rethread it though if it came off like mine. Now you want to go in take you're thread You want to weave this into your beadwork a little bit so you don't have a tail on the back side so you can just go ahead and weave it into your beadwork and go now weave it in. Once you've woven it in just take your Thread Zap carefully zap that and the thread is now hidden. Go back to the other size if you had two needles your needle should already be on there. With one needle rethread it go-ahead and weave this tail in as well. And use your Thread Zap again. There we go we have a finished piece. We're ready to go on to either the next step which can be creating a bail, incorporating this into a design, you can go ahead and put a pin back on here and call it good and make it into a beautiful broach but this part is now complete. Go to Beadaholique.com for all of your beading supply needs!

Customer Reviews

Based on 1 review Write a review

You recently viewed

Clear recently viewed