How to Backstitch in Bead Embroidery

SKU VID-0106
Designer: Julie Bean
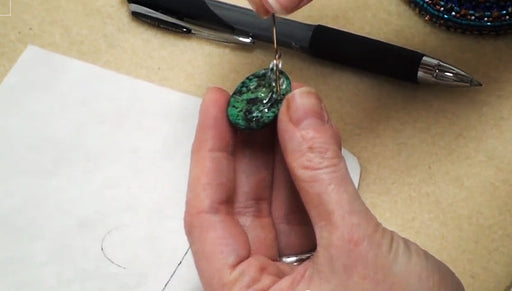
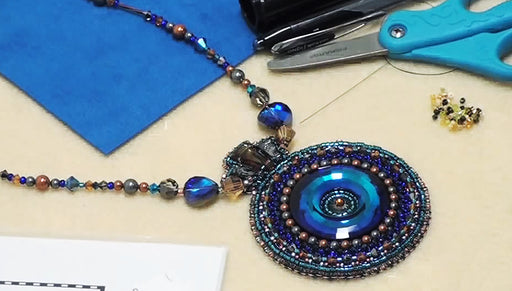
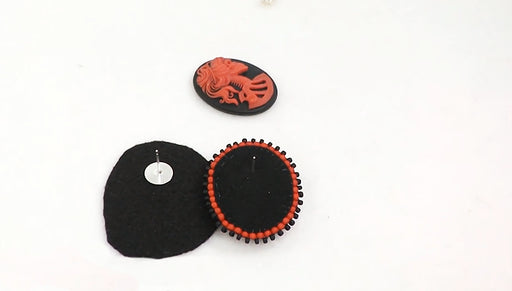
In this video, learn one of the most common and widely used stitches in bead embroidery - the backstitch. In this video we cover 2-bead backstitch but you can use the same principle to backstitch any number you choose. Repeat this stitch to make uniform rows of bead embroidery.
Audio Transcript
Note: This audio transcript is auto-generated and may not be completely accurate.
Hi, this is Julie with Beadaholique.com Today I want to show you a basic two bead backstitch in bead embroidery around a cabochon. You're going to need some thread. I've cut myself about a yard here so thirty six inches for my particular project. I have a size twelve needle, a size thirteen well also work really well and I've got myself some size 11/0 seed beads. In a previous video I showed you how to glue the cabochon onto the LAcy Stiff Stuff beading foundation using E6000 so this is now dry. It's not moving anywhere. So all you need to do is first begin by threading a needle Pull the tail down so it's not quite even with the other tail but fold your thread in half so you don't have quite as much to pull through each time. On the other end opposite where your needle is go ahead and tie knot. I like to loop it through a couple times to create a little bit bigger knot Do that one more time. Going under and over twice capturing my original knot if possible. There it didn't quite happen but it'll be okay. Do that one time For the first one I'm going to trim off that one. So I'm ready to begin what you're going to do is go ahead and line your needle up so that is going from the back to the front and you want it to be along the side of the cabochon and so it's gonna take a little poking to begin with. That's a little too far away. The line here that's been drawn on there was for the placement of my cabochon. It does not pertain at all to my bead embroidery work now. So keep poking until I come right up along the edge of the cabochon. see where I am in the back pull through have the tail there picked up two seed beads onto my needles and I'm gonna visually judge where these two seed beads would line up along the edge. So I want to see about that amount of space and I'm going to go head take my needle guesstimate that amount of space right up along the edge of the cabochon again push through my beading foundation and pull through. I'm going to come back to about where I started and it's going to take a little work to begin with once you start doing this a little bit more you'll be able to gauge exactly where that needle is gonna need to be placed. I find every time I start a project it takes me a little while to warm up and get that needle placement correctly. So I came back up the backside and I'm gonna go through my two seed beads that are already strung on there pull my thread through. So the first two are on there pick up two more. Again I'm going to visually gauge where they would line along the edge go ahead place my needle there pull through the thread got a little bit kinked. Now what I want to do and this is important I want to go back through the last two beads strung and one of my other set. So what I need to do is I need my needle to come up between the first bead I strung and the second bead I strung. The first bead I sewed on and the second bead I strung I sewed on and carefully insert my needle into that third bead two and one and pull through that's why it's called a two bead backstitch. Go ahead and sew on two beads, go back three, sew on two, go back three, sew on another two place them in make sure my thread doesn't get kinked go back through three so it helps to have a smaller needle You can see how they're nicely lining up along the edge and I'm just going to keep repeating the same step over and over So two go down pull through go back three and then I want to show you what the back is going to look like You got these nice little stitches You go all the way around your cabochon until you come back to your starting point then I'm going to show you how to make it so that your beads line up even a little bit more evenly. I've almost completed my row of beads around my cabochon and I want to show you how to finish up this row I'm going to do a couple more. Again I'm just adding two beads at a time Add two beads. Go back three through those three. So just the same process that you've been doing to create this nice curve and that's why we're only going two beads at a time because it really allows us to get the nice shape to our beads that we want. There's certain artists that prefer three or four beads at a time. I really do like the two beads because I get that nice curve. This happened where two beads actually just filled in the hole correctly to make my ends meet you might end up in situation where you need to add two beads and then just one more bead for the next one but you'll see how that works you want to make sure you have a nice continuous circle and then we're going to go back Again go through the three. I've got my three beads I'm going through. So I've got a complete row but I'm not done yet. Now what I want to do is take my needle and I want to carefully come into the bead next to where my thread is coming out and I'm gonna run my needle through as many beads that I can at one time pull my thread through Go through the next bead. So there's no gaps I'm just continuously going through all my beads YOu're going to do it all the way around your circle. You may want to do it a couple times and basically what you're doing is your just securing up those beads making sure they all lay flat. They all are straight and in line and they're making that nice curve and they're secure onto your foundation material and back to the beginning pull tight I've got a nice even row around the cabochon on the back that's what my stitching looks like and if I wanted to at this time I could go back into my foundation come back the other side and I could actually to take my needle carefully go under one of my stitches and tie a knot. I'm not going to do that on this piece because I do want to actually add more beads and do some more embellishments If you want to tie it off at this point or you can go onto your step but there's your basic two bead backstitch in bead embroidery. Go to Beadaholique.com for all of your beading supply needs!

Customer Reviews

Based on 1 review Write a review

You recently viewed

Clear recently viewed