Beadaholique Live Class: Wrapit Loom Jewelry

SKU VID-1340
Designer: Design Team
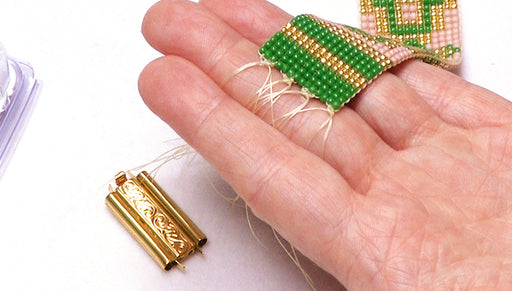
In this Beadaholique Live Event Event, join designers Julie Bean and Kat Silvia to learn all about the different types and styles of jewelry you can make with the Wrapit Loom. Kat and Julie will not only discuss the types of materials to use but they will show you how to set up the loom, start a piece of jewelry, do some beading, and also demonstrate how to finish a design. Also shown are many examples of finished pieces - everything from simple single wrap bracelets to quadruple wrapped designs and even a belt!
Audio Transcript
Note: This audio transcript is auto-generated and may not be completely accurate.
hi everyone it is cat and Julie and thank you so much for joining us for our Facebook live class and we love doing these classes so welcome back to those of you who have joined us before and welcome to those of you who are new in this class we're gonna go over some amazing stuff we have it give away so we're going to talk about that in just a minute but this class is all about the rapid loom and here I have the Professional Series duo and Julie actually has the original rapid loom so we're going to talk about both how you can combine them some of the differences so that's a fun stuff to go over today a lot of very fun stuff so we're gonna open these up in just a minute you see we've got lots of samples on the table we have other supplies you can use with them we're gonna show you actually how to start a rapid loom and actually how to finish it and do the bead work on it so a lot to cover but if you have seen our classes before you know you always have a chance to win a giveaway and the way you win the giveaway our enter it choice should stay is by leaving a comment on this live feed and then we'll randomly select a winner at the end of our class and we'll announce that winner live here on Facebook so cats going to tell you a little bit more about what's in the giveaway but please do start leaving those comments they can be questions it can be a shout-out like hi I'm watching from Alaska whatever it may be just let us know you're out there and leave some type of comment for us very curious when you go back and read all I know me too so for our giveaway today we are doing the rapid loom professional series due out now this is one of our latest kits and they are launching today actually at beadaholique.com and for this one you're gonna get the pink version and you're gonna get not only the rapid loom pro but you're also gonna get all the supplies to make this bracelet and here is the finished example of we're not gonna get to make and it's these are so fun to work with so you will get this and then you'll also get a refill kit and we'll kind of explain what those are in just a minute but you're gonna get a refill kit of our cotton cord kit now these have been on our website for a little while so you're gonna get this gorgeous blue color with this kind of nautical gold and I just love this one and then we also are going to give you some more beads and leather cords and some buttons and just some fun stuff to kind of get you started with me be designing your own or to help jump-start you into creating some beautiful color waves so that is our giveaway it is a $50 value so be sure to you like Julie was saying just leave a comment that's that's all it takes enter yep so that's a lot of fun so I'm gonna start by showing you the original rapid loom kit and I think I was the first one who got to play with it here and I was so excited I sometimes come across our desk that are just really cool and you are bubbling with excitement and you just want to share it so I think once I started working with this I was very much in that mindset of like you guys have to see them so this is the one that I actually started with and if I open it up here I'm going to show you what you get so in it you're gonna get full instructions on how to actually set it up and you are gonna get these instructions here which show you how to do the beading I'll show you that and then on the backside or some more details so just a lot of really detailed instructions we also do have full videos on just about everything you're gonna see discussed here on our youtube channel so please check that out and go over there and subscribe so you can get the updates but in this original one you get the loom which is what you see right here re have one assembled so you're gonna get the main track you're gonna get the little feet the anchors you're also gonna get like a little bead tray which is in here and then you're gonna get some supplies to get you going right away so you'll see here you're going to get some wrap line some outer cord some little buttons and a whole bunch of little beads to play with so this is a great gift idea it's all set is ready to go you don't have to purchase anything else and you are just ready to start playing the moment it arrives now let's say though you want to do something with maybe a little bit of a longer bracelet design a double wrap a triple wrap whatever it may be you might be interested in the professional series professional series do and you can see that the box just looks a little bit different but the difference here is that you are also going to get those lovely instructions so if you don't worry this is not sort of an advanced one it's just gonna provide you with that sort of longer track so you'll get that lovely instruction booklet there and of course we is Julie was saying we do have a video so for this one I'm actually gonna take it out and we're gonna set it up so I have three little bead trays here and these are nice little scoops but I'm gonna set those aside for right now I'm gonna pull out my two tracks here now this is the main difference between the duo and the regular loom you can see on the regular you get one track but for the pro you'll get two so you can make those longer bracelets I'm gonna set that up in just a second here I have my two little feet and one quick note as she's getting all these supplies out is you can actually combine these so if you have already gotten a rapid loom and you're interested in the additional tracks you can use this track here and combine it so you can even then at that point have a bracelet which is three tracks long yeah and that's one of the things that I discovered that was actually really really cool because I was like oh no I already have a rapid but you can actually combine so you're gonna take your two tracks and they have a male and a female end here and you just sort of slip them together and they kind of sit together so they're nice and interlocked and they're actually really tight in there which is great and then I'm just gonna flip it over here and you're gonna get two feet so I like to kind of position mine maybe at the three or four notch and you just kind of press them in there's no tools to assemble this which is great so I have my little feet ready to go and now I'm going to take sorry I'm going to take that male end here and this is the part that will hold my button closure and you just see the bottom there fits nicely on and you just kind of slide it into place and you'll hear a nice little click and it's on it's nice and secure you can just sort of test it with your hands and then on to the other side you're going to have your slider portion and just you size your beads so you'll see how this works in just a minute but that should slide nice and easily on your track and then here is that bead stand could we were talking about you can either set it in there to help you you can set it in there to help you with getting I swear I've done this before you can set it in there to help feed your beads to help you string them a little bit easier I'll just show you real now where you see they just kind of scoot on down there and then they're ready to be picked up yeah so it kind of is like a little helping hand yeah exactly so I'm going to set this is high but I want to show you how to start the actual give you a little bit more room right here I was like the track is a little large alright so I have two yards of my leather cord here now this is the 1.5 millimeter chord and this is a beautiful white color and we have lots of different colors and we're going to be showing you that in just a little bit here but let me be really professional so what I'm gonna do first is I am going to take my button closure now this is one style of button that you could use we also have a different style of button I'm going to show you on the piece that I'm wearing here it's got a little bit of a shank this is the same starting technique no matter which style of buttons so if you're confused about that don't worry I'm going to show you alright so I'm just gonna string on my button and what I need to do is I need to string that button so that it is in the center of my cord so I'm just going to string it all the way down music you wouldn't want me to sing I could try but we yeah just like bouncing so I have my button in the center of my shank there and now I'm just gonna take both those cords and do an overhand knot and just pull that leather through now with this style of button you're going to want to leave just a little bit of room at the top there so that it will fit nice and easily over the hole that I'm going to create and you want to make sure that your leather words are nice and even go just kind of working it up towards the front there there we go so you can see that I left a little bit of space just to let it all lay nicely once I put it over a hole alright so now I have that set to go and I'm going to place it into my pro and I'm gonna place it in between the button and the knot there now what you're gonna want to do is I already know the size that I want but you're gonna want to measure this to see how much it's gonna wrap around your wrist and you can either test it on your wrist or you can use a ruler it's up to you but just to kind of show you here so I'm gonna wrap it once around my wrist and twice so that is where I want my not to be so very simple very technical technique so we're just gonna take it and I'm gonna from the first one here I'm gonna tie another overhand knot and then I'm gonna again keeping those cords nice and even because you want to have that nice even cord right there I'm just gonna make a little knot and that is going to be my very first knot and I'm gonna take this out actually so that you can see how I'm going to size that second knot because you're going to want to create a loop for it that button needs to fit through so I know that I need to put my next knot right about there cuz that'll be enough space for it to fit through so now I'm just kind of holding it with my fingers and this is where you just want to kind of go slow and test that that knot is where you want it to be for that second alright so I'm just gonna kind of go slow before I tighten it up officially go and just slide my button through there making sure that it fits nicely and that'll work that's all you need to do and now from here what you can do for sizing purposes you can tie another knot and then another knot it just is entirely up to you you'll see that the reason I recommend having two yards of cord is that you want to make sure that you have enough cord to get the sizing correct so now I'm just going to place it back into my here and keeping those chords on the top separated what you're going to do is you're going to move to your slider end here and I'm going to put right in between those two knots right in between that little slider piece just like so and now my slider piece you'll see here on the bottom you'll watch it kind of click a couple there we go because you want that nice and taut all right so now I'm gonna each other would you help me take stronger concise a quest card so this is the size of four of the Griffin silk and it comes with this little twisted wire needle which is really cool so I'm going to take that off and take all of it off of my card now if you're doing it just a regular or an original rabbit you won't need two cards of Griffin so you'll just need one so I'm going to show you kind of how it works with one and then I'm going to show you how you do it with two just to kind of give you a little bit of a guide so in let's say I had just a regular wrap it what I would do is I would find the center of my Griffin silk so one hand will have a needle and then on to the other end I'm gonna want to add another twisted wire needle and it looks just like this it looks very similar to the original side so it has just a little eyes so you would slip it over there so because you're going to want to needles on either side so what you would do is you would just take the center and lay it across and then you would wrap it around pull it through and then tie your knot now because for this one I need a second piece of Griffin silk because this is going to be so long I'm going to take both ends without the needles there you go Thank You Julie cooking show assistant so I have both my ends without the needle so what I'm gonna do is I'm gonna tie a surgeon's knot so you just cross it over you dip it down and then to your top here if you've ever done sutures or anything you just wrap it around the top there and then you're pulling this knot together now if you want for extra security because the Griffin silk is silk so it is a little slippery gonna add just a little overhand knot but you don't want to knot it too much and don't worry we'll be adding a little spot of glue to this when we go to do our finishing technique later so that is how you kind of start it so this is now my midpoint so what I'm going to do is put that little knot kind of in the center of those two cords and it's the same I'm just going to wrap the right-hand side all the way around that cord and pull it out to the side and take the left-hand cord wrap it around the left-hand leather and pull that all the way up to the sides alright and the last step before we really start adding these and getting it started isn't gonna scooch it up towards the top I'll get my hands on the way in just a second there we go so you have one cord wrapped out to the right the other cord have wrapped out to the left and now I'm just going to take those two cords and just for a tad extra security I'm just gonna take one more tiny little nut see if any music give us your music suggestions alright so now we're getting ready and now we're gonna start our beating so this is always how you start each row is you wrap it through the center and out to the side and you never want to criss cross over at this step so I'm gonna pull it apart you're gonna see so you have both of your cords just like so alright so now onto my right hand needle here I'm gonna start by adding one of my 8 OC beads and that is on to the right hand needle there and I'm going to take my left hand needle and I'm gonna put it through Criss crossing going the other direction and now I'm just going to pull those to the side so it's gonna come all the way down and when you start on a pro you're gonna have lots of that griffin's look to get through so just be patient and let it slide all the way down and this is my favorite part when it just pops right into the center of that leather cord see just it's a nice way to kind of get it started so I'm gonna do that and now I'm just going to yeah I'm gonna move a little bit faster just kind of wrapping both out to the side here and now to kind of graduate it because I want to use some larger beads I'm gonna put on two of my 800 seed beads here just like so and I'm gonna kind of hold one through at one time on the next one now you'll notice that in order to kind of expand these you can use a couple of different techniques I'm using just 8 OC beads and just adding 1 each time just like so and Julie's going to talk a little bit more about that here in just a second but you can already see how now my piece is getting wider so it's nice and tapered so I'm gonna keep adding a few more beads and I'm actually going to work up to adding one of our donut beads here so I'm gonna do that next and Julie is gonna start talking about some of the different ways to use some of these really unique yeah so I have a piece started right here if you want to take a look so this is you see it here it's just using the one piece of Griffin silk and here you can see how I started it like Kat explained where I just found the midway point started it in the middle here wrapped it under you see a very discreet little knot right there and then started my wrapping and I started with a 4 millimeter Swarovski pearl and went up to a 6 millimeter so that was a really nice little tapered effect so what I want to show you now is and this was actually something I was doing as I was designing this bracelet I was like well what do I want to do do I just want to do all pearls which could be very prettier and simple but I want to show you what it would look like to pop in something a little bit fancier so sometimes you come across those beads that you just love and you want to be able to just use one two or three of them so these are little bead L beads so that's how that would look with the crystal one and so these are eight millimeters so they are getting a little bit larger there's another one so you see how it changes the look quite a bit you can do that you can just have a little focal of some really special beads but the one I'm going to put in here are these little tierracast trapezoids and these are metal which i think is nice because i've got a little gold metal clasp which is my button in there and so God might my loom all set up and I'm gonna add a different shaped bead here because it is a trapezoid I want to show you something you can do with it now I have the Griffin silk needle right here and I've gotten a lot of questions about to use big eye needles instead of the twisted wire the answer is yes I do have a big eye needle it creates a little bit more bulk right here where the thread ends up doubled so just test your whole bead size so like here is a pearl a Swarovski pearl and it's a little bit tight to pull over it so what you're going to want to do is pull it over the big eye needle side first so then you get pull it all the way through so that double thread is gone and then at that point use your Griffin silk needle so it's just not quite as much bulk going through it at once so then that one goes through nice and easy and we just slide our on down and it pops into place and you see how that is and so that was exactly what Kat was doing but with a pearl now I do want to add the little trapezoids because I think they're gonna look really cool as a center of metal a little metal element so here I've got a trapezoid I'm gonna put it through again going through the big eye needle side first if you are using a big eye needle and then the Griffin silk and then we're gonna pull it down and you can see how that is and then what I want to do because these are a really cool shape I want to stagger I'm going in opposite directions so we're just going to do the wrapping the same as normal and you just keep your needle on the thread the whole time you're not taking your needle off to do the wrapping and putting it back in place so now we're just gonna do the exact same thing but we're going to make sure that this is oriented properly we're gonna pull it down and you can see how that's going to lay so that I think is really fun how you can mix and match your beads you don't have to just do the same ones also you can go ahead and use different colors of rap line different colors of the leather cord or cotton cord so here I have an example and this would be the exact same basic bracelet just with different beads so it's the same length same button but I've used a really pretty colored leather cord here on the outside use a different color wrap line and then these are crystals so these are Swarovski crystals kind of in a color-block design and you see they really do shine so you can switch up your design with the beads with the buttons with the wrap line color with the cotton with them sorry the leather cord on the outside there's different thicknesses in diameter for the leather cord and then you also use cotton cord as well and actually Kat I know she's in the middle of doing some great beadwork here but she has some options in front of her maybe I can help point to them as she's I got excited over here I was excited to add these donut rondelle's and I'm actually very pleased with the result I kind of I thought I was just gonna have a solid pattern of rondelle's but just those added metallic beads in between is actually really making the design pop in a way because these particular donut Ren dolls have that matte finish Tim so I actually I kind of like this so I'm going to finish this last one I promise and then I'll go on well I like how the wrap line becomes a design element yeah you know you could have gone with white and it just would it pretty much disappear and all you would have seen with the beads but you're getting this a really nice striped effect with the color drama it's kind of cool so yeah so speaking of the different kinds of material you can use so this is that white leather and like I was saying this is the 1.5 millimeter we also have 2 millimeter as well but we have this lovely cotton cord and this comes in some really great colors so this is one of this is one of my favorite I just love the turquoise I'm so classic and but we do have some blue and I just wanted to point out here so tonight see the difference in size so this is the 1.5 and this is the 2 and now this is the cotton cord and this is a nice structure that you can use for these bracelets and you know just really kind of explore that but the main thing I want to point out to you is that sizing this cord is just your preference when you go to size your Griffin silk that's what you're gonna want to look at as Julie was saying for getting that cord through your beads because this Griffin silk is not going through any beads or I'm sorry this leather is not going through any beads it's the Griffin silk that you have to test now I want to show you on a couple of the cards that I have pulled here so we have number 0 2 4 6 and then it jumps to 16 but you'll notice it has these little markings on there that lets you know exactly how thick it is so that will help you when you're kind of looking at a bead you'll see the whole size and then you'll need to know how much you can fit now as you can see I'm fitting two cords through and you'll always be fitting two cords through your Griffin silk but you'll also need to be aware that if you have a needle like a big eye needle like Julie was showing you you're actually fitting three cords through there so you might need to just kind of adjust and be careful about that but we found that the size four is the one that works best for most yes you can use the two if you're working with some smaller pearls or smaller gemstones so you can make this as delicate or as wide and thick as you want it to be yeah and if you have some beads which do have bigger holes and you want this outside to be more of a design element and you want to really play off that then you could go up to a thicker one it might look really interesting you're really getting more of that texture so yeah really play with it I think the thing we've found that we love about these looms and the bracelets you create on them is you have so many different options of what you can do yeah this actually might be a really good time to show some of the fun options yeah so actually what Julie was saying is if you're using a bigger of a large hole bead here so this was done by our designer Alexandra and she had the great idea to use some of that sea glass in there so you can see that she's still used to size for it but these holes are large enough that you could use a larger size Griffin silk but she wanted to still use that four millimeter check last fire-polished so that is their and that's just kind of a really cool thing but I do want to point out that sometimes you might need a thinner one especially if you're working with two whole beads where you're kind of getting those cords through there but they just you know especially on this one you can really see that is a design you know the color like the blue brings the orange together and that kind of thing there so that's really a fun thing you could really play off the two hobbies I think you can use a lot of beads you might have you been wanting to do something with this is a great option now let's say you just want to get going with the rapids and you want to take some of the work out of picking your beads or maybe you want to give us a gift so we've created some exclusive beadaholique and so these actually aren't just being released today though these are brand-new and so the designers have gone ahead and we've picked the color combos we've picked the proper Griffin silk so it'll really get you started these are gemstones with a leather and you can see you can make a double wrap I just want to show you some of the different color combos because I know sometimes it can be a little overwhelming to pick out color combos and make that cord match and all and so we've done that for you I remember the guesswork is taken out honestly it's funny every time I look at this group of kids I have a new favorite color I know me too like I really liked the orange but now I'm like oh god that turquoise and white is just so pretty yeah I'm lovely so yeah so we've got this and then a little while back we did release these ones which are a little different take on it and these actually have a cotton cord outside and we're using really pretty Czech glass beads that sparkle it's got that nice metallic Center so you can see these so a couple different options for you if you want to just be like you know I just want to get going I just want to get started so you can get pick up on these kits and if you already have the loom you can buy a refill kit so if you're not familiar with how our kits work usually if there's a kit that has a tool involved such as the loom quemo disk anything like that we have the full kit which means you'll get everything you need you're gonna get the beads you're going to get usually the needles you're gonna get the loom whatever the main tool might be but once you've already purchased that if you just want to make more of the color variations or sometimes would come up with a whole new series of like loom kits or in this case we have another series of rapid kits yeah you can just buy the refill and that's what like this thing here in this giveaway is where you're getting all the supplies for the project - the tools so that's really a nice option - if you want to make a bunch of these for gifts or just for yourself whatever it may be yeah and just to call out a giveaway again if you're just joining us we always do a giveaway line while we're doing the class and you're gonna get one of those pink wrap it looms and this is gonna be the leather double wrapped version you're gonna get that refill kit and you're gonna get the beautiful blue and gold version and then we're gonna give you just to kind of start you off some coordinated colors of Griffin silk some Czech glass beads we're gonna give you some Toho seed beads as well as some beautiful leather cord and some buttons to just kind of play with it and have fun so you're gonna get a lot to get certainty yes okay so I know we've done a lot of talking here there's a lot to cover we did have some questions and for sure before this class is over Kat is gonna show us how to finish on your wrap it so you'll be able to have seen the start the actual beading and the finishing so they were set to go but we do have some questions and rachel is going to be asking them for us on your behalf since we don't have a screen in front of us repeat the questions you guys yeah absolutely oh that's a really good question so um Terri had asked how do you make the wrap pieces with designs on them so I think there's a couple different ways of going about it some people actually like to do I know I love doing colored pencils and graph paper that's a really simple way of doing it you figure out how wide you want it to be and the graph paper has little squares already set to go for you this is a great example so you can actually use colored pencils and just fill in where you want the the dots to be some of it is just playing trial and error earlier and then I dunno there are some software programs out yeah that can do loom patterns for you so you can go ahead and look that up and see if there's some software available yeah and it's the same if you did try to look at something that is for like a beaded loom more than traditional style it it's the same format as this where you're gonna get those nice neat little rows right across so if you can find some loom yeah software this is exactly the same pattern that you need to set up for that and that's why I actually graph paper is really good as well because it's nice straight lines it's not like peyote where it's staggered so if you do want to do some graph paper and colored pencils that's a really good option to yeah that'll help kind of just just put what's in your head onto the paper to see if it's gonna work and there have been many pieces that I've taken apart and I think with something like this I mean this is definitely like a pattern where you have a design but if you're talking about a pattern like this this was playing this is experimenting and we do have these on as projects on our website and you can go and look and see how to do them and most of these are videos as well so a lot of this type of pattern is really just playing seeing how the beads fit together how they look and doing a lot of experimenting yeah I think I really enjoyed working with the two whole beads just especially with these beads here these are tangos and they just kind of just sort of fit together and I just wanted to do that little Arrowhead pattern so honestly I kind of arranged them on my work surface to kind of figure out how I wanted them to lay it yeah together so I mean that would be a little more difficult if they were seed beads but first time I put two whole beads you can kind of see how they're gonna notch together for you and just kind of okay I know we have another question I'll string you right and left no it's it's complete preference in fact if you wanted to you could string on your beads slide them all the way down and then take your other needle and then slide it all the way out you can put it on the needle and crisscross it it's but they're your keep you just keep kind of going like this back and forth so lefties righties it's all the same yeah it's not like a knotting technique where I know when you're doing a lot of nodding it does matter like left or right first for to get spiral pattern or something like that but with this it really is just anchoring those beads in place and you'll see that you get these really nice uniform wraps regardless of which direction you go first yeah and another question I would say Griffin silk size four yes she's asking what is the best already okay what is the best size for size 8 seed beads so what I'm using here is these are a taught seed beads here and I'm using a size 4 so yeah we do like size 4 you know it's because it's kind of the middle of the road it's enough to show up without being too flimsy and it's just I think it fits the majority of beads don't hold me to that but yeah so I would say size forward for that because I've worked with it it works that's a lot of color options yeah they're not that we have the most color options in the size 4 and then followed by the size 2 and 6 so it's kind of on either side there but they're they're very very close it's not like there's an inch you know in between they're just what is it a tenth of a meter yeah so they're very very close I wanted to actually quickly pull up some more of the designs that we haven't shown yet and again these are by Rachel she's just she's the one who's giving us these questions and looking at all your questions and she is such a wonderful designer and she's really like these Rapids are amazing that she's been doing she's the little delicas it's just we were been talking this look so boutique e it does it looks it looks expensive it looks really done and then here you see bugle beads and then some other beads here and different buttons to choose and so a lot of really fun options that you can do you can do button like this here or I kind of like these new tiny tierracast buttons they are just sort of nice and neat and I'm just gonna pull one of these off of here actually and this is a triple Rab one and the way you do that is you just sort of put three tracks together so just kind of nice and easy but you can get that triple wrap and again we were showing the delica one and this is four wraps that you can do as well and then speaking of I know we're so excited we both thought of as a time I mean following us on Facebook live our designer Rachel we're just oh it's so gorgeous this is a belt that she made using the rapid limb so it's not like eyes and this uses some of the gorgeous Czech glass materials and they're try cuts so they had those beautiful facets to them I just love this piece and I want to show you especially the start and the end point to this because it's the exact same technique as the bracelets so she didn't change anything except for the length and the width but the technique was the same the starting was the same the ending was the same she just had this great idea and it was great she put it on and it looked fantastic so it was really a very wearable piece and it's quite sturdy this these beads are on here they're not going to fall off you can definitely wear it and enjoy it so that's a great option I think we were also talking be fun to do a choker with those yeah I think we haven't done before and chokers are very trendy right now yeah just the fact that you can make it so delicate I mean because just look at how wide that is and it works for a belt but then you can also see how thin something can be and how delicate and tiny cuz imagine if you just did that with just one row of the delicas it would just be so teeny tiny and delicate yeah and I love that so it's something for everybody alright so how does you gonna finish off I want to show you how to finish off and this is kind of a different thing so kind of going back to the different beads that we were talking about here I'm actually gonna just move these out of the way for a minute so I've actually been using the spike crystal s and they look like this I'll just kind of show you the cross-section there in my hand so they have these little shanks on the but there are little like crystal at buttons and I've been using the spikes so just as a quick note for the majority of the pieces that you're probably going to do on this they're not gonna have a front and a back but this one I wanted to have a front and a back so as you're working because those knots are gonna be on top this is gonna serve as my back so I kind of created this little spiked look and it's very cool it's very dragon dragon like so I'm going to show you how to finish it so what I've done here is I've gotten to the end and you can see that I have I'd say about a half an inch there now what I've done overnight and you can do this leave this for a few hours is what you're going to want to do is just sort of kick that tension back and let it relax and hang out because what's gonna happen is that leather has been tensioned and stretched so you want to let it relax because you at this point had the option to add another row or you can start tapering now I think for mine I'm ready to add I think one more row so like I said I've let it relax so now when I'm ready to continue I'm just gonna kick that tension back so it's nice and taut I have my wraps going already so I'm gonna add one more row here of my two seed beads and then I think I'm gonna start tapering here so yeah so one more row now this taper might take a little bit longer like for example if you're making something similar to the belts the taper is a few rows so it might not be as simple as what I'm gonna show you here but it is the same technique alright so I think I'm actually good with that you can see I have some bubbling up there so I'm just gonna kind of run my fingers along the side just to scoot some of those things down there we go now I'm sure some of you might have some questions about the tension and the tension on the sides is you don't want to yank it too hard because you're gonna end up with ripples that you might not want there if you're going for a scallop to look that's one thing but what I'm gonna do here is I'm gonna just take my needle and it kind of gets tight in there so this is where you're gonna want to just go slowly use your needle alright and now for the last one here I'm just gonna add one more tiny sea bead now I have a little bit of your room in there but I'm happier with a little extra room than trying to shove extra beads in there because you don't want it to kind of bubble for you all right so just crisscross and there we go and now I have plenty of room to do my nice little knot so what I'm gonna do is again just take my needle and wrap it around now I'm gonna take these two cord ends here and I'm gonna tie a quick overhand knot and what's nice about the black-on-black because it does kind of disappear in there so you're not kind of having to worry about a lot of little knots and I have enough room here I'm actually going to repeat that process now you have an option you can do a double knot right where I just had one there and just tie it off and be done with it but I have a little extra space that I'm gonna film so I'm gonna take my needle and now I'm gonna tie a double knot first not and you can just see that they're kind of nice and hidden especially when it's that black on black there so if you're using the same color leather or cotton cord you can do that as well alright so that is my double knot so now you have two options with glue actually you have many options but I recommend the GS hypo cement or using the e6000 so for today I'm going to use the e6000 and the only tool that you're going to need to applicate this is just a toothpick or just a little scrap of wire we often use that around here because we often have tiny little scraps of wire everywhere so I'm going to just place it onto my Griffin silk card or onto a post-it note or any other surface that you have you don't need a lot of glue you can see I just had a little dab there and I'm never gonna use that much so I just get a little bit on to my toothpick there and I'm just gonna dab it into that knot and just kind of work it onto that silk now this silk is going to kind of absorb that glue so you don't need a whole heck of a lot actually I'm just gonna kind of move that glue around there so I'm gonna let that sit but on the other side if you had that let me actually bring it back this is my pro Thank You Julie and on this side here you have that extra knot up at the top so when you're finished on the other side you can just go ahead and add that dab of glue there before you trim off the ends this does dry fairly quickly but I do recommend waiting at least 24 hours just to let it really solidify before putting anywhere on it you can also just kind of leave it on there like that before clipping the ends but I am going to move back to my original piece here for just a second and I'm gonna cheat and I'm gonna trim my ends up now just because I want to show you how it's alright and then to take it off you just kick it back and this has a nice little teeth that you can just kind of open that up and I'm just gonna slide that out to the side and at this point you can decide if you want to do one of those extra knots I have a little extra on my cord here but I think I am just going to clip it because I sized it earlier and that's it and then you are all done so that is a completed rapid piece and it just kind of you know what I didn't think I was gonna like it have you ever started a piece and you're like I don't know if I'm gonna like that I really like it and I like the green like it says very dragon like with the spikes in the green yeah well I dunno we have another question so Rachel's gonna go ahead and let us know what that is okay patty has asked if you can use large hole beads on the rabbit loom so I think the answer is yes we were actually just discussing this in the design space what I would recommend and we do have to test this and we will do a video on it cuz it is on our to-do list I think you're gonna want to somehow make those large holes smaller and that's a little weird sounding but you're gonna want to do that by probably putting a bead on either side of it that would go a little bit into the large hole and then have a small hole coming out the other side so almost like you have a four millimeter or a five millimeter sandwiching that large hole bead because if you're just putting the cord the wrap line through the large hole you might have a little bit of unevenness and wiggling as we're kind of a little bit concerned about we will test it out and if you can do it straight we will definitely let you know but kind of our thought was maybe you need like a little bead cap or a little in sir or just a little something to make it so that your rap lines are even on the outside especially if you're going to be using a contrast color for your rap line where you're gonna see it perhaps if you're using like a black on black it might not be as noticeable right but yeah it's on our to-do list and it was just yesterday talking about it yesterday and especially as Julie was talking about some of those really crystallized beads you know we're just like oh so many people have at least one of those beads or you know you can have several I know yeah moms tend to have birthstone colors and I think that's great so we want to definitely show you guys that technique so yes and we will do a video yeah cuz that'll be a great video actually yeah that'll be a really fun video and we have another question they are the one that I started I assume you're talking about here let me bring it back yes these are Czech glass doughnut beads and like I was saying these are actually a new color that is launching at beautifully calm today so you can see that under our new products and here I have a pile of them so you can kind of see these little guys yeah we have some more that we can show you that was done in this toilet and Juliet Julie made this bracelet she actually did this in a video so if you guys are looking for that too but these are just the Czech glass donut run dolls and we do have different sizes of these with it once they actually are quite large so they could look really fun on the rapidly especially if you maybe graduated them so yeah unless of the lots of different sizes in the same color it'd be a cool graduation so yeah so those are check last donut rondelle's so I think if you haven't already left a comment and you're watching please leave a comment it'll enter you in a chance to win our giveaway and we are just about ready to pick a winner so leave a comment right now and still be included in it and then we're gonna ask Rachel to go ahead and select a winner and this random completely random so we do a random number generator so we don't actually have any say in who wins and that's part of the fun of it - yeah and if you happen to be watching this not live after the fact please still leave your comments below I'll be answering them throughout the coming weeks and stuff or if you have a suggestion for a video that you want to see this is your opportunity to reach us to be like hey how do I do that absolutely so this is that's great so like I said even if you're not watching live be sure to leave your comments below and we'll be here to answer them yes and we love video ideas too we are always doing videos and like that wonderful large-hole video idea please leave us video ideas if you haven't checked out our YouTube channel please go check it out we have hundreds and hundreds I almost feel like I can say thousands at this point of beating videos and if you subscribe that's great you'll get notifications when there's more so please do go over to our YouTube channel and give us ideas because we are always looking for it and we have a winner and Deborah Deborah Thatcher not sure so Deborah what you're gonna do is you're gonna send us a message and let us know where you can send your giveaway so congratulations thank you so much yeah so well this has been fun definitely still leave us questions and comments we will answer them and ideas and we hope to see you again for our next Facebook live class which will be in September so we do want every month every month we do one and then we also do be table wednesdays on everybody where we just show you what we're working on and then we have to do a facebook live on friday with cat showing you what's new at beat Halik so today what's new is our rapid loom kits with the leather and our doughnut rundown so we kind of showed that to you here so we'll be doing not another video that kind of covered it so but thank you so much for tuning in guys and as always happy beading have a wonderful weekend bye bye you

Customer Reviews

Based on 1 review Write a review

You recently viewed

Clear recently viewed