How to Make the Oceana Bracelet

SKU VID-1681
Designer: Kat Silvia
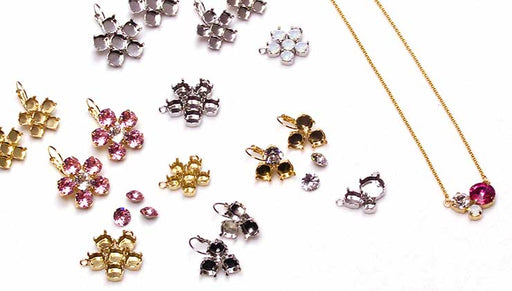
In this video you will see how you can create a simple sea inspired charm bracelet using TierraCast components from their Oceans collection, Austrian crystals, and Vintaj Patina for a pop of color.

The brand name for the crystals shown in this video is no longer available. High quality Austrian crystals are now available under the PRESTIGE™ Crystal Components line.

Audio Transcript
Note: This audio transcript is auto-generated and may not be completely accurate.
Hi, this is Kat with beadaholique.com their ocean collection so as you see we have some beautiful little starfish a mermaid a little turtle and then what's really great is it actually comes with these little clasps as well which have that same kind of rope nautical design and I just wanted to bring out the silver version up here so you can see that we do offer it in that beautiful antique to silver so for today I'm going to show you how to add a little of the vintage patina to chain and I'm going to add a little bit of that to my charms here just so that it gives it kind of a found treasure kind of look so to do that we're going to be using the vintage patina and today I'm gonna use the verdict rate we do have other colors for you to utilize as well so to do that we're just going to be using a little paintbrush and the other things that we're gonna need to sort of put this together we're gonna need some eye pins excuse me we're going to need some head pins here and I'm also gonna be using some jump rings and then if you look over here we have some beautiful Swarovski crystals in the white opal I thought that would be very very nautical so again basic tools that we're going to need we have a couple pairs of chain nose pliers I have a round nose plier and I have a pair of flush cutters as well so the first thing that we're gonna do is we are going to use the patina on the chain so here's how that's gonna work so let's go ahead and I have a little sticky note here so this is easy to kind of use and it's easy cleanup so go ahead and take a little bit of the patina and get it on to your little sticky pad there and then I'm gonna place this onto my little paper towel here you kind of open that up there we go onto my little paper towel so I'm you know covering my work surface take a little bit of that patina and here's what I'm gonna do I'm just gonna kind of go along the length of the chain and just sort of dab just let it get all in there just a little bit of dabbing all the way across and back through just so that it kind of gets all inside there and then what I'm gonna do is take that paper towel and just run it through just to clean off any excess all right so we got a little bit of color on there so I'm gonna kind of flip it around I want to add a little more color to what kind of starts to appear like the backside here so just a little bit more of that color on to that chain and I have a little rope design in it so you want to kind of get that patina into those little grooves there all right there we go a lot more color happening I have the same thing just kind of run it through that paper towel alright so you can see that chain just really transform there so I think I'm gonna do kind of one more little pass here just adding a little more color this is great for you to build up the color that you want without adding too much you can kind of again and you can see that we just sort of wipe it off I'm gonna kind of flip that around there get a little bit more on the edges there we go making sure my chain is nice and coated and then again I'm just running it through alright so I'm happy with that so what I'm gonna do is I'm gonna move that paper towel to the side and I'm gonna bring in another one and I'm just gonna let that dry up there so it's out of the way okay so the next thing we're gonna do is we're gonna do a similar thing with our patina with each of our little charms here so I'm gonna kind of hold the little loop at the top take some of that patina and just dab it onto my little starfish there and then just quickly kind of DAB it away now I'm gonna do both sides of mine you can do one sided if you want I'm gonna kind of do both sides so as the charm bracelet wears it can kind of flip around and you see all that beautiful color alright so just a little touch so I'm gonna add that over to the chain so let's go ahead and repeat that with our mermaid here and you know I think I need a little bit more patina onto my sticky pad here there we go all right and you don't mean much just enough to kind of get into those little crevices there to make that little design on the charm pop and patina dries quickly so you want to move quickly there we go and flipping that over I'm just kind of dabbing it and you can really see it get into the grooves especially on the back there with the with the mermaid hair I'm gonna try to get up a little a little higher there on the top there here we go all right so our mermaid is done a little more in the tail right now romaine is done so I'm gonna set that one aside and I'm gonna keep doing this for my little turtle here and for the other starfish same process really wanting to get that patina in there so you can kind of wipe it off and dab it off all right let's back over there and see if I didn't want to add any more you can use gloves for this you don't have to if you don't want to it's entirely up to you all right there we go so that guy side and last but not least we're just gonna do our little star charm here flipping it over and the patina does Drive pretty quickly you can work with it almost immediately I'm just setting these aside just to dry for a little bit all right and just to bring in just a little bit more of that green I'm gonna do it just in the little rope sections here and I'm actually gonna separate my little clasp so just kind of going around the rope just like so and then I'm gonna kind of twist it in that paper towel there we go just kind of bring in that extra little style there very attracted all right it's the last last one here all right there we go so so everything is all set to go so the last kind of component that we're gonna put together here and let me just put my paintbrush aside there we go so the last little component is I have five of these Swarovski crystal opal color round beads and these are six millimeters I think it's a nice scale so what we're gonna do is we're just gonna take an eyepin string on one of those beads there we go take our round nose pliers and we're just gonna kind of bend that backwards and bend it up and over to create just a simple wire loop bring that across and come in with our flush cutters and we have one loop alright so go ahead and finish those next four and then I'm going to show you how we're going to construct and put together this entire bracelet nice and easy alright so we have everything all set up and ready to go so you can kind of see that I've set up my pattern I'm alternating the charms with the crystals so this Center crystal is going to sit in the center of my bracelet so I have six inches of chain here so here's what we're gonna do I'm going to sort of pick one of these up and then I'm gonna bring the other side in there so that I can see where exactly that center link is there we go so I got it so now I set that down very carefully there we go so there's my Center link so here's what you want to do first you want to anchor your Center bead so I'm just gonna open that eye pin like a little jump ring slip that on and close that up alright now let's set this aside here so when you're creating a charm like bracelet you want to make sure that you stay on the same link and that's gonna mean every other link and you're going to want to stay on the same side unless you're really like embellishing it 360 but so you can see that that kind of sits on that row right there so here's what I'm gonna do I'm going to work my way out to one side and just repeat on the other side so I'm gonna go over and I'm going to count the links as so here's the first one I'm gonna skip that one there and I'm gonna add it to this link here so I'm going to open a jump ring slip on my little mermaid charm and we're gonna go one and then two right here I'm gonna add that all right and back out make sure everything is where it should be they were on the same side you can kind of check by making sure everything is dangling downwards all right so same thing so skip one and go into the next one there and we're just gonna open up our little eye pin and again making sure that we're going on the right side of it slip that on close that up alright so next we have a charm so we're gonna need a jump ring here okay let's go to slip on our starfish charm so we have the one that we're skipping and then the one that we're going through right there alright and we have an eye pin here so let's double check make sure everybody's on the right side alright so we're skipping one and then we're going into that next one right there all right perfect all right I'm gonna go ahead and separate my clasp there and onto the end just take my magnetic clasp slip it on to the chain and we're gonna close at it all right so I'm gonna continue and I'm gonna add the other four here just in the very same manner going back the other way and then I will show you what it looks like when it is all completed so there you have the Oceania bracelet featuring some vintage patina on tier caste oceans collection I hope you enjoyed this video you can see more videos and even more tutorials by heading over to beadaholique.com

You recently viewed

Clear recently viewed