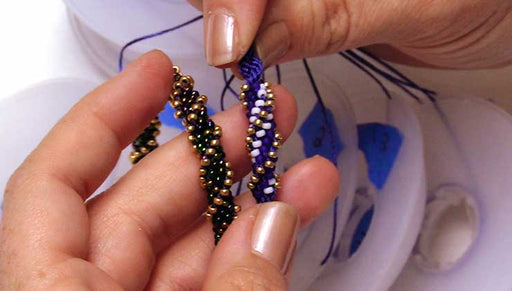
How To Make a 24 Warp Kumihimo Round Braid

SKU VID-1614
Designer: Kat Silvia
A 24 warp Kumihimo round braid can be achieved by using the Double Density 64 Slot Kumihimo Disc. If you like Kumihimo and want to take it to the next level, give this a try to achieve fun colorful patterns with S-Lon cord.
FEATURED IN THIS VIDEO
Audio Transcript
Note: This audio transcript is auto-generated and may not be completely accurate.
Hi, this is Kat with beadaholique.com hemo round braid using the beadsmith 64 slot double density a kumihimo disk now that 64 slot disc is what I have here and you can see that the numbers go all the way from 1 all the way around to 64 so typically you're gonna get a 2 kumihimo disk that goes to 32 so this is more of your typical disc that I have here for you so this is probably something that you're more familiar with now also when it says double density I'm gonna take these and show you the side so this one is a little bit more dense and that'll help grip some of those cords a little bit more for you and this is the sort of original one now we do have the original 32 in the double density so you can see that here as well so those are two options that you have we also have the mini kumihimo disk now this is small and what I love about this is is great for travel it's very lightweight but that opening is going to be a little bit smaller so if you're doing something with some big beads this might not work for you you might want to go to the double density and then we also have our square kumihimo plates here as well and we do have videos showing you how to do these so we have the mini version and the full version here but they have as you can see the same number of slots it's just you know maybe one's a little bit better for travel or for a smaller piece and one you're gonna want to use for a larger piece alright so for today we are going to be using the 64 slot double density disc and the reason is is you can do a lot more with this so we're going to actually get a chance to do a 24 warp now with the other ones you can do 8 12 16 but this one's really going to allow us to do something really kind of cool so this is actually the finished piece that we're gonna be making in this video here and I've come up with this really cool little rainbow pattern so it's a nice little sort of stepped down rainbow pattern I'm gonna show you exactly where to place your cords so that you can do that but in order to achieve that we're going to be using six different colors of our s LAN cord and this is a size 18 so this is what we're going to do so I have a nice little sort of rainbow effect with the cord and then the other tools that you're going to need is you're gonna need some bobbins now because we are doing 24 warps we are going to need 24 bobbins so this is quite a bit of bobbins but it is worth it to keep all of your cords from getting tangled so we have those at the ready and then to complete our piece here we're gonna need a kumihimo Gator weight I have some snips here we have some glue I have my chain nose and my bent chain nose plier I also have a ruler that's gonna help us measure out all that cord and then when you've decided what you want your cord to excuse me what you want your bracelet to look like I have some finishing techniques here so we have a magnetic clasp and then I have some end caps with a toggle and I'm gonna show you how to use that version in this video but using the other version is just as good it just depends on what you want to do all right so if you have everything ready to go we're gonna go ahead and get started with our 24 wrap Brady alright so first let's bring out our ruler here and the first thing we're gonna do is cut all of our cords now you're gonna want for each color we're gonna do six feet two three four five and six alright so six feet and I'm gonna cut and then I want another six feet of the same color so you're actually doing 12 what we want to have a nice little cut between each one so you're gonna do this for all of your cords now if you are unsure of the length that you would like for your bracelet I recommend maybe going up to eight feet just give yourself a little extra cord you know you're seeing actually when I'm taking it off the spool here you're not using a whole lot but this will give you the opportunity to have extra pieces or a little bit of extra length if you're not sure because unfortunately with kumihimo there's not really an easy way to add extra cord once you've started you kind of have to just end your braid and that can be really really tough once you've done all this hardware alright so I'm gonna continue to cut to six-foot strands of each of my cords and I'll be back here to show you what we have in just a moment alright so I have one end in this hand and one end than the other so we're just going to combine those and then what we want to do is we just want to find the midpoint of our cords here so now I can really set from my other hand and what we're gonna do is just take this big loop down here and just tie a big overhand knot and just gonna slide all those cords through and just make a big loop here at the bottom so just get a nice big knot there this is where we're gonna attach our weight so this is going to be the start of our braid so give it a nice good tug we want to make sure that is nice and secure the next part we're going to do is attach our Gator weight to our loop here and we're gonna let that kind of hang down into the center ok so now we have all of our cords here so I'm going to go through where each cord lays to get that specific pattern so the first thing that we're gonna do and I'm just going to kind of work clockwise here is I'm gonna pull a blue cord up to the left side of the 64 and then I'm gonna kind of fish in here and find a purple cord and put it on the right side of the 64 alright so I can kind of get those out of the way there and now we're going to move to the 5 so I'm gonna pull up one red cord here and be careful sometimes your colors can look very similar with the red and the orange but once you have it set up you shouldn't have to worry about it anymore alright so the red is gonna go to the left of the 5 and then I'm gonna come in here and get another purple and I'm just trying to make sure that nothing gets too tangled right from the beginning here alright and that purple is gonna go on the right side of the 5 so this is what we have so far we have blue purple red purple alright now we're going to move to the 10 and on the 10 we're going to take one orange cord to the left and one red cord to the right and that is our 10 okay just kind of I just kind of keep putting these behind me there so they don't get in the way there we go okay so now to the 16 we're gonna take one yellow cord and again just trying to kind of fish through here so we don't get it too tangled so we have a yellow cord and then I have an orange cord on my 16 all right I'm just gonna kind of move this around here and to our 21 I need to fish out a green cord and a yellow cord and you can see that it's things are getting a little tangled in there so I'm just gonna kind of come in and remove some of these cords from the center there we go and don't worry I will go over all of this once I get to the end just to make sure that you guys are in the right position so in case you're kind of seeing this all happen very crazily don't worry I will go over it okay so now I need a blue cord and this time we're working with the 27 so blue cord and then a green cord alright and now we're down here at the bottom dot here so I need a blue cord and a purple cord yeah and moving right along I need a red cord and this is now we're working on the 38 so I need a red cord and a purple cord go again I'm just kind of trying to get them out of the way now you can see the the reason for the bobbins because otherwise this would be very hard to do alright so now we're going to move to the 44 and I'm going to take an orange cord here and on the other side is my red cord and now moving to the 48 which is going to be our dot here I'm gonna take all right I'm gonna take a yellow cord yellow cord are on the 48 and my other orange cord here and then we move to the 54 and what we're gonna do is we're gonna do a green cord and a yellow cord and then to our 59 which is our last two cords here we're gonna do the blue cord and the green cord alright so I'm just gonna let you see this for just a moment here and I'm going to go around clockwise just kind of so between the 63 and the 64 we have the blue and then we have a purple and then around the five we have the red and the purple around the 10 we have the orange and the red around the 16 we have the yellow and the orange around the 21 we have the green and the yellow around the 27 we have the blue and the green around the 32 we have the blue and the purple around the 38 we have the red and the purple around the 44 we have the orange and the red around the 48 we have the yellow and the orange and around the 54 we have the green and the yellow and finally the 59 we have the blue and the green so this is your starting position to get this sort of pattern with it all right okay so now the next task is let's take care of all of these little cords that we have because this is going to be a big old tangled mess if we just leave them as is so I'm gonna kind of go to the back here take one of my cords and these are a little flexible bobbins they kind of come open you just pop them out so then you just take our cord and we're just gonna wrap it in there and wrap it up until you have maybe about six inches or so and that is one bobbin so go ahead and do that with the rest of the 24 and then we are going to start our braid okay so if your disc looks like this with all of your bobbins underneath you are ready to begin so I'm gonna hold this out in front of me and we you always want to start with the warps that are facing you and again this is just like regular kumihimo so we're always going to work in twos so go ahead and release the purple cord that is between the 32 and 33 and we're gonna move it up and over and it's gonna come straight up to right between the 62 and 63 so we're gonna pull that one down and then we're gonna take the cord that is between the 64 and the one and go ahead and release that and we're gonna bring it down so that it is next to the one that we released before so now we are at the 30 and the thirty-one so go ahead and slide that into the knotch and then normally we rotate 90 degrees but we're only going to rotate to the next portion here so we're going to rotate counterclockwise so I'm going to rotate so that that 38 is now facing me so now the 38 is going to play we're going to do the same thing it's going to play with the one that is around the five so bringing in that 38 and 39 up to the three and the four and then taking the five and the six and bringing that down to the 36 and 37 and here we go again rotate so now the 44 is facing me so release the 44 and 45 bringing that up and over so that it is between the 8 and the 9 and then bringing the 10 and 11 making sure we're not there we go 10 and 11 down to the 42 and 43 rotate one more time now we should be at the dots of the 48 so we're going to release our 48 and 49 up and over to the 14 and the 15 and then the 16 and the 17 up and over to the 46 in 47 and again rotate so now the 54 is facing us so we have the 54 and 55 up and over to the 19 and the 20 and then the one that is between the 21 and 22 up and over down to the 52 and 53 and rotate so now the 59 is facing us and the 59 and 60 comes up and over to the 25 and 26 and the 27 and 28 comes up and down to the 57 and 58 and again rotate so now that is one whole rotation and completion so we are just gonna continue that and the threads are gonna move all around the board but just as long as you are consistent with keeping it right with the path that it's across so if you ever get lost just remember that if you want to put it down you want to leave three up and one down so you know exactly which chord you were at if you leave them all basically like you know just in twos you're going to lose your spot and we don't want to do that because that will kind of mess up the pattern of the braid alright so I'm gonna continue to move a little bit faster just to show you and then we're going to show you how the braid starts to develop here and this is all it is so you just always start from the bottom and bring it up and over to the top and bring that down and just back and forth and this is really fun this is really really easy this is a great you know activity and you can do all kinds of fun different patterns now this is just one example of a pattern that you can do that I have here with my little rainbow but you can also make it a solid color you can create a beautiful rope like effect or you can kind of do two colors if you want you could just have so much fun experimenting with all kinds of different patterns alright so as you can see just up and over and down and back there we go and just focus on making sure that you're moving it to the right one if you do get lost you can always sort of reverse which can be tough but just make sure that when you're releasing you're not bringing it to one or to another it should always be the one that is directly up and down on your board and this double-density really does help to kind of grab on to these s long cords they're really not slipping and as you need to just kind of release a little bit of your bobbins you can just give them a little tug and that'll release more cord for you alright so I'm gonna continue this and I'll be back to show you how our progress is in just a moment I'm just doing one more here all right I remember leave three up and one down and let's check our progress underneath here so we'll kind of get a little peak so that is how our braid is starting to turn out you can see there's a couple little bubbles there in the beginning and because of that let's say you wanted to do a seven inch braid I would recommend doing at least seven and a half maybe even eight you're gonna have enough cord just so that you can kind of tie off those little bubbles so what I'm gonna do is I'm gonna keep braiding and then I'm going to come back and show you how to tie everything we're gonna remove our bobbins and we're gonna finish our entire bracelet all right so keep on braiding and I will see you back here when we have our desired length so once you've braided your entire length that you want go ahead and remove all those bobbins and we do it just like we did before where you just kind of pop it out and just remove that cord so we can kind of set all those aside now go ahead and remove your kumihimo weight here at the bottom you can set that aside as well and what we're gonna do is we're just going to release all of these braids from the top just going all the way around just pulling them out and you can see it start to loosen there so I'm just kind of coming in with my finger just to kind of hold that together and this is a lot of cord so I just want to hold our braid as we release it from our disc now I'm just gonna pull that through and now we have our disc released and this is what we have left all right so go ahead and gather all those cords this is going to be similar to what we did in the beginning you're just gonna take and you're gonna do a big overhand knot this is also why I suggest you try to weave a little bit longer than you think you're going to need so let's say you wanted to do a seven inch length I would do maybe eight inches just to give yourself that little extra space because we're gonna be cutting off some of this so now all I'm doing is just working that knot down so that it stays somewhat close to that bottom there there we go all right so now what I'm gonna do is I'm just gonna take off a cord and I'm just going to clip off the blue one here you can clip off any any color and now what we're gonna do is we're gonna take it and we're gonna tie it around one end here just doing again that little overhand knot just like so and then bring it as close to the end of the braid as you can and then we're gonna give it a nice little tug because we really want to cinch up and make sure that that braid isn't going anywhere so give it a nice tug and then just to secure that we're gonna do one more little knot here and again nice tug there all right so as you can see we kind of have that little cord coming across the back there and that's gonna keep all those little ends together so now I'm gonna do one clip here just kind of clipping that off and I'm gonna do the same on the other side here just clipping that off so we have two little tails there all right and now go ahead and this is where you want to get your clasp and everything ready so let me kind of bring it over here so we're going to be using our East 6000 glue I have my toothpicks I have my little end caps here now you can use a magnetic clasp like I showed in the beginning here or you can do these little end caps and then we'll be able to do our toggle clasp with those so we're gonna use these guys for this for this purpose but feel free to do whichever you like this is about six millimeters around so that's give or take what the size you're looking for is all right so we're gonna come in here and just with my snips here I'm gonna actually kind of saw cuz this is a really thick braid but I want to keep it together and then we're gonna take our East 6000 I just like to put a little bit on just a scrap piece of paper here on your work surface whichever you've got there we go nice little blob of glue and we're gonna take this and add it into the well and just kind of squish it all around there we want to make sure that we get some nice glue down there at the bottom because this is what is going to be holding that all together don't worry if you have a couple little glue strings hanging out afterwards it's very easy to clean up and I'll show you that alright so now we want to take all of these cords and you gotta get them all in there and press down and just kind of give it a nice little twist there just to make sure they all fit down in there really nice and tight and there you go so you just remove that little glue all right and just hold it and then you just repeat this on the other side here so we're going to just do that really quick and then I'll be back to show you how to attach your toggle clasp all right so the last thing we're gonna do here is we're just gonna attach our toggle clasp and to do that we're going to use a couple of jump rings here so go ahead and take them in your chain nose pliers and I'm using a chain nose and abettin nose and we're just gonna give it a nice little gentle twist open add it to the loop of one side of the toggle clasp and then add it to the loop of one of our end caps come in with our pliers and close that up making sure we have a nice good closure and just repeating that on the other side there giving a nice little twist attaching it to our class and to the other loop here and go ahead and close that up and then we can attach our toggle to our loop there there we go and we're all set so that is how you do a 24 warp kumihimo round braid I hope you enjoyed this video you can get all the supplies that you've seen here by heading over to beadaholique.com

You recently viewed

Clear recently viewed