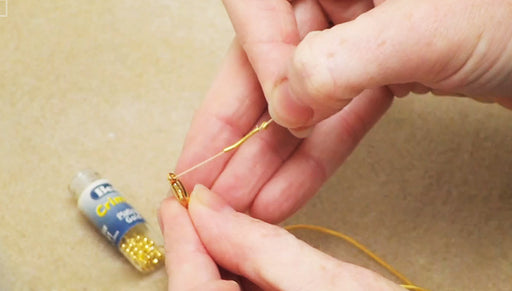
How to Use Thread and Wire Protectors

SKU VID-0289
Designer: Julie Bean
Learn how to incorporate thread and wire protectors into your beadwork for a finished, professional look. These findings will also create uniform loops at the ends of your strands and protect the actual thread and wire from wear caused by clasps, toggles, etc.
FEATURED IN THIS VIDEO
Audio Transcript
Note: This audio transcript is auto-generated and may not be completely accurate.
Hello. This is Julie from Beadaholique.com and today I want to use thread and wire protectors. In a previous video we explored french wire and this is a very similar item to that. Completely different piece of hardware finding but it has the same purpose of french wire. It's going to create a finished look for your piece and it's also going to protect wear and tear on your beading wire or thread. So what exactly is a thread and wire protector? Well they're these little guys right here. They come in a variety of sizes. I have some gold ones here but they also come in silver and copper, in all variety of finishes. If you look at them I'm going to show the larger one just so you get a little bit clearer picture of exactly what this is. You have two little almost barrels. This is going to be where your thread or wire goes through. It's horseshoe in shape. Then you have a groove right here and this is where your thread or wire is going to lay into when you string it. So let me show you how to do this. It's quite a simple process. So I have my bracelet here. It's already strong. I've got some bead stoppers on each end until I was ready to finish it. I have a crimp tube already strong on there. So now I'm going to take the smaller one of my thread and wire protector. I'm just going to thread the wire through that first barrel pull it through and now I'm going to thread it through the second barrel just like that. When I pull it down it is going to actually rest within that groove. You choose the size of your thread and wire protector based upon the size of your beading thread or beading wire and also the size of your clasp you're going to use. I'm going to use a little bit of a smaller clasp so I want to make sure that the protector was going to fit through my clasp. Let me show you how that looks. So once this is on you can pull it down towards the crimp bead. You just take your thread or your beading wire thread it into the loop of the clasp and then let the clasp go over the protector. You can see if you look real close you can see now that the clasp is not actually touching my beading wire at all. It's touching that protector and that's the purpose of it. It's prevent wear and tear. I'm going to thread my beading wire through the bead next to my crimp tube just like I would if I'm crimping without a protector. I'm going to pull it snug and I'm actually going to take my fingers now pinch the two ends of the protector together to form a nice loop and I'm going to crimp my bead. And there you have it. That is how you use a thread and wire protector. Go to Beadaholique.com for all of your beading supplies needs!

You recently viewed

Clear recently viewed