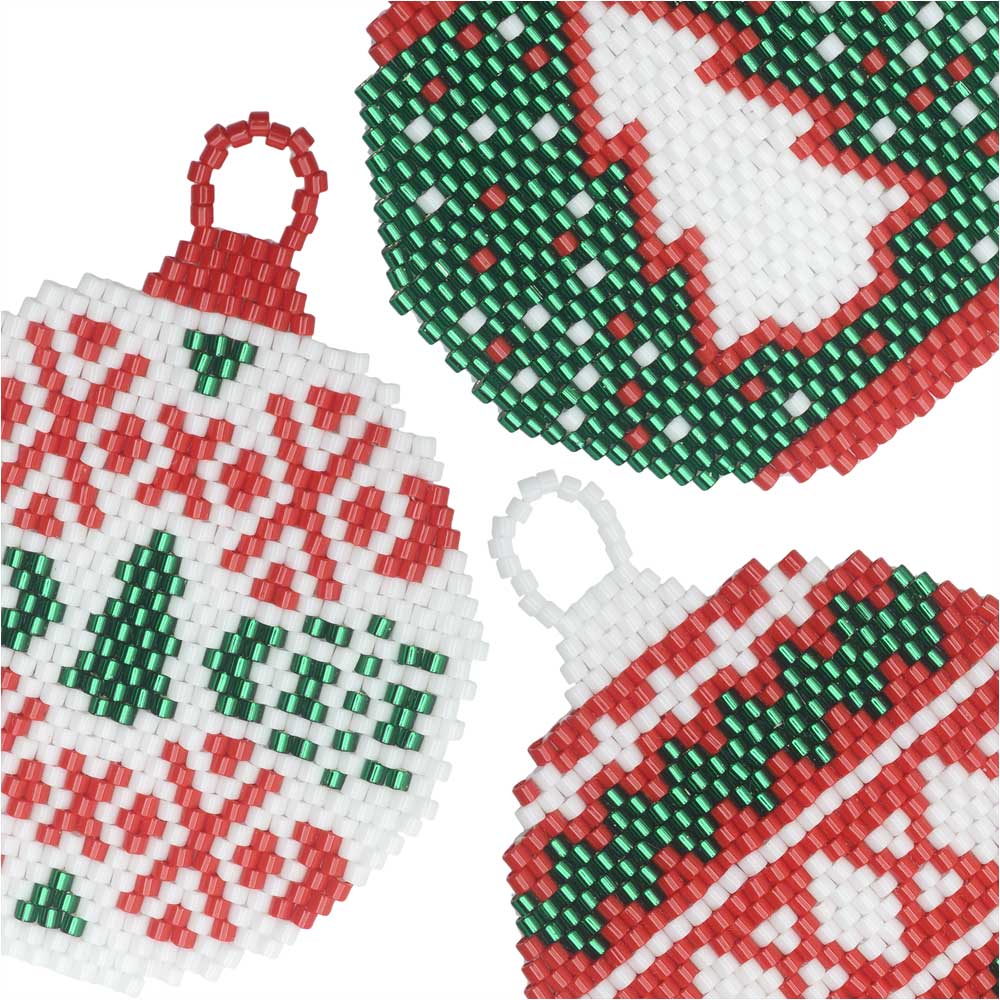
How to Bead Weave Brick Stitch Christmas Ornaments

SKU VID-1595
Designer: Kat Silvia
In this video you will learn the techniques needed to follow along with the pattern to make these brick stitch ornaments. You will see how to do increases and decreases with brick stitch as well as how to form a loop to hang your beautiful ornaments.
Audio Transcript
Note: This audio transcript is auto-generated and may not be completely accurate.
Hi, this is Kat with beadaholique.com and now of course we definitely encourage you to choose your own colors and choose your own patterns and really make these your own but I wanted to give you guys a little bit of a kick start with some different styles of patterns here so again here are the leftover beads I just want you guys to kind of see this these are the leftover beads for making all three so you're going to use the most of the white so just be aware of that as you're pouring them out we don't want you guys to lose beads because we want you to be able to make all three but of course if you wanted to make a nice set or change up the pattern go ahead and purchase additional seed beads now for these we are using the Miyuki 10 Oh delicate beads and I have a nice colorful mix here and this is just to utilize to show you guys how to do the pattern so I'm not going to be remaking one of these I'm going to show you the different techniques that you're going to need to create this nice round shape here and the little loop at the top alright so we're going to be using 4 pound fireline and for my demonstration I'm going to be using the smoke color but for these ones I did go ahead and use the crystal so I recommend you do that as well we don't want to see all that smoke through especially on that pretty white and then I'm going to be using a size twelve beading needle so I've already got some smoke fireline attached here I recommend you start with about six feet or as comfortable as you'd like to work with as we go through I have my little pattern here now this is my little brick stitch finished piece and this is the pattern so when you begin you're going to want to start in the middle row here so for us that is this row here so it's that Center row and that's that white bead there so what you can see is how the pattern is laid out is you're actually going to be going in and out and in and out and then decreasing all the way up to the top and then we're going to increase by 2 and then 1 and then 2 and then we're gonna increase by several so I'm going to show you how to do the increases and decreases and brix it has a natural decrease so I'll be showing you how to do that but then I'm gonna also show you how to step it up a little bit and then how to do that nice loop at the top which is not part of the pattern there but I'll show you that alright so again so you're gonna start here and let's go ahead and get our first row started now if you're familiar with brick stitch because this is a little bit more of an advanced technique to do a sort of pattern like this so go ahead and watch our video on how to do brick stitch also we do have a video on how to do increases and decreases but I am going to show you all of that right here alright so I have my colorful 1000 Miyuki Delica seed beads here so we're gonna start and we're gonna pick up two seed beads just like so and go ahead and bring them close to the edge there we're gonna leave a tail of about 8 inches or so we'll tie that off at the end and then we're gonna take our needle and we're gonna go back up through that green bead which is the first bead that I strung and we're gonna bring that together and they're gonna kind of sit just like so just next to each other there so what we're doing here is we're creating our row of ladder stitch so I'm gonna take my needle and go down through the orange bead back up and then let's go ahead and we're gonna pick up another seed bead and we're going around the loop and we're going back through that orange bead there and it's gonna sit right next to it just like so and now we're gonna go up through our blue bead and I'm just gonna adjust my tension here just making sure everyone's nice and tight there we go and we're just gonna keep adding seed beads here now as you're following the pattern you're adding 28 across that is the center row here so I'm not going to do a full 28 I'm gonna do a little bit less but you'll still get to see what that looks like there alright and we're just going around and up through we'll add a few more here and you're always going around to create that little loop and the nice thing about using miyuki delicas and you can do this with a 1000 or with an 11 out is that they sit like little bricks because they have the nice little edge to them they're almost like little cylinders alright so as you can see we're just continuing to build up our ladder stitch this is always going to be the base for your brick stitch and I want to build up a nice little pattern here so I can really show you guys how this works this is so fun and the great thing is is that once you've gotten a pattern you can print it out and then you can make your own just decide what you want to do it's so fun and these actually make really wonderful gift toppers as well you can brick stitch an initial into the pattern there that's always really fun for a little gift giver alright so I'm going to do just a few more here alright I think that should be good let me just double check here because I want to make sure that I'm doing an even number 1 2 3 4 5 6 9 circuit I need one more alright and let's go ahead and add a light blue there alright i miscounted alright well now we'll add 12 there we go so now we're working with a little bit less than half of what yours would look like alright so let's just take a look at what we have so far so this is our row of ladder stitch now yours will be longer but this is our row of ladder stitch if I have my tail coming out of this green bead down here and the tail coming out of this red bead here now what we're gonna do is I'm going to just flip my work over so that I have my tail coming out the top there and so the first thing that we're going to do and let me just bring my pattern back in here the first thing we want to do is we're going to be adding two beads and we want it to increase so you can see that this is the last bead there and we want it to increase so what we're going to do is we are going to pick up two beads so I'm going to pick up a dark blue and a yellow bead here so we're going to go down through the first thread bridge there just catching that and then we're gonna go up through the blue bead and don't worry if yours is a little loose we'll kind of adjust it as we go and we're gonna go down through the yellow bead and in that step I'm also gonna catch that second thread bridge the one that is between that green and that light blue bead there we go and I'm gonna pull that through and then I'm gonna go back up through that yellow bead and now when we adjust you'll see that our beads sit just like so so we have that nice little increase there so now now that we have our ladder stitch we've done our first two of our brick stitch here's how to do brick stitch alright so I'm gonna pick up a little purple bead so now we're only gonna pick up a single bead and go down through catching that next thread bridge pull our bead through and go right up through the top there and now we just continue so picking up an orange bead here I'm gonna go down through the next thread bridge catching that and back up through the bead so now you continue this all the way across and as you work you can just see that I'm just kind of pulling the tension there just to make sure that everybody is nice and tight we want good tension on this all right so now let's just go ahead and I'm gonna quickly continue because I'm assuming that you've probably done brick stitch before but that's just a nice little review for you and you can get all the way across okay so now we're coming to our last bead so I'm gonna pick up one more bead and again same thing we're gonna go underneath that thread bridge and back up through our blue bead so you can see that brick stitch has its own natural decrease but what we need to do now is do an increase on our next row because we're gonna be going up to the next row so let me just pull out my pattern one more time so I can show you so we've done our increase or I'm sorry we've done our decrease now we need to do our increase there alright so let's go ahead and do that right now so what I'm gonna do is because I'm right-handed I'm gonna flip my work over so just keep in mind that your pattern you know just follow it very very closely and you'll be going back and forth just like so all right so now just as we did before we're gonna pick up two beads and now we're gonna go through that first thread bridge there there we go and we're just gonna go up through that second bead just like so so instead of going over a thread bridge we're just going to focus on that one right there and then you can see that I've done my increase and we're all set to continue down the line there so picking up your next bead going into the second thread bridge there and back up through and now just continue all the way to the other side and then I'll show you how to do that increase once we get to the other side there because that's the next step that you'll need to know all right so we're getting towards the end there and you can just see that again it wants to do its natural decrease so if I wanted to just leave it as a decrease this would be my last feed here but since I want it to match the other side and do an increase I need to add one more bead so again just follow along I'm gonna flip my work over so you can still see that I'm coming out that orange bead right there so now I want to pick up another bead and I'll pick up a yellow bead so you can see it so what we want to do is we want to go down through that blue bead that's there and pull down and then we're gonna go up through the second bead in that second row there and up through the third bead in our third row just like so so go ahead and push your needle all the way through and now go down through the next bead to the right and up through that bead we just strung that yellow B right there so now it looks like we're ready to just come out and do our next increase excuse me our next decrease so it looks like we're ready to come out and do our next decrease so we're gonna pick up two beads and I'll pick up different colors there there we go going down through that first thread bridge and back up and we're going to go through our green bead and now through our blue bead going through and catching that next thread bridge right there between the light blue and the orange bead going back up through our dark blue bead and now we have our natural decrease one more time all right so that's how you're going to jig jog up the side there and once you've reached the top point you'll just continue to do that decrease all the way to the top and if you ever get lost you can always go back and take out some beads just follow along with the pattern and you'll know when to increase and decrease all right so I'm going to get to the other side of this pattern here or this row and then I'm just going to show you guys how to jump up you can see that it gets a little bit faster once you have a little bit more to hold on to I know it's it's difficult on your first couple of rows there especially because I'm working with a much smaller piece but at least working with the ten OHS if you have not done brick stitch before this will give you a little bit of a nice advantage just so that you can work with some slightly larger beads the 11 o is tend to be really small and they work well with this design but just if you're unfamiliar with it try working with the tunnels you'll have a little bit more leeway and it'll be a little bit easier to see your work as you're going all right so we are coming to the end of our row here and I'm gonna add one more bead after I get this guy of course come on there we go alright let's add one more bead here I'll make it a bright colored one so you can see this is our yellow bead here alright so again you can see that it just does that natural decrease alright so I'm gonna flip that over and it always just makes sense for me to keep flipping it if you want to work in the reverse you're more than welcome to do that it's whatever you're comfortable with alright so I now have my thread coming out of my yellow bead just like so now let's say I want to and I'm at the point where and I'm gonna bring my pattern in one more time I'm at the point where I've worked all the way up the side here with those natural decreases but now you can see that there's no extra bead right here so what I want to do is I want to move my thread so that it's coming out the next bead there so what we're gonna do is we're gonna play a little game so we're going to go down through our orange bead but since that's the be it I need to be actually coming out of we're gonna go down through the purple bead that's just there up through my light blue bead and you can watch that thread just kind of tuck in there and disappear and then up through the orange bead and my thread is right where it needs to be now you can disregard this first thread bridge there so just let's pretend that we're just keep we just keep going so again you're gonna go through the next thread bridge come up go through your first bead there your red bead and then go down with your green through the thread bridge and this is just like a normal decrease then and then back up through the green bead but you'll noticed once we pull tight what we've avoided it is we have avoided adding the bead that should sit right there in that natural decrease but we've just moved the whole row over one and when you get to the other side the only thing you need to know is just when to stop so you won't go all the way to the edge you'll just do one less bead and that's how easy that is and that's the same method if you need to skip over one or two or even three rows so you just keep weaving your thread and if you just keep going down through the thread path that you've already committed to you should be just fine so if you get lost just make sure that you're just turning your thread around and you're coming back up through the right bead and you should be just fine alright so I know my my row is going to be a little bit larger but I do want to show you just how to do the last portion of this all right so remember what I said where you just needed to know where to stop so that's where I need to stop you can see that I could add another bead there but because I need to match it on the other side we need to leave that space open right okay so now I'm gonna flip it around one more time and once you get to the top there again let me just pull this out and I'm gonna show you on this one here just so you can see the red so you're gonna have four beads at the top there so once you have your four beads and you've tapered it down you're just gonna do a nice little loop there and I'm gonna show you how to turn around and go backwards so this actually is a loop of fourteen beads now you can make it larger or smaller but again I caution you you're gonna you know have only so many beads but if you want to make it smaller you don't have to do it at all you can always add in some other type of jump ring or a ribbon or however you want to attach it so that's why the pattern kind of stops here this is allowing you to make however you want to finish that loop alright so what we're gonna do is we're gonna pick up I'm not even gonna count I'm just gonna pick up a whole bunch of beads here but for the example there you're gonna want 14 but because my row isn't exactly 4 across as you'll see I just want to show you how to do this fairly quickly alright give or take we'll call that what it is alright so I've got my row of beads there and now you're just gonna loop it around and go down through that first bead and down through that second pede there and you can do that all in one fell swoop and then just come back up through that blue bead and we're gonna go back up through that red bead and then just follow your path all the way around to reconnect all of those beads together right over the top making sure you're hitting each one and because these lay like little bricks you just want to be careful how you are how tight you are with with how it's going cuz you want it to kind of sit sort of nicely alright so again once you down to this side go ahead and go down through and we're gonna do the same kind of little turnaround with those three beads there and you can go back up and do it one more time just to reinforce it and your thread should always disappear you should never have your thread going across a bead if you've done that you may have skipped over or skipped diagonally diagonally when you shouldn't have so just go back through and you can always just take your needle and kind of reverse your pattern just to get rid of that bead there alright so now let's say I finished and I've gone through three times so I feel that's a good reinforcement so now I'm just gonna take my needle and I'm gonna just go down and down and all the way down until you get back to exiting our first bead that we started with there so now you're ready to sort of take your pattern flip it over and work the same way to finish off the bottom so it's that easy so that's how that sort of techniques work with this and then when you're ready to tie off your thread I'll just show you that really fast when you get to the bottom I'll just go through a couple of beads here just again following that thread path let's go down through that orange bead and up through that blue bead there and then go ahead and catch that little thread bridge underneath and tie a little knot and go through it and pull all the way down and then just weave in your thread just like so and that little knot will disappear and then you can trim off your thread and then you can go back to the beginning and trim off your tail so overall that is how you do increases and decreases to get the sort of shape to look now you can do different types of shapes and I actually have another little example here so if you're curious on how to do this I'm gonna walk you through it really really fast so again you can see and this is the difference between an 11 oh and 10 oh so just so you can see the size difference side-by-side there all right so for this design one thing I want to point out to you is that you would also you could start in the middle you could also start from the bottom now that you know how to do increases and decreases but what you'll notice is that to get that flair out on the side so you can see that it naturally naturally decreases and you get to here well if you want to add two more what you're gonna do is you're just gonna do two loops of ladder stitch and then come back and finish your brick stitch and then when you get to the other side do two loops of ladder stitch and then you're ready to continue your decreases of brick stitch so that's how easy that is I know it looks a little bit more complicated but it's actually very very simple alright so that is how to do these wonderful brick stitch ornaments and this little brick stitch earring there as well I hope you enjoyed this video you can get all these supplies and all of the patterns by heading over to beadaholique.com

You recently viewed

Clear recently viewed