How to Make a Wrapit Loom Bracelet with SuperDuo Beads

SKU VID-1635
Designer: Kat Silvia
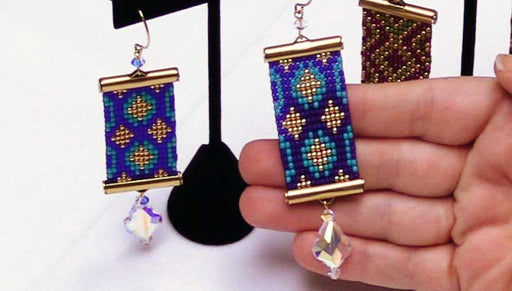
In this video you will learn how to use Czech Glass SuperDuos with a Wrapit Beading Loom. This fun design features these 2-hole beads to create a chevron scale like pattern. Once you've mastered the technique, it's easy to get creative with your own colors and patterns.
Audio Transcript
Note: This audio transcript is auto-generated and may not be completely accurate.
Hi, this is Kat with beadaholique.com i'm gonna show you this particular technique here today now this is a really simple Chevron striped pattern so you can do this pattern or feel free to make it your own so this is what we're gonna be doing here and I want to start by saying that I used a bead mix to create this and this is actually the leftover beads that I have so you can just see how many beads I use and that's just up here but when you're choosing your mix there's a couple of things you want to consider now I have a huge range here of our lovely mixes and what's great is you can choose a couple and mix and match so if you're not quite sure what colors you want to use go ahead and grab one there's this great mix here that has a lot of metallics to it so if you wanted to just pull the gold beads or the bronze beads out of there and then mix it with another one you have the opportunity to do that now some of these mixes do have some more clear beads so you'll be able to see that thread path going through so you can either swap those out or you can use those if that's part of your design you'll be able to kind of see just how that works if with you have when you have some of the different colors of beads here alright so those are the mixes now I did bring out another mix and the mix that I'm gonna be using here is the Jasper mix now this is the whole tube of beads right here and I've separated them out by color because I wanted to see how many I had of each color so that's another thing to note is when you have your mixes it's not always going to be completely even so for this one I have 6 different colors and what I wanted to do is I wanted to separate them you can see that I have some shiny some that are a little bit more of that pearl eyes some are kind of a little bit more of a matte finish so I wanted to separate those out so that I could choose my pattern and I think I've put these in the pattern that I want and I'm again just gonna do that simple Chevron so let me just go ahead and pull these all out just one at a time and there we go and one more over here so I've alternated my reds and I have this nice little clay color because don't forget this one is going to loop around and touch this bronze over here so that's a nice sort of shiny next to a matte so I wanted to kind of vary that up in here as well so I have some different finishes so this is the pattern I'm gonna go with and the reason I wanted to do that is for a couple of reasons so the one that I have the least amount of beads for is this brown bead down here and you can just kind of see my pile so you can see it this guy is the smallest so what I made sure to do was looking at my original pattern here the one I had the least of are those light blue aqua beads here so you can see that there's five per Chevron per arrow there so I did five ten fifteen twenty twenty-five so I know that I at least need twenty-five if not thirty if I wanted to extend this a little bit further but for my bracelet here this is going to give you a six and a half inch bracelet so just to give you a little bit of sort of knowledge there about your sizing and the other thing you can do is instead of having just the two nuts here you can add a third knot and that will allow you to give another little position for your excuse me for your button there so if you needed to just sort of extend it that way without adding any weaving you'll see that we'll have some extra leather cord all right so lots of information about sizing I'll kind of go over that as we're working here but we're going to be using some size two of the Griffin silk I have some 1.5 millimeter round leather cord I have my little button and inside that button fits a nice little Swarovski crystal this is a stone size 34 and then for tools we're going to be using our fine flexible twisted wire beading needles I have some GS hypo cement I have just some snips you can also just use a pair of scissors if you like and I have a pair of bent nose tweezers I think these are actually really going to come in handy sometimes you're gonna see that those beads get really nice and tight so this is a good little tool to have on hand and then of course we have our rapid loom now I've set up mine here if you need a refresher on how to set it up you can look at the instructions that come with it or we also do have a video walking you from start to finish on how to set up your loom all right but I'm gonna kind of dive right in I know we're eager to get beading and you guys want to see how this is done so let's start and I'm gonna set aside my little crystal there we're gonna glue him in a little bit later but let's go ahead and take our leather cord now I have a yard of the leather and I'm just going to slip on my shank here and bring that all the way down to the center so I have it fold it in half and I have my button in the center and now we're just going to take both ends there bring them together and we're just gonna tie an overhand knot so just over and I'm gonna take those two ends and put them through very simple and now we want to make sure that knot is nice and close to that button so I'm just kind of scooching it down with my fingers okay alright so just like so so that's just a nice little overhand knot to get us started all right and I'm just kind of pushing it down there towards the end making sure it's nice and secure alright so now to get to the second knot here and like I said I'm just going to demonstrate that you're gonna do a six and a half inch bracelet so when you look at this you'll notice that the knots are now just under six inches because what happens is that leather spreads apart so we want to make sure that aren't second knot that we're going to tie is at least six and a half inches down here and again you know you can redo this knot and there's lots of sizing options in terms of where your button is going to fall but I'm just going to try to just eyeball this here and get it to that point there we go and scooch it down and that was a little far away so I'm gonna try to scoot you a little a little bit closer I'm just gonna loosen that not just a little bit and scourge it down that's much better all right so yeah so there we go so now I'm at about six and a half inches not too not alright so that is gonna be good to start and then I'm just gonna move down about an inch and tie another overhand knot and this is going to be that first knot there that is going to allow our little button shank to sit in there so you can also bring your button over here and just kind of eyeball but it'll fit through there and tighten up that knot all right so you have you do have extra leather which is why I'm saying you can tie additional knots if you want to you can just leave it like this for now until you've decided that you've gotten that far so now we are all set to go ahead and put it into our loom here and we're just gonna kind of open the jaws here and set our little button inside and then come back here to this side set it into our loom between the first and the second knot and let me try to show this on the on the side there so it's between the first and the second knot there because we want to pull it back and you just pull it until it clicks and you have some nice tension there all right so next let's go ahead and remove our Griffin silk from the card and it does have one twisted wire needle attached to it so we'll just need one more from our package here go ahead and take that all off the card now don't worry about the fact that it might be a little kinked from being on the card that'll all work itself out here alright so I have my twisted wire needle so I'm just gonna take one out of my package and it has a nice little eye there and I'm just going to slip it on to the other side here and it looks like that guys separated so there we go much easier to thread that on alright and go ahead and you can put that down a few inches there alright so now what we want to do is we want to take the ends of our cord and we want to find our midpoint here and now I have my midpoint so I'm going to take it and put it on both sides just like so right across the top there and then I'm gonna take one side loop it down and around and pull that all the way through and out and take this side and loop it down and through and all the way out all right so now this is what we have it's laying across the top and then through the center there and I'm just going to kind of scooch that up I want to get that as close to the knot as I possibly can because we want to kind of hide it in there and then I'm gonna come to my right side needle here and I'm gonna leave my little pattern kind of set there for me to look at then I'm gonna go through one hole of the super duo string through crisscross that over to the side and then I'm gonna come in with the other needle going through the opposite direction to finish that crisscross so I've brought both of my cords here and now this is gonna sit in the center there now these first couple are gonna be a little tight because what we're doing is we're kind of opening up that leather so just go ahead and make sure that he sits right up close they're nice and tight so then we're just going to repeat that process we're gonna go down through the center with one cord and down through the center with the second cord and next what we're gonna do is we're gonna pick up one of the very same color there go through one hole and then we're gonna come with our needle and go through the second hole of that second bead or I'm sorry of that first bead there and then before we finish off we're gonna come in and we need to add on one hole of another super duo in that same color so just like so right okay so now I'm going to pull this cord all the way through to the other side making sure to not get it caught on anything here we go alright so now I'm gonna come back with the other needle here and this is probably probably one of the hardest residue I'm actually going to release a little bit of tension on line so that I can allow that to open up a little bit more alright so now I'm gonna go through that first hole there on that last bead that I added kind of bring that through go ahead and pull that now I'm just gonna let that kind of sit down there as I go through the second hole of that Center one there we go and finally I'm taking it and I'm going through that first hole of that third bead there so I'm just Criss crossing so if you're just paying attention to the rows you're just going right through the center there all right so now I'm gonna pull both cords here and we're gonna kind of watch that kind of sit right in there alright so you can see now that we have our little sort of trio happening there again just sort of wiggling your cords around making sure they're nice and taut alright so we're ready to do it all again so go down and around and down and around alright now in order to continue our pattern with that Chevron I'm gonna pick up one more of our same color bead here and go ahead and let that and fall down and then I'm gonna pick up the next row that I want which is going to be this sort of pearly bronze color here so I'm gonna pick up one whole of that guy it's I stand corrected excuse me so before I pick up this other one I need to go through this hole here but only that first one okay there we go sorry about that guys alright so now we're going to go through our next color and then we're going to go through the second one here making sure it all stays on top there and then we're going to go through one more of our original color here all right so now we're gonna pull that through and crisscross it to the other side there and then we're gonna come in with our other cord here and go back through that entire row so as long as you're just paying attention to the holes and paying attention to your colors you'll know pretty quickly if you've missed a step or if you've skipped over a bead it'll be pretty apparent for you all right and also at this point you're just kind of following through that whole little section of beads you just strung and you can kind of see that I'm threading on one at a time the twisted wire needles you know they just need a little extra love to kind of go through some of these beads because it gets very tight but I love them because the result is really nice and also if you need to bend the tip of the twisted wire needle you can do that to kind of like hook through some of the beads because you want to make sure that your needle and your cord is staying on top of the leather cord all right so I'm just gonna tighten that up there we go and now slip that through this last cord over here and after this row it'll start to get much easier because we'll have a little bit more structure okay all right I'm gonna pull this guy all the way through here and then I'll get my hands out of the way so you can kind of see and I'll walk you through it one more time all right so now we can kind of see what's happening there so we laid it across the top wrapped it around went through the first hole of this bead Criss crossing then we did our wrap again and then we went through the first hole the second hole in the first hole making that line across wrapped it around again and then now we're starting our second color so we're taking three so now what we're going to alter and we're gonna do is we're gonna do two and three so you'll notice that you'll be adding two and then adding three oops and this is where we just want to keep that tension nice and tight it will eventually open up and you can also release a little bit of your attention here if you need to let it do its its own little thing there all right so one more time and this one's gonna be a little bit different too so we're gonna go down and around just make sure that you're always wrapping around your leather first it's always a good first step just make sure that that's that's how you're starting so now what I want to do is I want to take this needle and I'm gonna go through the first bead there and only the first bead and I'm gonna pull that nice and tight and now I'm gonna pick up that second color there that I've chosen which is the sort of pearly burnt orange pick up one go through that Center one I'm gonna pick up one more and now you're gonna go through that last bead and again staying on top of your leather don't let it dip below because then you'll get all twisted and we're gonna pull that through so you can kind of see it now what's happening there all right and we've gone through and this is our other cord and I'm just gonna kind of help this up a little bit there we go all right so just going all the way back through and you might be able to get two beads at one time don't worry if you can't here we go all right now I'm gonna turn this a little bit to the side so I can kind of start to work with my needle and get it through there don't say that one I went through two so that was nice and helpful all right I'm just getting my needle through going through that first bead there and I'm just straightening out that needle there we go and through the second one - all right so just all the way across there and down and around all right so now I'm just gonna kind of just take a look here and just adjust any cords that need tightening on the outside because you kind of have to do this at this stage before you continue on all right so that's pretty much it so you just keep going down and around and keep going through there and it will gain its structure I'll come back and show you what it looks like when we are all the way towards the end and then I'll show you how to taper it off and then we're gonna finish it so just keep on going just wrapping around and going through those two hole beads so as you can see I've done most of my weaving here and I'm just getting down towards that little tip there so let me just kind of flip this up so you guys can sort of see so you could you might be able to squeeze an extra row in there you just kind of have to decide now one thing I will say is that I actually ended up doing more rows here so I actually moved my knot up so I would stop doing rows you can actually take this off and if you need to take it off you can just kind of kick that back slide the knot out and the back side here and sort of redo that knot readjust it so if you notice that you're getting either too far maybe you put the knot there you can just kind of undo that and just re re tie it all right so I am happy with the way this is looking so let me just kind of reset up my loom here so I can finish it off and I will say that you know as I'm talking about sizing here the best way to adjust it once you're done is to add extra knots in the leather so that you can extend it because you do and you can see here I have about six to eight inches or so left of each side of my Griffin silks you can do a few more rows it just starts to get a little tight so just be aware of that as well if you wanted to do like another ten rows just be mindful of the amount of the silk that you do have all right so I've taken it you know I finished that last row there and I've gone down and around and through and now instead of adding an extra bead to this side we're just going to taper it and I'm just going to go straight through that first bead and then I'm gonna only pick up one bead so instead of picking up that row of three I'm just going to what that next color would be and for me it's going to be that shiny bronze and then I'm going through the second side there and out there we go and then I'm gonna take this side and just go straight through all of those holes that I just went through so the bottom one there and let's see if I can do this all in one step I might not be able to okay so I went through the bottom one and then the top of that bronze and now I just need to bring my needle back and put it through there as you're going you can kind of you know kind of curl that needle sometimes it might help just sort of scoop it down through that hole there we go all right so give it a nice little tug and you can see that's gonna sit very nicely in there so I'm just gonna take both of those and go around that leather one more time so down and out and through and again down and out and through it's a little tight in there there we go and now the last thing I'm gonna do is I'm just gonna go through that bronze bead criss-crossing just as we did with our very first bead here and this is going to nicely anchor it into that little little arrow that's right there alright and here's how those tweezers can come in handy for you there we go alright and one more time taking our needle and we're gonna go down and through and out and down and through and out there we go alright so now very simply we're gonna do just like what we did on the beginning side we're gonna do a nice little overhand knot and bring that down pull it tight and do one more overhand knot again give it a nice nice tug and since this is our very last knot I'm gonna go for one more I want to make sure and you can see that little knot is not too big he's just gonna sit nicely in there so now you're done with all of your weaving the next part we're gonna do is we are going to take our glue argyus hypo cement and I am just going to add a little dab of glue onto that silk there alright and you can also use e6000 for this I I like using the Jesus hypo cement I think it just really bonds nicely to the silk alright so we're gonna leave that I'm gonna kind of remove it though for the purposes of my video I'd say I'd say go ahead and leave it there for maybe 15 20 minutes before you move on to this next little step alright so the last thing we're gonna do is I'm gonna let that dry before I trim the ends but I want to add my little crystal to my button so again we're gonna use some of that Gia's hypo cement and we're just gonna fill in that button there just right in the center cuz it'll kind of smush itself out there we go adding a nice dollop of glue and then I'm actually gonna use my tweezers here to help me so I can simply place it there we go flip and Center that right into my button there there we go I'm just gonna press it down and hold it for a minute and then this I would definitely let dry for at least 24 hours before you wear it otherwise you might end up losing your crystal and you don't want that to happen so I'm just trying to put my glue away so that doesn't dry out there we go I'll set that aside alright so now I'm going to move to this side I've let that dry for a few minutes here I'm going to trim those and again you can see how little silk you really do have left over and then I'm gonna go ahead and trim my leather because I know this is the size that I want so I'm gonna come about an inch or so three quarters of an inch down and just trim off that extra leather so you do have extra leather to make those knots if you needed to make a couple additional knots there and then you also do have all of these extra beads now you can actually see that I used mostly the bronze ones here and unlike this one where I did five colors in this one down here it's actually I ended up using all six to create my little pattern but you don't have to you can mix and match you can alternate it's just dependent on how many rows you're gonna want and how long you're gonna want your bracelet but I recommend somewhere between 23 to 25 rows but you can go ahead and decide that for yourself so this is it this is all finished I'm definitely going to let that dry before wearing it but that is how you make a rapid loom bracelet using the czech glass super duos so choose your favorite mix color and happy beading thanks for watching guys if you're new to our channel be sure to hit that subscribe button below and of course you can get all of these supplies and tools by heading over to beadaholique.com

You recently viewed

Clear recently viewed