How to Make the Loom Statement Earring Kits by Beadaholique

SKU VID-1428
Designer: Kat Silvia
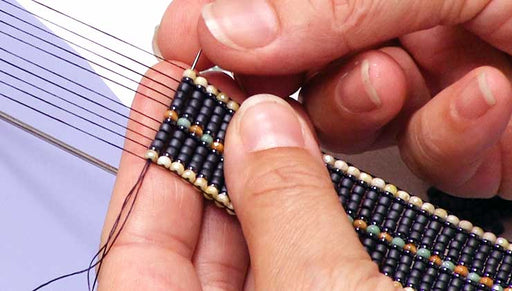
In this video you will learn how to make the Loom Statement Earring Kits by Beadaholique. These beautifully bead woven earrings use the perfectly sized Baby Jewel Loom by Beadalon. Purchase a full kit to get the loom, needles and glue along with all the components to make your desired pattern. Already purchased a full kit? Buy a Refill Kit which will give you all the components without having to purchase and additional loom, needles, or glue.
Audio Transcript
Note: This audio transcript is auto-generated and may not be completely accurate.
Hi, this is Kat with beadaholique.com and beadaholique.com so i'm gonna start by showing you guys the beautiful patterns that we have for these statement Lumiere and kits so if i can just draw your eyes up here these are how lovely they are and now you can kind of just see from my hand how large these are so these are definitely gonna be some statement pieces but we're doing a nice little loomed piece here with some ribbons slide ends and then to top it all off or to I should say to bottom it uh-huh we're adding a beautiful Swarovski crystal just to add a little flash so this is the one we're going to be making today this is the Ibiza version we also have a beautiful sort of wine and olive with a lovely golden shadow down there and that's going to be our Tuscany we have a Bristol which is going to be a really beautiful sort of almost like a sweater pattern in a pink white and sort of a gunmetal there and then we also have our last version here and this is the Helsinki so a very nice traditional one we just added a little crystal to the bottom just to give a nice little pop to the silver black and white so we have two gold and two silver there for you but when you purchase a kit from beadaholique.com and then for your findings you're gonna get your head pins and eye pins your slide ends you're also going to get your earring hooks and then we have your crystals down here as well so you'll get six of those little bicones and two of the Swarovski crystal baroque beads you'll also get your Nemo thread and a tube of e6000 now what you'll need to provide yourself is I'm going to be using some toothpicks here to help me with that glue but you can also just use a scrap of wire and then I have a pad of sticky notes here and your see how I'm gonna utilize that a little bit later but you can also use scotch tape for what I'm about to show you in a little bit and then I have some flush cutters a pair of round nose pliers and a pair of chain nose pliers and you'll also need a pair of snips or cutters or of course you can just use a pair of scissors as well now I'm going to be using a ruler to help me with mine today and then the other thing that you're going to get when you purchase the kit is these lovely patterns so for your particular one that you're gonna get this is the one we're gonna do today it's a nice large easy to read pattern that is nice and in color for the kit earrings so you'll get your coordinated pattern so you can just kind of see how that'll look on the page they're nice and easy to follow along with so if you have everything ready to complete your loom statement earring kit we are ready to begin alright so let me first bias start by showing you at the baby Jewel loom now this is a shortened loom here and it is of course baby so it's a little wheeze so I'm just gonna take it out of my packaging here it does come with a full instructional booklet to help you set up your loom but I'm going to show you how to do it for our purposes here today but this is also just a great little added value so I'm going to go ahead and set that guy side and I just want to show you the difference in size so this is the regular Jewel loom and this is the baby Julia Malthus eyes which makes it perfect for doing our earrings now if you already have the jewel loom you can do this earring as well and what I want to kind of tell you is that we do also here at beadaholique your refill kit you won't get the loom the needles and the glue you'll get everything else here that I showed you in the beginning but you won't get those three items so if you already have those if you have the jewel loom you can still complete this project I will say though you'll see how our earring is going to kind of mock-up and it's going to sit in the center here you can do it on the jewel loom but I still wouldn't recommend trying to do two at a time I know that might be a question some of you might have I still recommend only doing one the ideal reason to use the baby jewel room is one it's nice and compact and two you won't be using as much thread so you'll have a little bit more name-o left over at the end so you'll kind of see as we work how that's all going to kind of come together all right so I have my baby jewel loom here so what I'm gonna do first is I'm gonna set up my jewel and let's just dive right in so what I need to do is find the end of my Nemo here and let's see get a little bit off of there and I'm just gonna loop it around one of my pegs in the back and I'm gonna tie just one overhand knot just to secure it to the peg there and then I'm just gonna do another overhand knot there we go all right so I'm just gonna kind of wind that around a few times with my tail all right so now I'm just going to kind of hold on to it so what you can see is now what I'm gonna do is I have my little tail here I'm just gonna hold it with my finger there and I'm gonna guide it over to one of the pegs in there and just kind of bring it up and over at the top now what's really nice about the jewel loom is that you have all these little notches here to help keep your warp threads sort of separated now you don't need to get it exact as long as you kind of keep following the pattern here you should be fine so I just go directly across and wherever it seems two notches is fine by me so I'm going to notch it there now flipping it over I'm gonna wind it around and pull it up so that we go over the next one there this is a little hard to show but I'll kind of go slow alright so I've wound it around and now I'm gonna go up into that second notch there and bring it across all the way so you see how I just follow the second little notch there and then again just go around the peg just like so and bring it around and do the third one and I'm I am right-handed so I go to switch hands there alright there we go and just loop it around and come back over and our pattern here is 15 beads wide which means we need 16 warp threads so just keep going until you've built up all 16 and then I'll show you how to tie it off there and what's nice is you can just see that the spool of thread has sort of stayed nicely on my it doesn't unwind too quickly which is nice so it's just kind of sitting on the back of my hand there all right getting a little closer and you can see just how much thread this is gonna use so you really see the value in getting the baby Jewel loom also it's really it's great for travel I love using the baby alright let's see that looks about 16 let me just check real quick 1 7 8 9 10 11 12 13 14 15 and 16 all right so you should end make sure you do that properly you should end on the same side as your tail so that's how you know you've done an even number so what I'm gonna do is I'm just gonna take my little snips here and cut that off and I'm gonna wind it around a couple of times here and then take my other tail and I'm again just gonna tie a couple overhand knots just to keep that nice and taut there we go all right I did three just for a little security all right so now I'm just gonna for getting it out of the way I'm just gonna trim these a little bit so they stay on the back alright so now we have our loom all set and ready to go just make sure that you have really good tension and then all your warp threads there and so now we're ready to start with our looming so I'm going to go ahead and open my package of needles here now what's great is you actually get six needles which is why we're not giving them to you in the refill so one of the benefits in doing a refill is that you can actually purchase one full kit and then the other color variations in the refills and another great thing is that all of the kits will have the same amount of beads so let's say you wanted to make this kit that we're doing here but you wanted to utilize these colors so you can do this kit and this pattern using these colors so you can actually kind of mix and match and make your own so it's a really great little tip if you're looking to buy one and then get the other refills so you'll get the same number of beads alright so I'm gonna go ahead and you need my ruler for this because you'll need about five feet six feet if you want to go for a little extra security there I'm just gonna kind of measure out about five feet here I always want to err on the side of safety we'll do a little more all right and I'm just gonna get trim that off and now we can set our thread aside alright so now I'm gonna just thread my needle and pull it about halfway down or so all right so now I'm gonna pull over my pattern here and you're gonna kind of see how this is gonna start alright so you'll notice that there's a full row of color and a full row of color at the top and the bottom these rows are actually going to fit into our slide ends so our pattern doesn't actually start until one row in so let me just kind of show you on my earring here what I mean so when you're looking at the earring here and you see that you don't actually see the top and the bottom row because it sits inside of that ribbon crimp or I'm sorry that ribbons slide end right there but you still need to do it in order to get our achieved look so like I said we have 15 beads going across so I chose the blue to sort of go inside there so I'm gonna pick up 15 of my blue beads here for all right so let me just double check here two four six eight ten twelve fourteen fifteen all right now you see how nice and long that loom needle is and that's why you definitely want to use a proper loom needle for this it'll make your life so much easier all right so we have our loom set up and you can see and I'll just kind of show you just so you have a little bit of a visual reference we're just sort of Center the loom piece on the work here so that way you kind of know it's about an inch and a half from the top there so what I'm gonna do is just take that needle underneath all those warp threads there and sort of take my hand underneath and press up and make sure that those threads sit right in between all of those little beads there so I'm gonna keep my hand there and I'm gonna pull my needle all the way through until I have about a tail up I'd say a good eight inches or so so you just want to kind of just judge your tail and just make sure because you're gonna need this to tie off at the very end all right and now going over you're gonna kind of press those beads up through get your needle make sure you're not catching any of those bottom threads there and you're just gonna go through one by one catching all of those beads and just sort of loom it backwards and pull all the way through all right now you'll know if that worked if you remove your hand and all of your beads are still there if you had some pop out and fall down you just have to do it again because that just means that you went up and over or I'm sorry you went under one of the other threads alright so that is our first row nice and tight there and give it a little tug you can just see I'm just sort of adjusting my tension it's always easier to adjust it at the beginning so what I'm gonna do now is just follow along my pattern and for my pattern here I'm gonna pick up two blue beads three gold beads and I have five blue beads five three gold and two more blue all right so the same thing I'm just gonna take that needle go underneath and sort of come down here and press it up just making sure that all those threads kind of sit nice and tight in there you can kind of scooch it up a little bit and pull it through and I'm just kind of kind of just with my finger there just sort of push it up just make sure it's nice and flush and then the same just going up and over all the way across there we go all right and you're gonna want to go slow you don't want your thread to sort of tangle on you all right so that is the first two rows I'm just gonna continue on with the pattern and you just pick up the third row and then the fourth just keep that as the same technique I'm gonna meet you back here on the other side to show you how to finish off this loom piece all right so I've just completed the last row there so now I'm going to add that row that goes underneath that ribbon slide again so it's gonna be 15 of our blue beads here I'm just setting in underneath there and you can see just how much thread I have now like you saw earlier I'm using five and a half or so feet but that is definitely more than enough for this and the nice thing is is because it is a smaller piece you don't actually have to worry about tying it off halfway through all right there we go so now our loom that part is done here so what I'm gonna show you now is the final tying off the threads so I'm just gonna orient my thread again I'm a right-hander so I'm just gonna kind of flip it around that way so I have this as my needle up here alright so it's coming out that top row there so what I'm gonna do is just turn my thread around and go into the first couple of beads there I'm gonna go in about five and poke my needle up and sort of bring it through and now what I'm gonna do with my needle is I'm gonna go under that warp thread that's right there and kind of go up and what I'm gonna do is just create a nice little knot so I have a loop here we're just gonna take my needle and go through it and just create a little knot that's gonna sit right on that little thread there and you can see that I knocked some beads out of the way but those will just kind of go right back in place all right so that's one knot and I'm just gonna move across and I'm gonna do another knot there and same thing just catching that little thread underneath just something to sort of hitch that knot - and I'm gonna pull through again making sure my knot is secure go through a couple more beads don't go all the way to the end so I'm just gonna come out those gold beads there alright and then I'm just gonna scooch my look guys right there take my little thread snips this is why I like the thread slips you can get nice and close and cut off that thread alright so now we're gonna just remove our needle from the other from that thread and we're going to attach it to this side and all we're gonna do is just repeat that process so this is why you want to have a good nice long tail at the beginning there so it's coming out that side we're just gonna go in a few beads here and I'm just using those gold beads is a little bit of a guide for myself there we go and again just going underneath there catching that thread going through the loop and you can just kind of sort of you can see I'm just sort of bending my little loom piece there again we'll go under catch that thread come back go through that loop and then through a few more of those beads just to sort of make sure that it's nice and tucked away alright I removed my needle there I'm just gonna kind of adjust my loom piece there to get nice and close take my snips and we're done all right well we're done with this part all right so this is where you should your loom piece should be right now it's all nice and secure and on your loom for you so the next part here what we're gonna do is we're gonna flip it over and we're gonna cut it off of our loom here so just sort of free it from the loom and on this side I'm just gonna go through and just cut that off on both sides alright so now I'm just gonna set that aside alright so if you've gotten this far what you're gonna do next is you're gonna clear off if you're using a bead mat here we're gonna need a hard surface to work on so I'm gonna do that and I'll be right back alright so the reason I'm working on a harder surface now is because I'm going to use these post-it notes to help sort of secure my work to the table so what I'm gonna do is I'm just gonna take one side here and just kind of tape it down right there all right and for the next site here what we're going to do is we're going to take all of these little threads and we're going to tie them in little knots here so we're going to go two at a time so go ahead and separate two and again this is why those little sticky notes are nice and helpful so I'm just going to kind of secure one side that way it's nice and easy for you guys to see all right so I have these two threads and you can kind of see where they're coming out at the top and all I'm going to do is just take and do one overhand knot and make sure it sits below there and then do another overhand knot and now I'm going to take these two I'm going to pull them off to the side here I'm going to take the next two and do the same thing so I'll show you one more and then I'll let you kind of do this on your own alright so again I have two here go around I have my four over here all right so now you just continue on doing those two overhand knots and work your way all the way across you'll have even numbers here so that's why you're working in twos so I will see you just on the other side in just a moment all right so I'm just finishing off tying that last one there on the side so let me kind of show you what I'm working with now so if I can kind of pull this down here you'll see that I have them all now it's easier to see kind of going to by two so the next step here is to now take the ones that are in twos and sort of knot those now this is just really helping to set really secure your knots here at the end because you don't want your piece to fall apart so this might seem tedious but trust me it is all worth it all right so now I'm gonna kind of set these apart so you can see so what's happening there is I have two of the threads from each of those previous knots sort of separated there and what I'm gonna do is now using each thread as one I'm gonna knot it just the same as I did that first time just keeping those separated right like so all right and you don't need to pull too tight you don't want to sort of kink your loom work so you're just gonna do that double knot right there so now you can see that we have a nice secure knot all right so do that with the rest working all the way across and then we will be back and I'll show you how to finish off the glue portion of this all right so what we're gonna do now is assuming I've done the same knotting on this side you'll do it correctly on both sides but I just wanted to kind of skip ahead and talk to you about doing the glue here so for this we're going to be using e6000 and just go ahead and unscrew it and if you have a fresh 6-thousand you'll just sort of puncture it on the end there and then go ahead and sort of spill it out onto your work surface you see how little we're really using to do this so that's why we don't give you an e 6000 with those refill kits because we know that you'll have plenty left over all right so now I'm gonna use a toothpick like I said before you can use a little scrap of wire and again I'm just gonna get a little dab of glue on there and I'm just gonna go through and I'm just gonna kind of drag it across those knots there you don't want to get too much on your beads but just enough on those nuts to really help secure it and again don't worry cuz all this is gonna kind of slide underneath that little ribbon slide end that we have there so you don't need to add too much glue but don't be shy all right there we go all right now if my other side was not and I'm gonna do that at the same time but now what we're gonna do is we're gonna let this sit for at least a few hours I definitely recommend letting the e6000 dry for at least 24 hours before wearing but to go on to the next step I would definitely leave it just for a couple of hours so go ahead and let it sit and then come on right back and I'll show you how to finish off the earring we're almost done all right so we're gonna move on right now I still have my loom piece here drying so I'm just gonna leave that alone for a little bit but we're gonna kind of move on to the next step here so the next step is sort of creating the finishing techniques for our earrings so we're going to start by taking one of our head pins here and we're going to string on one of those bicone crystals and then what we're gonna do is string it on our bead with the large size down that's our beautiful Swarovski crystal baroque bead and then we're going to string on one more of those bicone beads now the bicone just helps sort of stabilize that so you want to kind of just make sure that they're all nice and nestled in there so now what we're gonna do is we're gonna take our round nose pliers and we're just going to make a simple wire loop by just sort of bending our wire back a little bit and then wrapping it up and over the top moving our pliers and just wrapping it around the side just like so we're gonna remove our pliers and then take our flush cutters and just trim off that excess wire so we'll just set that little part aside all right now I'm just gonna kind of take my chain nose pliers there and adjust a little bit but now we can go ahead and set that guy right down there for just a few minutes now we're gonna take our eye pin here slide on one bicone and what we're gonna do is we're gonna do that same simple wire loop but what you want to notice here is that loop right there is flat so we need to create something that is going perpendicular so it's going to go the opposite direction there so if you can kind of see from the side here I'm gonna put it into my pliers just like so and Bend back a little bit and then wrap it over the top so now you'll see that I have those loops going in opposite directions and this will just help orient that earring so that it sits nicely when you're wearing it all right and I'm gonna set that down alright so now we're ready to go on and sort of bring our loom piece over here so I've let him dry for a little while there and I'm gonna take my snips and just cut off the tails there now I'm cutting close to those knots you don't want to cut too too close but don't worry about leaving a little extra all of this will sort of fit into your ribbon crimps there and set those aside and we're just gonna repeat on the other side there all right I'm gonna bring my little pad back here I'm gonna take some of that glue there and I'm gonna place it onto my surface and now what I'm gonna do is I'm gonna take one of those ribbon crimps there you can see that one side is already open for you I'm just gonna kind of drag my toothpick through there because what I want to do is just kind of go inside and just sort of swirl it around and just get a little bit of glue happening on the inside there just for that a little extra security all right and now what I'm gonna do is I'm gonna take my loom and slide that last row of beads right down into that slide end just like so there we go and now what I'm gonna do is I'm gonna take my chain nose pliers here give it a little kink there and then just sort of finish it off what I'm gonna do is I'm gonna press it up against my work surface so just sort of gently press it down that'll give you a nice little leverage to close that I'm actually just gonna make sure that other side is nice and closed as well all right so all we're gonna do is we're gonna repeat that on the other side here so I'll get to show you again so again just get a little bit of glue there and you can see just how little I'm using it's just for that little added security when you put it into your ribbon crimp there all right just sort of scrape the inside there and now the same thing again you can see how that last row of blue beads just sort of disappearing into that ribbon but now you can also see why we want to do all those knots there just to really give it that security all right and again same thing we're just gonna sort of Bend that down just ever so slightly and secure it and I'm just pressing it down just sort of on my table there all right so now we have our piece ready to go and now we're just gonna finish it off all right so go ahead and take your first piece here and I find it easier to use those chain nose pliers and you're just gonna open it like a jump ring slip on that little loop to the bottom and then close that up just like so and now we're gonna move on to the top there I'm gonna take that loop that we created and we're just gonna open it a little bit more just for ease slip it on to that loop close that up there we go and now the last little part is we're gonna take our big beautiful ear wire and we're just gonna again just give it a little gentle twist just kind of opening it up slip on our I pin and closing up that loop nice and secure and there you have one earring now of course logically you'll just repeat all of these steps to do the second earring however what you can do is while you're loom piece is drying you can also go on to the second loom piece that way you kind of complete it all at the same time but I just wanted to do one full one here so that you understood exactly how to make these beautiful loom statement earrings now be sure to get the refills if you love this kit and you'll already have your loom and your glue and your needles so it's a wonderful kit to buy and then buy the refill kits and of course everything you see here including all the tools I use are available at beadaholique.com and if you enjoyed this video be sure to hit that subscribe button below to get the latest from beadaholique you

You recently viewed

Clear recently viewed