Audio Transcript
Note: This audio transcript is auto-generated and may not be completely accurate.
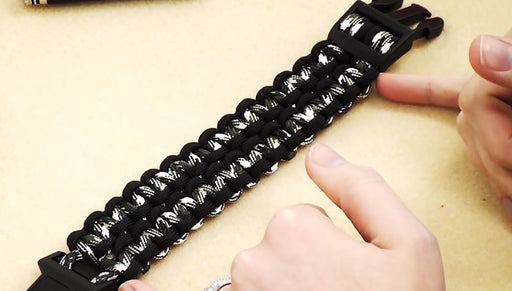
Hi this Julie with Beadaholique.com and today I want to show you this technique. You're actually are going to be knotting rhinestone cup chain onto a curb chain. You've probably seen this in boutiques it's quite popular right now. It's actually really easy to do. So I have an example here where it's a single row of the rhinestone cup chain knotted onto a curb chain you see how that looks and then I also have an example where I did a double row of the rhinestone chain onto the curb chain you can see how that looks. It's a little bit a variation here and actually this example was a mistake. I didn't quite cut enough of my cord and I ended up having too short of a piece and I decided that I didn't want to let it go to waste so I just added some jump rings added some more chain and made it into a bracelet where it has more of a focal as opposed to this one where that chain goes all the way around the wrist definitely play with this technique, there's a lot of different variations you can do so in order to make this style of bracelet or necklace or however you want to use it you're going to need some rhinestone chain it's very pretty. All the rhinestones are connected together you're going to need some regular chain. This here it is a curb chain you're going to need some type of cord I have some satin rattail right here you need a binder clip a mat or some type of flat work surface that you can clip onto you need some E6000 glue some type of applicator to apply the glue little pad to put the glue on a clasp, I have a lobster clasp and have a little oval jump ring and a pair of scissors a pair of some type of wire cutters. You're not going to wan to use a good pair of flush cutters if your chain is a little heavier like mine is, you'll want to use something that's gonna be a little stronger a couple pairs a chain nose pliers to apply that clasp when it comes time and I've got a ruler I'm going to clear my tools to the side right now and just focus on the technique itself. I've got my chain my rhinestone chain and my curb chain and what I need now is the cord and for this technique you're going to need eight inches of cord per inch of the bracelet that you want. So if you're doing a six-inch bracelet you want to do six times eight which is forty eight and then if you're doing a seven inch you wan to do seven times eight which is fifty six keep that in mind when your cutting your cord and that was the problem I ran into with this first bracelet. I just didn't cut quite enough so I'm going to do an six-inch bracelet cut myself forty eight inches of the satin rattail. I've got eighteen and eighteen which is thirty six I need another twelve that should give me enough and then I like to be a little safe so I'm going to cut a few extra inches just to be careful take your cord line up the ends we're done with the ruler for right now find the midway point take your rhinestone chain slip the midway point under the last link, so right where the two last rhinestones are on the chain, that little connector bridge that's where you want your midway point to be and then you just going to take your cord ends you're going to criss-cross them and do a simple overhand knot and pull it down so that it rests right in the middle take your chain and what you don't want is you don't want the chain to be all twisted you don't want it to be like that you want to try to lay it out this flat as possible and we're going to go ahead and take the right hand cord and slip it through going from the back to the front the last link of chain you have to constantly straighten up your chain to make sure it's going in the right direction as you go there's just no way of avoiding that my first one's going to be the hardest so now we're gonna take the left cord slip that under the rhinestone chain and then we're gonna take the right cord split that under the rhinestone chain as well so we just crisscrossed pull those down hold this in place we're crossed beneath the rhinestone chain now take the left cord and the right cord and criss cross again, so I've taken the left one over and under the right hand one which now becomes my left one and then just pull it down and we're going to tighten that in the middle section again and make sure our chain is staying in place pull so that was the hardest part of all and now we're going to take our binder clip we're going to clip it to our work surface clip it to the first rhinestone link and the first link of the actual chain repeat that process make sure your chain is straight again make sure your rhinestone chain is straight take the right hand cord go from behind pass it through the next chain link on your curb chain pull it through take the left cord go under the rhinestone chain now take the right cord going under the rhinestone chain so it's actually now on top of the left cord pull those a little tighter so they criss-cross under the next bridge between the rhinestones and take our left cord and right cord so now then the left one goes up and over and under the right one we've made a simple overhand knot. You want to make sure you stay consistent in your left and your right just so that your knotting looks very uniformed so now we're gonna pull that tight right and over that bridge between rhinestone links and we're just going to do one to one. This little link right here is going to connect to that link there this link is going to connect to that one, this one to that one. You're not going to ever have 2 or 3 in the same link on either of the chains, the rhinestone chain or the curb chain I wan to keep showing you this just so it becomes very easy, so we're taking the right hand cord threading it underneath the curb chain and through the center at that link pulling it through keeping our chain nice and straight taking the left hand cord we're going underneath the rhinestone chain taking the right hand cord now we're going underneath the rhinestone chain but on top of that left that you just did criss-crossing and pull it down so it's a little bit tighter and more uniform take the left hand cord and cross it over there right hand one and under just a simple knot and pull down so that where it actually crosses it stays in place is in that bridge area between your rhinestone links under and through the next curb chain link making sure your chain is straight left hand side under the rhinestone chain right hand side under the rhinestone chain but on top of the other one you just moved make sure your chain is straight make sure those criss-cross below take the left hand one cross it with the right hand one left one goes up and over and under the right hand one and then where they meet and where you pull it tight is going to be right in that center space pull this off for a moment so you can see what we've got going we're just working our way down, just going to keep doing it one link to one link, one link to one link knotting in the middle and on the back side is going to look like. So it's actually really comfortable on your wrist once you finish and it's really nice and neat looking just need to clip this back on and then I can continue and I'm actually continue for as far down as I want my bracelet to be on this one here I wanted the rhinestone stones to pretty much wrap all the way around my wrist so you can measure your wrist ahead of time and determine how long you want it to be so I do that and then I'm gonna come back and show you how you're going to end your actual knotting as well and how to attach a clasp I've continued braiding and this is what I have. I'm going to measure on my wrist to see exactly how long I want it to be and remember that the lobster clasp in this particular project is going to take up about half an inch see where this is on me I think I want about one more link and then I'm going to call it good you can see I'm running out of my cord here, so I'm glad I cut those few extra inches, it's always good to be on the safe side this is going to work but it is getting a little bit close and you'll see that this here with one more link it's just gonna be six inches right on that's how big my wrist is clip this again to do this last one, it's the same process I'm going to show you one more time, there's something special we're going to do with this one too go up and under and through actually that link has already been used go up and under and through the link keeping our chain nice and straight crisscross underneath, so the left one went under and the right one goes under here. It's actually on top of the left one pull that so that it crisscrosses right below that bridge right there after this very last one you need to do something special we need to put some glue on it because it's going to help prevent it from unraveling when we snip the end so I have some E6000 glue right here I have a little head pin which I'm using as an applicator now normally I like to be really careful precise with glue, in this instance though I wanna saturate it. Take my glue put it right in the middle there and put a good amount now I'm going to take my threads criss-cross them. Tie that simple overhand knot and then as I'm pulling it down I want to keep an eye on where this is going to lie I'm going to add a little bit more glue to the actual cords themself I want this to be really nice and a good bond pull and as I'm pulling I'm squishing that glue, pulling it through wipe off the excess and I'm just gonna let this dry for probably a good half-an-hour or more I just want it to be really nice and stable I don't wanna cut those threads until it is fully glued So what I'm going to do while I'm waiting for that to dry is I'm going to take my flush cutters which has a nice narrower tip and cut the link on the rhinestone cup chain just like so that's separated now I don't want to cut the link that my cord is tied to, I want to cut the next one and that's if you don't want an adjustable bracelet I'll show you what I mean I made this to fit my wrist so I know exactly how long I wanted it to be so it's a nice fit on my wrist but if you're selling this or making as a gift and you didn't know exactly how long how wide the person's wrist was you could actually straighten my link you could leave some extra chain and then what that would look like now it wouldn't be quite as much as you have here but you could leave a few extra links and that way they can adjust but I know how big I want this to be and I made it to match so I'm going to take a heavier duty cutter and I'm going to snip the link that doesn't have anything tied to it now I'm going to wait for that to dry before I trim it and then I'll attach my clasp so as we're waiting I want to show you how you would add a second row to the cup chain I'm going to do it with this scrap right here you would take your bracelet line it up just how you had it before take the other bit of chain take some more cord and I'm not gonna measure this out because this is just example for the video but if you're doing it for yourself you would make sure that you had the right amount remember it's about eight inches per inch if your bracelet and add a bit extra because you did see it pretty much was exactly eight inches again line your cords it's the exact same process find that middle point where that middle point is place right under the first two links of your chain right in that little area where there's a connector we're going to tie it onto our chain the same way we did before such just a simple overhand knot then we're going to take the left one, we're basically just working backwards before we took the right one and we put it under the chain, this one we're going to take the left cord put it under the chain and up through that first link before it was left under then right under. We're going to do the opposite. So now we're gonna do the right one under left one under pull those that they criss-cross beneath rhinestone chain and now pull the correct cord which happens to the left hand side and on this one we're going to do the same thing, left cord over and under the right cord criss-cross pull down and make that knot in the bridge between the rhinestones and take the left cord same exact process, left cord under and through the next chain link and do the right cord under left cord under crisscross pull so that they're sitting beneath your cup chain and then take the left cord up and over the right cord crisscross make a simple knot and pull it down right in that area between the two rhinestones. You can see what we're doing. We're going all the way down what's nice about doing it this way is you have your cords which looks like they're jutting out, you can see it a little bit better here it looks really nice and uniform and that's all you'll need to do if you want a add that second rhinestone chain it's the same process just with a little bit of variation I'm going to undo this because this is not what I want to be part of this bracelet if you do make a mistake this is really easy to undo and my glue is not quite dry enough. I'm going to wait another twenty minutes and then snip the ends and attach my clasp so I patiently waited and I'm ready to trim off my cord ends what you do is trim as close as you can to your knot the without cutting you're knot there you go do that on both sides now what I want to do is go back and add a little bit more glue put it on our ends and right there where the ends meet the knot as well then what you can do is if your ends are a little bit ratty once the glue is fully dried and you've really saturated it and got it so that it's connecting to the actual knot itself you can trim any stragglers if you want to trim that down a little bit so you want to let that dry, in the meantime I'm going to show you really quickly just how to attach the clasp and one thing I really like about this bracelet design is the other end of the curb chain, the end opposite where you can attach a clasp, is actually the ring you're going to use to link to the curb chain open the jump ring put it in the last link on your chain add the little lobster clasp close the jump ring and you are set to go I'm show you how this looks on the wrist and if you measured it right it should just make it so that it comes almost all the way together with the rhinestone chain and then the lobster clasp adds about an half an inch and connects to that last chain link so hope you enjoyed this video. It's given you some ideas about how to use rhinestone cup chain combine with chain using a knotting technique and you can find this project and others on Beadaholique.com in the free project section. Go to www.beadaholique.com to purchase beading supplies and to get design ideas!