Audio Transcript
Note: This audio transcript is auto-generated and may not be completely accurate.
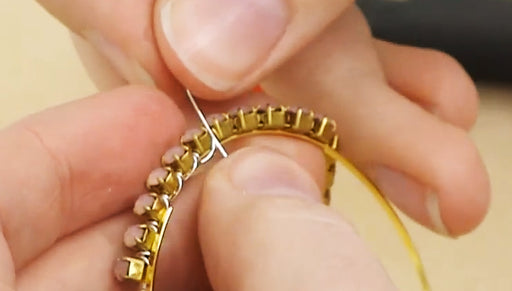
Hi, this is Julie with Beadaholique.com and I'm gonna show you how to wire wrap rows of beads onto a form. So this is probably gonna end up being an necklace and here I made this into an earring. I want to show you how to create these rows now I've got a quick link here which is great because whenever you're doing a project like this you're gonna need two sides obviously for your rows to stretch across so a quick link or pre-made form is great. You can also make your own forms of course you'll need some beads and you'll need some wire now you can use craft wire. You can use artistic wire whatever wire you want. Just make sure it's really soft. I'm going to use 28 gauge I feel like it's a really good gauge to work with for this particular project and I'm gonna try to use some contrasting colors here so you can see what's happening I'm going to cut myself length of wire the length of wire that you'll need is really going to be dependent upon how many rows you're doing. If you're doing little 11/0 seed beads you're going to fit a lot more rows in there and you're gonna need more wire and depends on the size of your form as well cut as much wire as you're comfortable working with it's not a big deal if you have to add more later. You are just making these nice tight little coils around the edge so you can always add more later. I wanna show you this technique so I'm not gonna end up doing the entire second earring here but I'm going to show you how you do it cut myself some wire. I need to anchor my wire to my form, to do that just insert your wire into your form wherever you want to start and your rows can go diagonal. They can go across or zigzag, whatever you like I just wrapped it around the wire and I'm going to do that several times. 28 gauge is a very nice thin wire that also means it's not as strong as say a 24 gauge you are gonna want to create a of number anchoring rounds here and I would recommend at least five so that your wire never come undone and I'm just feeding it through and around. However many you want okay so when you're ready to add your beads go ahead place them onto your wire We have three to begin with. So if I was stretching this across, maybe if I went over to here three would suffice but I actually want to diagonal so I'll add a fourth one I'll stretch that across. Actually you know I think I want a fifth one on there this is all about playing, seeing what you like, there are no rules I like that. So I got that one stretched across, my beads are filling my entire gap you might wanna consider using various sizes of beads so you can fill it in a little bit better I just pulled some four millimeter bicones here but if you say had three millimeter some four millimeter and some five millimeter you can really get it nice and tight in there with beads so as I've been talking you've probably saw I just took the wire and I wrapped it around. Now I'm just wire wrapping my form I'll do a couple so you can see this. I want my wire coils to be nice and tight so I'll use my fingernail and push them together. Wire is great because you can manipulate it I'm just going around and around now what I'm looking at now is I wanna make sure that I create enough coils that there's enough space between my two rows of beads so that my beads are not crowded and on top of each other and let me show you. Like I don't think this is enough space I'm going to add some more beads. I'll do another five If I was to try to stretch this across, now granted I could go like this, I could do whatever I want but if I wanted to create a row like this, well they're a little bit crowded right there they're bunching up and I don't really want that so I'll take them off and do a couple more coils around I think just two more should do. That's one this is going to be two I'll put those back on and see if they have a little bit more breathing room another advantage to 28 gauge wire versus perhaps 26 or 24 it's easier on your fingers when you are wire wrapping it. It can get to be a little tough on your hands. So I'm going to go with that actually know what I want a few more coils I am trying to put my coils right next to each and not on top of each other. Watch out for kinks okay that looks happier to me. They are a little bit spaced out you could make it a little closer but that looks pretty nice to me so now I stretched across to the other side. Hold it in place and wrap it around the outside of my form. Scoot that coil down so it's nice and tight and then just wrap it keep doing this, just back and forth. Keep wrapping it until you get enough of a gap where your beads are gonna be spaced nicely from the next row and then continue on to the next row. There we've got two rows we would just add another one, go back and forth. Now what you are gonna notice with this particular way of doing this, you end up with a jogged effect for where your wire is. See if you see it on here with the silver, it is a little hard to see with silver and silver I'm but if you're doing something with a contrasting color you will end up with wire here, no wire, wire, no wire and if you want to avoid that, if you want say you're coils all on one side what you're going to do is do it here since this is our example piece you can just trim the edges when you are done with your coil just make sure that they're flush up against the frame. If you want your coils to be on the same side you're gonna work with a smaller piece of wire, wrap it around the same way started you got that nice anchor wraps. Remember you want to do at least 5 of them just because this is a thinner wire I have some nice wraps eat. Get my tail out of the way so this is just to show you an example. I'm no longer concerned with my pattern here and I'm going to take some beads put them onto my wire same way as before so on this one I'm going to stretch it across now what I would do is instead of going up because I want my next rows to be up here, I would just look at the direction on my ankle wraps, snip off this tail so it's not in my way and wire wrap around the form in the same direction as my ankle wraps, so if they're down I'm going to make these ones go down one thing that is nice about doing it this way is you have to cut the wire more but you're working with a smaller amount of wire which for some people is a little bit easier and you don't have to worry about getting kinked up as match. So just do the same amount of wire wraps around the form on the side that you had on this side so that they're even and then just cut your wire and what you would do for the next row is the same thing, you'd cut a smaller amount of wire just stretch it across here. So you get the idea you can either go back and forth with one piece of wire, have this little jogged effect or you can wrap each row separately with a smaller piece of wire and just have coils going in the same direction each time. So that's all there is to creating rows of beads on a wire form and then like on this one I finished it off with a simple earring hook attached to the form Like I said turn this one into a necklace. Go to www.beadaholique.com to purchase beading supplies and to get design ideas!