How to Set Create Recklessly Spots in Faux Leather with Melissa Cable

SKU VID-1053
Designer: Melissa Cable
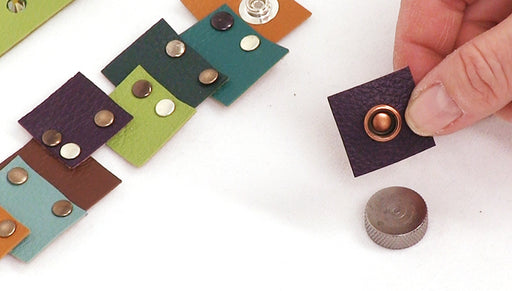
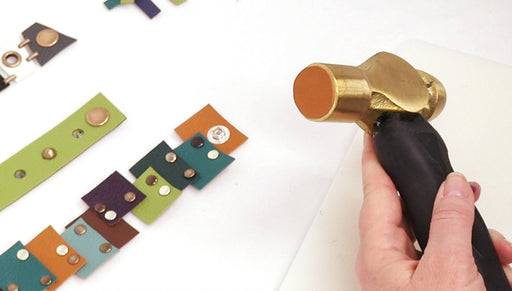
Beadaholique guest designer Melissa Cable teaches how to use spots with faux leather. In her designs she uses them to connect layers together, as an accent and even to attach a beaded focal. These same techniques can be used on leather in addition to faux leather. Find Create Recklessly faux leathers, tools, and hardware for sale at Beadaholique.com.
Audio Transcript
Note: This audio transcript is auto-generated and may not be completely accurate.
hi i'm melissa cable with create recklessly and i'm here to show you how to set spots in leather and faux leather spots also known as nail heads come in lots of different sizes and shapes you can see here we have some rounded head spots here some actually used on a design and they come in a couple sizes here's your small ones these are conical shaped spots which are used across here to give a little more dimension and then there's also um interesting shapes of spots these are for example some rectangular spots which work together to create stitches the thing with spots are that they're incredibly flexible in their use you can use them to connect things together as I did here so this spot connects these three layers of leather together I can use them here simply as an accent I just wanted some pops of metal in this design so they're not holding anything together they're just for designs sake here I use them to connect panels together and here I actually use them to connect this beautiful piece of beadwork to the leather and they require less pressure to set them than eyelets and rivets and that makes them the perfect use for attaching delicate beadwork without risking damaging the beadwork we'll talk about more how to do that in a moment but first let's talk about how we Pierce our leather in order to set our spot in the create wrecklessly toolkit we do have a 8 millimeter or 5/16 thought setter so this is really unique to the create wrecklessly line and it was important for me to include it because I wanted you to be able to in just one hammer be able to create the perfect distance for your spot so with that hold created we can now slide the spot in there and you can see that it's goes through very cleanly you'll also notice that the hole are perfectly spaced so they're not extending on either side of the spot making it a nice clean presentation around the front now in this leather I've backed it it's not required to have a backed piece of leather or faux leather when you're setting spots because there's no way they're going to come out or stretch out after the fact I just happen to really like using contrasting colors and be sure to watch our video on how to apply backings to leather and we'll talk about why we do this and when we do it so to set this spot now that we have it on in holes on to the leather we're going to simply turn it over and in this case you can use your work surface here we won't need to use our anvil like we've done in setting eyelets and rivets and snaps because again we don't need as much pressure to set these so a lot of people like to just kind of start them with their fingers and push them on over I don't recommend you finish it off like that because you want a really good good flat and flush setting so that there's no scratching so for example let's turn this over here and you can see it's really smooth I can wear this against my skin there's going to be nothing that's gonna snag on me in this case here I have the leather back but also again a real smooth setting now one question that may come up is why if we have a backing do we not try and hide these spots underneath the backing and I it's a personal preference I like to put my spot settings over the backing because when you go to glue your backing down you're gonna have all these little bumps and it doesn't look intentional anyways so your hardware might as well be set over it which has more intention and doesn't cause any conflicts with the wearability of it again because it's very smooth when it's set properly so we've started pushing this one over here and I like to take one of my little hammers that I have and just tap it down turn this around and I'm gonna tap down this other side now you notice I'm really holding the leather down firmly on each side as I tap him down just light taps I don't want to collapse the spot but I want to make sure that those ends are as far down as I can so nothing is going to be pokey on the very end so turn that over you can see we have an unblemished properly set spot now the little spots can be is slightly more difficult to set I'm gonna show you why you'll notice on the larger one that the length of the prongs are equal to the diameter of the spot itself so you're able to really close them down on top of each other fairly neatly but in this case you can see the prongs are slightly longer than the diameter of the spot now it needs to be in order to be able to go through a couple layers if you wanted to use it as an attachment but again because the prongs are longer than the diameter it can be a little tricky so there's a few ways to set it and I'm going to show you my my preferred way and let me turn this over here you'll see here on the back of this one that I set we cross them over now I prefer to cross them over like this rather than opening them up like a brad because when we open them up like a brad I'm going to show you what happens so here's a piece of leather where I've already pierced some holes which I'll show you how to do in a moment but I also have a little trick here I want to show you I have a little black dot drawn between the holes and that's because sometimes if I pierce my holes when I'm all done and I go to set in all my spots I can't find the holes anymore so that little black dot between them it helps remind me where they are and that spots just gonna cover that anyway so it won't be a problem so I'm gonna push that in here now if I was to open this up like a Brad and I'm gonna use some pliers to help me do that sometimes what you do is you get a bit of a ghosting effect on the front let me lay this down see if I can exaggerate a little bit so you can see it there at home but if they aren't completely completely flat you can see little bumps here from the ends of those those prongs and especially going across an entire bracelet it'll begin to rip a little bit so I really prefer not to set them that way and prefer to set them where they're crossed over one thing also to see is the holes when we punch the holes if you can look at the area around this spot right here is nice and clean there's no holes showing from the side but this one because the holes were punched too far apart you can see a little bit of the holes and it makes it a lot less cleaner so let's talk about how to pierce these slots for the spot and make sure that we do it in a way that's going to give us the cleanest space around that spot for that we're going to use the 1.5 millimeter slot piercer and you'll see it's a about the same width as our prongs are on our spots we use it on our interchangeable head it's gonna take off the spot pitch now you'll notice the distance on our spot piercer is just too large to use for our small spots and that's why we're going to do these manually screw on our 1.5 millimeter and then we're going to take our tiny spot and we're just gonna press to create an impression so we know exactly where we need those to be and then I go to the inside of those impressions because we also have to take into account the thickness of the tool again if I wait too long when I take this out that sole leather is gonna slightly self heal which makes it really hard to see those holes especially with eyes like mine so I'm gonna go ahead and put that little dot there now I'm gonna take this place it in the holes covering that dot and again you'll see I have a nice clean area around there I'm gonna turn it over and I'm going to cross them now rather than use my hammer because this is such a tiny area I like to use my pliers and again give it a firm grip so this spot doesn't move around on you and fold it down slightly angled just partway then you're gonna take the next one and fold it slightly down just partway and then finish it off with the slight camber in order to make sure it's nice and flat flush now nothing's gonna snag on that and so you can see you have a much smaller profile here versus opening it like a brad and when we flip it over you can see this one here is much flatter around it than this one which kind of has some bubbling here and that's from those prongs pushing that faux leather up so I do prefer to set them crossed over versus opening them up like a brad whenever you can now I did talk about how I prefer to use these spots over the backing when I set spots but in the case of the small ones because they are so tiny oftentimes I will set my backing over small ones if I'm only using small ones and you can barely see them through the backing so play around with it both ways and you'll kind of come up with your preferred method for working with hardware and backing and and um in which order you like to do things and you'll find that out over time so thank you for watching our video on how to set spots I hope you have a chance to also check out our videos on how to set eyelets and how to set rivets and how to set snaps there's a whole bunch of different hardware pieces you can use to connect things together or to just add great pops of metal color to your designs thanks again for watching you

You recently viewed

Clear recently viewed