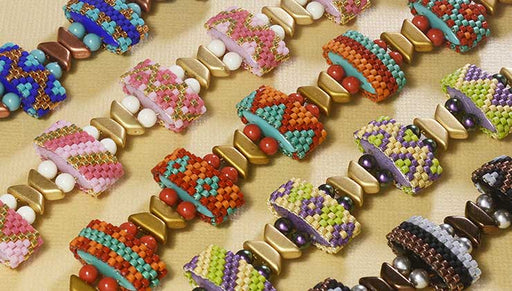
How to Make the Giza Bracelet Featuring Super Kheops par Puca Beads

SKU VID-1636
Designer: Alexandra Smith
In this video, you will learn how to bead weave this design using a combination of 2-hole Super Kheops par Puca beads, Brick beads, and Es-O beads using Fireline beading thread and 11/0 Miyuki round seed beads. You will also see how to use jump rings attach round rolo chain to either side of the bracelet.
FEATURED IN THIS VIDEO
Audio Transcript
Note: This audio transcript is auto-generated and may not be completely accurate.
hi this is Alexandra Abita Holley here to show you how to make the giza bracelet in caramel so here we have the finished variation using a floral color pattern and this bracelet showcases the compatibility of several to whole beads including super key up spar Puka beads brick beads s o beads and also some monkey seed beads for spacing for embellishment we have some three millimeter Rolo chain that I've attached to the beads using jump rings so the first part of the video will be weaving the centerpiece and the second part will be adding the chain the piece is finished with a magnetic clasp I've got some thread protectors some jump rings the Rolo chain and a couple of tools there's needle nose and round nose pliers some scissors smoke fireline my size 12 needle so let's begin I have cut three feet of fireline and I'm going to string on a stopper bead I'm going to leave myself about four inches of tail because I'll be weaving in and tying off both ends of my thread when I'm done so with that on there first I'm going to take one of my super key ops part Puka beads now you can see that these are pyramid shaped on the top they have a flat bottom to them and they're double drilled so I'm going to set the bead on the table so that I know the orientation of my my holes first I'm going to go ahead and pull in a couple of my other beads that are going to be part of the design and this way I know I'm getting off to the right start with the orientation of my needle through the beads so I'm going through what I'm calling the nose end that pointed nose end of the bead and pull it on and come through my brick bead and then the backside of my next super key ops bead still keeping the pyramid side up and the flat side down once I had those on I'm gonna start with my seed beads I'll string on two seed beads then one of these two whole sob it's two more seed beads and now I'm ready for my next set of key ops beads again I'm going to bring them over and lay them in front of myself so that I can see the orientation of the beads with the holes set that up and then string them through and then I'm gonna take on two more seed beads another tool sob two more seed beads and again with my set of Cheops and brick beads so this will be my pattern going up the one side and this is the challenging part to get the orientation of the drill of the holes coming down the second side is quite a bit easier there we go two more seed beads another sob two more seed beads and I'm gonna continue and once I get the link that I want I'll come back and show you how to attach the clasp on that end and then work our way back through the other side so I've strung on all my beads and I'm ready to finish off one side of the bracelet with a clasp so for that I'm going to take one of these thread protectors let's string up the one side there's a little tiny tube there I'm putting my needle through I just love the clean way that these findings help to finish off a piece now I'm going to bring my needle back down through the opposite side it's a little tube on that side too and it just cuts the string really nicely in that groove now before I double back through any of my beads or add any extras on I want to remember to add my clasp so I'm going to take half my magnetic clasp string through that loop and get that onto the thread protector you'll find that the magnet kind of pulls on to parts of the middle piece so it's flopping around against the middle there that's okay alright so now I'm ready to add on more beads I'm getting two seed beads and sob and two more seed beads now here I'm going to come through the opposite side of my two whole beads and it really starts to pull together now and you don't have to worry about drill orientation anymore you can just send your needle through okay and in between each set of Cheops beads now I'm adding two more seed beads one sob and two more seed beads and back through my two hole beads the key opps in the brick give myself a little more room there and adding on to more seed beads and also bead to more seed beads now design tip that I always like to give with any to whole project make sure that both holes of your beads are drilled because every once in a while you'll find one that's stopped up so just look through your beads beforehand make sure they're all good to go I having my seed beads coming through and I'll continue this down the second side of the bracelet so here's how we're looking let me flip it over front side it's really pretty okay I'm going to continue threading on my seed beads and s o beads between my other two hole beads and when I get to the other end we will finish off the clasp on that side all right so I've finished weaving down the second side of my bracelet and I'm ready to finish off this end we need to add just a few more beads to get up to the clasp portion my two seed beads my sob and my two more seed beads then I'm gonna grab my other thread protector string that on now this makes a six and a half inch bracelet if you want to add length just string on more beads going down the other side of the thread protector and stringing on my second side of the clasp now I'm coming up to my stopper bead here but first I'm going to add a few more beads two more seed beads and two more alright once those are on what I'm gonna do is remove my stopper bead just by sliding it off and with that tail I'm going to tie a simple knot between the two ends that will fall right between the seed beads and the key op speed there we go and I still have the needle on the one side and I'm going to thread through weave in my thread and tie the one side off just come between a couple of beads and bring the knot through there once and twice leave it in a little bit more throw some more beads and clip that there's my little scissors can use thread snips now I'm gonna thread my needle back on to the tail end there we go this one I'm gonna come up the opposite side away from the previous string tie a knot here and one more go through my last couple beads and clip my scissors got onto the magnetic clasp always the challenge there we go okay so we've woven the center portion of our bracelet the next step is going to be adding the chain so for that I'm going to use my two pairs of pliers my jump rings and I have pre-cut sections of chain again if you want to make a longer or shorter bracelet you'll just adjust the amounts of beads that you weave and the amount of chain that you're using now I've measured to know that I need seven lengths of chain for each section that I'm attaching here to space it right between the beads so I've also gone ahead and pre-opened my jump rings to get ready for the project now to do that I just took pliers in one hand pliers in the other and opened the jump rings side-to-side so I've got a little pile ready to go and my first step is to take a jump ring take one of my sections of chain slide on the end link of my chain and also slide on one of my two whole SOPs it's a delicate process they are glass so you want to go slow and just make sure you just slide it gently on and the jump ring fits just perfectly in that hole so now again that magnetic clasp was to hang onto things I'm gonna grab over and get my other plier and close that jump ring up nice and tight so that's got my first link of chain onto my two hole bead so next I'm going to take my next jump ring and my next length of chain slide on the end link I'm gonna slide on my next to hole beat before I close it up I'll latch the previous chain that's attached to that other tool bead gently slide that on hope you can see that going through and bring over the opposite link of my first length of chain and close that up I can continue that all down the length of this side and the next so I'll do one more section just to make sure it's clear get my jump ring grab my chain find my next sob on the line and I'm gonna slide it on to my jump ring these again are 22 gauge jump rings which is on the thinner side so if you have thicker jump rings they're probably not going to fit through these beads the 22 gauge seems to work really well got that other length on and I'm gonna close it up so I'll go ahead and finish attaching and show you the finished piece now I finished adding my chain lengths and I'm ready to make my final connection which is my last jump ring so I'll pick that up send it through my last sob sometimes it takes a little more than others to work that through just be very gentle and now on to the last link of my chain close it up and I chose to use antique metals to go with the colors of the beads the antique brass jump rings in class and the antique copper thread protectors so there you have it the Giza bracelet in caramel and also in floral I hope you enjoyed this video these projects tools and supplies are all available at beadaholique.com and don't forget to subscribe to our YouTube channel for all the latest updates thanks for watching

You recently viewed

Clear recently viewed