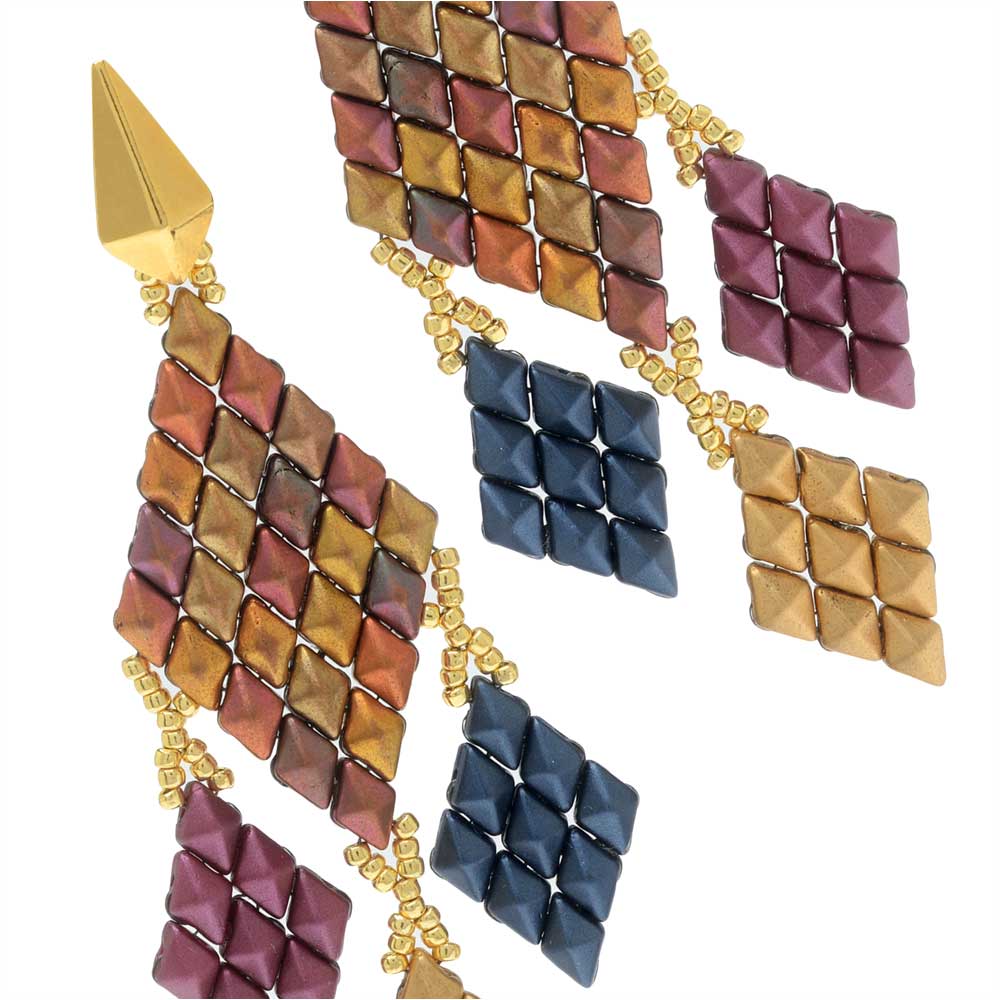
Audio Transcript
Note: This audio transcript is auto-generated and may not be completely accurate.
Hi, this is Kat with beadaholique.com in duo mini beads and these are two whole beads and they're gonna come together in this beautiful lovely statement earring so I just wanted to take a moment to actually pull out the regular diamond duo's here so that you can see them side by side with the mini diamond duo's so the mini are gonna be four millimeters by six millimeters and the larger ones are going to be five millimeters by eight millimeters so now that you get a chance to see them side by side there is significant difference now the design I'm going to be doing here today will work with the larger diamond duo's just understand that it's going to be a much larger earring when you really put it all together so they work the same way they have two holes that run down the side and the top and the bottom and the top there so you can actually kind of see that the needle fits right through the side there and you're gonna get a chance to see that as we work with them here so I just want to start by showing you that of course for this particular earring we're gonna be using four different colors but choose your favorite colors or you can do a monochromatic and to do that I have brought out some of the other colors here that we carry now this is just a selection but as I just wanted to show you some of the pastel colors we also have some beautiful metallic colors some crystal which is really kind of cool it kind of gives a nice illusion effect and then we also have some lovely backlit colors and luster colors as well so be sure to check out beadaholique.com and that's where you're going to find all the supplies that you need here to make this earring so the other supplies that you'll be needing are some 15o Toho seed beads I'm going to be using a size twelve beading needle a four pound fireline and this is going to be using the smoke color for me today we also have the crystal and the black as well I have a pair of snips but you can also use a pair of scissors or whatever you need there thread zap works as well and then I have a nice little earring back and an earring host that has a nice little loop on it which is where we are going to attach our earring and I went for this little kite shape because I thought it kind of went with a nice little silhouette that we are gonna be working with here today alright so if you have all of your supplies ready to go we're gonna go ahead and get started all right so we are gonna start by making the large diamond at the top so I'm gonna be using this metallic mix here for this now I have my size twelve beading needle with my fireline and I have about six feet or so on to my fire line so what I'm gonna start by doing is I want to kind of kick out a few and start to arrange some of the colors that I might want to do because as you're gonna be working you don't want the same colors to keep appearing over and over you want to get a nice sort of clean mix so I'm starting to see that there's some pretty purples here that I want to use and some pink ones as well so the first thing I'm gonna do is actually kick down the first three that I want to sit at the bottom there so it's gonna kind of look like that now on the front of these beads there's a nice little sort of beveling happening and on the back you can see I'll just sort of flip that one over it has a flat backing to it so we're gonna sort of treat this as front and back which can be maybe one of the trickier parts with working with these little guys but hopefully I'll make it nice and easy for you alright so I have the three that I want at the very bottom so what I'm gonna do is I'm going to pick up at the bottom and then pick up at the top and then pick up at the bottom so you can see that my needle is going straight through those first three beads and now you can see that they're gonna kind of give me a little trouble here as I slide them down to the end and I want to leave a good tail of about six I would say I would actually say leave about 10 to 12 inches let's err on the side of safety all right so now all I'm trying to do is just arrange them in my fingers just like so all right so now I'm going to take my thread and I'm going to go through the second hole of that top one there that's sort of bronzy one and I'm going to pull that through and I'm going to create a nice little thread bridge on the side there so let me sort of arrange that and then I'll show you alright so now we're just coming through and then came all the way back through our beads there so now I need to pick up another bead that's gonna sit in there and finish off that little diamond shape but I need to pick up my bead on the bottom half there and then string it through the next bead up at the top I'm gonna lay this down here in just a second so and I'll talk you through exactly what I just did alright so these are our three beads we picked up when we went through here the top one and then the bottom one we turned it around went through the top and the bottom one here and out this top bead right there so just like so so now we're gonna take our two little ends and we're just going to tie a gentle little overhand knot just pulling that through and that is going to do a couple things there that's gonna create a little thread bridge and now I'm gonna just kind of go through that one more time in a similar fashion so I'm going down through and you don't want to pull too tight and this is also the reason that we want to use that four-pound is because we want to be able to get our needle through multiple passes here because this is going to start to get really heavy when we start to add those other beads and the other components there so you want to just make sure that you're just using the four-pound and just pulling together fairly gently but keeping a good natural tension alright so now we're gonna come on the outside one more time and now what I want to do is I'm gonna add on a bead coming out this side okay so all I did was just go all the way through there and now I'm coming out the side so now to continue our diamond shape we need to add another bead right there so we're going to go through the bottom bead and slide that down and now we're going to turn around on this diamond and before we go through that next one I need to pick up the bottom of another bead so we're gonna pick up that bottom and go through there we go again just some good tension not too much though and now we need to pick up another bottom and now we're gonna pick up the top of a bead kind of find a color I want to use here there we go so now we're gonna pick up the top of another bead string that down and this guy will sit right in there so you see how I just picked up the top and then it sits right into my little diamond shape there so now we're gonna need to go up and over and around through a couple of beads there and I'm gonna go through this bead right here at the bottom and now what I'm gonna do is I'm gonna turn my thread around in the center here and catch that top bead or that top part of the bead I just came out of and now we're gonna come out this bead right here and we're gonna add on another bead so now we've sort of gone back and forth now if you get lost in this just make sure that you're not creating thread bridges between the outer beads there it's one thing to go over the same bead just don't create thread bridges on the outside there it'll kind of break the little illusion there for yourself all right so now let me just try to arrange this on our table here so we're gonna add another bead that's going to be there and we're going to be adding it at the bottom so when you just keep building up that diamond shape and now we're gonna go through the second hole there and you can see that I have my little diamond sort of setting up like little teeth so we're just going to add diamonds in between there and make sure that you're picking up at the bottom so we're keeping that beveled edge on top all right there's one I think I want to add a purple one in there then you can just sort of see the colors you know they all kind of start to create a really beautiful light light little metallic there all right so now we're gonna add the bottom of another one just like so and now what we want to do is add another little diamond duo that's gonna sit right there in the corner so you're gonna need to add a top say I'm just sort of flipping around some diamonds here so adding the top pulling that through and having it sit right there and you guessed it we're going to turn our thread around so go down through let's go down through two and go over one more and now we're going to turn that thread around all right and now we're coming out this side here so what we're gonna do is just turn that thread around actually I think I want to go ahead and add that last one on right now I think it'll make it easier there we go all right so we're coming out now let me just put this down so we've woven through and looped around so these were our four that we started with here and then we've added and just gradually built up now you want to build up until you have five across and that's going to be this row here that we're working with so that's why I was like you know what let's just add that one on right now before we even get to the other side so all we're gonna do is we're gonna go through let me find a good color there and we're gonna pick up one more on the outside so let's make sure we're getting it on the bottom and now that'll sit there this is our little turn around and again you can see that we have those four little teeth on top there and now you just need to pick up four more beads on the bottom sides and we're just gonna set them inside there now if you haven't worked with the diamond duo's before this might be a little bit of an advanced technique but really when you look at it we're just sort of adding them all together and they fit so nicely that you actually almost don't even you can't even really tell how sort of difficult this could be it just takes a little bit of time and practice all right and now we're gonna add another one to the outside there which is going to go into the top side of a diamond zero stringing all the way down here oops I misspoke I'm so sorry I meant the bottom side and that's how you'll know right away if you've picked it up in the wrong order because what I need to do is I need to pick up a bead that is gonna sit oops I need to pick up my bottom one first there we go see you'll know if you mess up right away there we go okay so add it on that last one there and now I'm adding on the ender bead sort of there so you can see that we're gonna pick up the outer edge or I'm sorry at the top I'm gonna go back through and now we're gonna complete that there we go alright so that gets you about halfway so now all we're gonna do is we're just gonna kind of decrease again so you can just see sort of how that is the center point here I'll just bring it up to that other earring so you can see so now all we're gonna do is just do the same and just decrease until we get to the top all right so I'm just gonna go through one of these beads there we go and now I can turn it around and I want to come out the side of that little purple bead here that I have this one but I don't want to go through that last bead that I strung so now I'm ready to turn it around and add in our little beads here at the bottom so I'll just pick up one at the bottom and go through pick up another one at the bottom go through making sure our threads aren't getting twisted there we go all right and let's see here another one at the bottom and go through and again we just gotta turn our thread around and because we're doing a decrease we have to go back just a little bit further so I'm going all the way to that third bead there so that I can turn it around here and then turn it around at that last bead I strung alright now we're going to create a little thread bridge and go back and you can see how this is shaping up really nice or making a diamond of diamonds and just two more here so there's one and then two and again same thing just turning it around and we're getting ready to add our last little bead up there at the top and actually in this step we're gonna go ahead and we're gonna take that extra little step and add on our earring post at this point using this thread so it'll just make it nice and easy alright so we've got at that point now I'm just going to go back one back went over to the side turning my thread around and adding our last little topper there and I want to pick up a nice gold bead for that there we go all right so now the next step is to get our thread so it's coming around so again we're going to take out this sort of pink one here and go down creating a little thread bridge and actually I'm gonna see if I can do that one stop there we go all the way down through that next topper there and we're gonna go out this side one more time all right creating a thread bridge and going all the way through that top hole and then the bottom hole of our very top diamond do because now we want to turn our thread around so that we are coming out the top all right so that is our very first big diamond so now we're gonna get ready to add on our little topper so we're going to need to break out our 15 OCD deer all right now you can see and I'll just sort of show you the back here that we're gonna be adding one two three four five six seven eight we're gonna be adding eight seed beads now you might have a little wiggle room in there as you can see on mine but what I suggest you doing is sort of flipping it over and let's add one two three and four so add four slide them down your needle all the way to the end and you can see that I'm working on the backside because you can see that it's all flat there and now we're gonna go through the little loop on the back of the earring slide that down and now we're gonna add four more seed beads so instead of trying to add eight we're adding four and four all right so now on the back of the earring we're just gonna go through that top loop there and we're going to run our thread all the way through that one more time just for a little security because this is where you're gonna be hanging your kind of earring from so just go through as many as can fit keeping good tension not too tight going through our loop and down through all right yeah you can see that when I pull it it just stiffens up a little bit and just make sure that everybody is happy there you have good tension not too much just good tension all right so now we're gonna go back down and weave it into our work all right so I'm actually gonna flip this over there we go so you can see that we're coming out one side of our little diamond now all I'm gonna do is I'm going to take my needle and I'm gonna go underneath one of the little thread bridges there and pull through until I have a little loop pull my needle through and give it a nice little knot there so now I'm just gonna go out to the side and weave down into the work and this is again why you want to keep good tension but not too much go down through one more time and we do a lot of thread passes so I'm just gonna you see how I've caught that little thread bridge underneath there so we're gonna just tie another quick little knot for security there we go pull through and I'm gonna weave through one more time you can see that it's getting tight in here which is what you want you don't want it to be too sort of floppy but just tight enough that you can continue to get your work through alright so there we go so now I'm gonna take my little snips here come over and just snip off that excess thread alright what I have left to do is I'm gonna tie in this tail because we're going to be using the tails from the other pieces to attach them so I just want to go ahead and get rid of this right now so just do that same thing to tie off and weave in your thread add a couple little nuts and then we're gonna get to making those small pieces and then adding it all together alright so now we're gonna make one of the smaller components here and I'm gonna be using this color in this example so I've gone ahead and strung up my needle again this time I have maybe about three feet or so of our thread you need much less obviously for these small ones so same type of thing we're just gonna kind of pull three down and with this one you don't need to worry too much about the coloring because they're all gonna be the same but it's gonna start off the same way with picking up one two and three across the bottom and top in the center they're stringing it down and now we're just gonna come over make that same thread bridge and we're gonna pick up the bottom of another one to complete our quad there and pull that through alright so we have our foursome again and take and we're going to tie a little knot there good tension not too much and go back through little beads and all the way back over all right so now just kind of tightening everybody up there there we go all right now we're gonna add on bottom bead and again just keep watching those bevels just make sure everybody is upright the way he needs to be we're gonna go back through creating that thread bridge picking up a bottom going through the next one there and picking up another bottom sliding it down okay and then we're gonna pick up a top adding that down there and then kind of turning it around on the edge there we go and going back through a couple of beads they're pulling tight creating a little thread bridge going back out to the side here coming back around adding one more bead at the bottom there into that little groove and now again we're just gonna go back through same as we did at the top of the last one and turning it around so that our thread is coming out the top here and now we are ready to attach it so I'm gonna repeat this process to make the gold and the blue ones and then I'm gonna tie in all of my little threads here at the bottom leave your top ones and then we're gonna come back and I'll show you how really quickly to attach them and then we're all done alright so now I have all three of my little diamond pieces here and before we go any further you have a decision that you need to make do you want to create an earring that is mirrored or that is duplicated so I'm actually gonna go for a mirrored look because I've done three different colors here at the bottom I'm gonna put my diamonds as you see here so that they have a nice little sort of right and left it's entirely up to you it will work fine if you just switch them they're both the same alright so let's go ahead and let's start by adding on our sort of blackberry color here and let me just thread my needle there we go so this is the top end and what we're gonna do and I'll just kind of show you on the other one here is we're gonna be adding in some of those beads those little 15 O's but they're going to kind of have a little X formation so we're coming out the left top side so what we're going to do is we're going to add one two three four five and six so add on six of our gold beads three four five six alright and now we're gonna come and take our needle and go through the second two top bead right there on the edge so we're going in through that little section right there and pull all the way through and don't worry that it'll flip around until we get it situated and now we're going to create a little thread bridge so that we're coming out the top of that bead and we want to be coming out the bottom of the bead adjacent to it so the one on the outer edge there okay so just let me get my hands out of the way so you can see so just like so and now we're gonna pick up one two three beads two three and we're gonna go into the second and third bead that are part of our lower half here so I'm just gonna slide that down and now we're coming around and going only into the second and third bead okay and now we're just gonna pull tight to create that nice little sort of bridge on the outside and now we're gonna pick up three more of our gold beads and we're going to come back through the other side here right through the top bead in our little diamond so we're creating a nice little sort of X that's happening there alright so now just go up through and repeat that taking your needle through the whole thing one more time I'm just gonna flip over to the back there so I can come out the side all right and again just all the way down through down through the first three all right sorry I guess the last three of those little seed beads let's go across that diamond one more time and now we're gonna do a little thread bridge down to the bottom here and we're gonna tie off this thread so you do have a little bit of extra thread here I always like to err on the side of safety if you find that you have too much thread and you're making multiples of these and you sort of learned exactly how much you'd like to use feel free to do that and just turn around one more time here like I said just make sure that you're not creating those thread bridges on the outside you don't want to sort of break the illusion by jumping over bead to bead go through one more and then I'm gonna trim this off all right so we now have one part done I'm gonna go ahead and do the blue one and it's just the reverse there so I'll do that one really quickly and then I'll show you the difference with the center one there all right so picking up one two three four five come on six seven eight three four five six let me just double count yes all right so eight seed beads and now I'm just gonna I'm just gonna kind of flip this around just so I can work the same way so we're going into the side bottom there so we're just kind of doing this in Reverse it's the same thing and just totally reversed around and come down and now we're gonna pick up one we're going to count down three one two three go through two and only two and then come around and add three and I lost a little tension there so I'm just gonna fix that there we go and now add three seed beads and go through all right now we're just gonna reach a sour steps and tie off and weave in our thread just as before all right now last but not least we're gonna be adding our goal one to the center down below and we're gonna be working strictly with that one diamond duo at the bottom there all right so we're gonna pick up one two three four five six seven and eight so eight of our 50 knows and we're gonna go through the bottom hole of that final diamond duo there at the bottom and then we're going to pick up one two three we're gonna skip over the first three there and go into the next two so this one will be even because it's hanging directly down to the bottom go into the next two so this one we're going to be creating that nice little X so give it a little tension and now pick up one two three and go through that diamond now we're just going to retrace our steps and tie off and weave in our thread make sure not to crisscross through the center here so you don't want to try to like do a figure eight that's happening that will only cause your piece to twist so you want to keep going in the same direction as before and just judge your tension as you're working here you want to keep good tension but you'll notice sometimes if you pull it too tight it'll get sort of kinked and pulled out of place so just make sure that you're watching that and just you know it's just kind of a feeling thing so as you're working just be aware of that all right so going back down through and we're just gonna tie off our thread we have a lot of threads going here so just be ginger with it you don't want to snap your needle but again this is why we recommend the four pound for this particular project because the beads are nice and tiny and you want to be able to have good tension there alright so you can just see I'm just sort of bending the needle back there just so I can get it through the edge you can do as many knots as you like to feel secure and as many knots as it can handle if you want to test it out there I'm good with that I just want to weave in once more through that Center there we go alright I'm Skye remove my needle snip off my threads add my earring back and we are all finished Oh beautiful result it takes a lot of little intricate work but I think it just creates just a stunning pair of earrings and like I said I made mine using four colors you could do two colors you can make all three diamonds the same color and your top a different color you can make it monochromatic there are so many options with this design with all the beautiful colors that are offered by the diamond duo minis and the diamond duo's themselves I hope you enjoyed this video you can find all of these supplies even more videos by heading over to beadaholique.com and if you're new here be sure to hit that subscribe button below

You recently viewed

Clear recently viewed