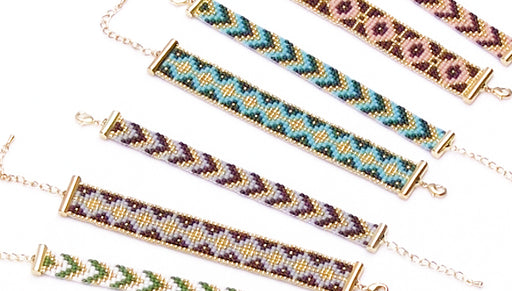
How to Make the Cotton Wrapped Loom Bracelet Kits by Beadaholique

SKU VID-1254
Designer: Kat Silvia
In this video you will learn from start to finish how to make our Exclusive Beadaholique Jewelry Kit: Cotton Wrapped Bracelets. This kit uses the Wrapit Loom by Rainbow Loom. Choose from our full kits and refill kits. Just pick your favorite color combination and have fun!
Audio Transcript
Note: This audio transcript is auto-generated and may not be completely accurate.
Hi, this is Kat with beadaholique.com and these are exclusive kits by beadaholique so i have brought out all the colors that you can purchase and these are featuring the cotton cord and this is a beautiful black cotton cord and you'll get this with each of them you'll get a personalized button and you can choose your color of beads and wrapping so these are the available kits that we have for you to purchase and we also sell these as refill kits as we call them so if you purchased a full kit which means you'll get the loom with it you can actually purchase more colorways so that you can create more bracelets without having to purchase another loom so that's always an option for you as well but no matter what kit you purchased if you just follow along this video I'll show you exactly how to make them so what you'll get in your kit let's assume you bought your full kit so you'll get your loom and I just want to show you really quickly that I have mine set up here but when you purchase your loom you'll get it in the full box here and this will come with instructions on how to set it up so I just want to show that to you very quickly and that's all I followed to set up my loom here so you just follow your instructions and you'll be able to set up your lamp so you'll be ready to go you'll also be receiving your cotton cord your Center beads and these are four millimeter czech glass beads you'll receive a button the Griffin silk you'll also receive a twisted wire needle and your seed beads as well you'll also get a little tube of glue and what's something that you'll need to provide yourself is just a little scrap of wire or a toothpick to help you applying that glue and then I also recommend either flush cutters or scissors to help you out and a ruler to help you with any sizing needs so if you're ready let's go ahead and get started all right so I've poured my beads out and I've taken my Griffin silk off of the card and I'm going to show you what we're going to do with that in just a moment but before we officially dive into making a bracelet I want to give you a few tips for sizing so as you can see here the way you're going to want to size and I'm just going to kind of flip my button over there because we're going to tie a knot at one end and then we're going to do two open lots on the other end so that you'll be able to actually size it in two different places now you're welcome to do multiple if you want to add a third open hole for your button to flip through but I just want to know that when you're doing your sizing what you're going to want to measure is from one end here with the knot to the other and here which is where your button will close so this will give me about a 7 inch bracelet and I'll show you once we get it on our loom how to kind of really gauge that but just be sure that you are making sure that you have enough space to do your loom okay so with that in mind I'm going to set aside my roller for right now and I'm going to show you how to set up your Griffin silk and what's really important about this is that it comes with one of those wire needles already attached to it but because we're going to be wrapping around our loom what I need to do is to attach my other needle to the loom and be careful not to get yours in a little knot let me just make sure that comes out there we go so go ahead and move to the side of your Griffin silk that does not have the wire needle attached and all you're going to do is thread it through and pull it down and because of the kinks in the Griffin silk you can kind of get it in one of those notches and all you're going to do is just pull it a little tight because you're going to want that loop to kind of close up and you can just kind of twist it with your fingers to help it out there so you can see that little loop is just getting a little tighter around that Griffin silk so that it's not going to move for me so now that I have my Griffin silk set up we are ready to cut our cotton cord now what I recommend is always cutting a little bit more cord than you think you're going to need because you don't want to get to a point where you've tried to size it and it doesn't it no longer works so what I'm going to do is I'm going to cut 30 inches of my cotton cord here and again you can use scissors or you can use flush cutters it is entirely up to you all right so now that I have my cotton cord what I'm going to do now is I'm going to slip on my button here we go and keeping those ends together I'm just going to make sure that it lands in the center of those two cords and I'm going to tie my first knot and this is just a very simple overhand knot you're going to want to make sure that your cords stay nice and even and make sure that that knot you kind of keep scooting it down so that's right up next to your button just like so and now here's where we're going to do a little bit of sizing so I'm going to move along here and I'm going to make my first knot at about the six and a half inch mark so I'm going from not to not here and I have that place in my fingers and I'm just going to tie and knot same as we did before just a simple overhand knot and just kind of making sure that it lands about that same place before I officially tighten it I'm just going to just double-check and I just want to scoot it back a little bit so there we go and you just want to make sure that both cords are still nice and even there we go and now what you're going to want to do is sort of look at your button they're all shaped a little bit differently so you'll have to do this with your own button here but you want to make sure that the next knot that you're going to make you can see it right there in between my fingers and I want to be able to flip that through nice and easily so I'm going to want to make a second knot that's about three quarters of an inch to an inch from the knot that I just tied so we're just going to tie another knot here all right and again making sure your cords stay nice and even and I'm just going to double check that my knot is good there we go fits nice and thick so what I'm going to do is just repeat that process to kind of create one more knot just making sure that it is the right distance from the previous not that I had strung all right so now I am all set and ready to go and we are going to start setting it up into our room now so go ahead and take your loom and set it in front of you so that's the slider portion is towards you and what you're going to do is you're just going to take the side with the button and you're going to slip it into the notch up there so that your knot is on this side of the loom and now what you're going to do is you're going to slip the other side in and I'm slipping it in between the first and second knot and all you're going to do is sort of pull it back and wait for it to sort of catch and get nice and taut and you can see that my cords kind of rotate so all I'm going to do is rotate this side just a little bit so that my cords are nice and flat and now you can see that they're parallel so this is how your loom should be set up and now we're ready to add on the Griffin silk so take your silk and what you're going to want to do is find the center point of your silk and we are I'm just going to kind of hold it with my finger and now what I want to do is I want to make sure that I get a nice even cord on both sides you're going to lay it over the top and what you're going to do is you're going to bring both sides through and out without Criss crossing them so your loom looks like this so now I'm going to do is I'm just going to push it up towards the top there because we want to start up near the top and now I'm just going to tie a double overhand knot just to secure my core is in place all right and now you just kind of make sure that it's nice and taut in there so the first step is to go down and around on the right side and down and around on the left side so now your loom looks like that is that's a same motion that we did for that very first step but now we're going to start by adding our beads so I'm going to move some of my tools out of the way all right so I'm going to begin by adding one of my teal seed beads here and I'm going to go ahead and slide that down and I'm crossing my cord to the left and I'm picking up my left cord going through that seed bead and now crossing over to the right so you're sort of catching that bead right in between there and now go ahead and scooch it up and give your cord a nice little tug now the same we're going to go down and around and out down and around and out and now because we want to get our beads going wider I'm going to do two seed beads and again crossing over I have my two seed beads here and with my other cord going through the other way and going out so you're just Criss crossing your cords through both seed beads so sort of through the same row so now as you repeat go down and around and out down and around and out and for this next row we're going to pick up three seed B now you'll notice that I'm just picking these up with my hands because they're size 8 OC beads so they're a little large but if you want you've also probably noticed that I have a little extra stand here on my work space and this will also help you pick up those beads if you so desire I kind of like to leave mine on the table but it is completely up to you and I will show you how to use that in your instructions that you'll get with the rapid loom so now I'm taking the other side of the cord and going through all three of my seed beads so you're always going through the entire row and then you just want to give it a nice little tug and make sure that it is nice and snug up against the other beads so you can see how our loom is widening as we add more beads so now that we have the starting portion we're going to start adding in those gold beads so the same process down and out down and out and now what we're going to do is we're going to take one seed bead one of our Center of beads in this case mine is a gold one and one more seed bead I'm going to go ahead and slide that all the way down and now you're going to take your needle and go through all three beads you're always going to always go through the entire row and pull that and now you can see it's getting a little tighter in there because we have some different beads but just go ahead and just keep on pulling it should be a nice snug fit and the idea is that we want this to be a nice structure we don't want it to be flimsy so now you're just going to repeat the pattern in that Center B so I will show you what that looks like here so we're just going to repeat that same pattern going all the way down and then I'm going to show you how to finish it off so I'm going to leave you at this - just continue that very same pattern with down and out and around down and out and around and then adding your row of one seed bead one fire polished bead one of your gold or silver beads and then one seed bead okay so I am adding the last few rows here and as you can see it's getting nice and tight here at the bottom and as you work you might need to loosen the tension so to do that you're just going to kind of kick up the little teeth groove and kind of let it so that I get a little bit more slack there so okay so when you get to about this point you're going to need to start thinking do I want to add another row of the main pattern seed bead or am I ready to start tapering off into the little triangle right there I think I am probably going to get away with one more row so I'm going to add another row again just the same technique that you've been working with here alright I'm just going to kind of tie that down here and I think that's going to be my last row of full seed beads because that was kind of getting tight to squish in there so we're just going to reverse the pattern that we did on the first time and you can kind of see I'm using those needles to thread up through there now because my hole is much smaller so you can't really get your fingers in there but we're just going to reverse that pattern so we're going to start with three seed beads slide angles down and going back through with the other needle all right I think this is going to be a really nice fit all right and now two seed beads just kind of taper it off a little bit more string those all the way down go through with the other needle making sure to catch both seed beads there we go all right and the final one is our final one that last seed bead so don't forget to go down and out and around we go and see it starts to get a little tighter in there but this is our last one so we want to be nice and flush up against the edge there all right now you have added your last bead and just continuing the wrapping around you're just going to go down through out and around and down through out and around keeping them on the opposite side and now all we have let's do is just sort of tie it off so what I'm going to do is I'm going to tie one overhand knot just to kind of finish off my work there so you can kind of see my knot just sits in there and then what I'm going to do here is I'm going to do the wrap around one more time because you really want this to be nice and secure so just go down and out and around and down and out and around one more time and now we're just going to repeat that process of tying one knot there we go so now it looks nice and clean there and what I recommend is kind of letting a little slack go and now we're going to be using our East thousands and go ahead and pour a little bit on two I like to use just a little sticky note here you don't need very much and make sure to close the back up before moving on because it will dry up real quick so go ahead and dip your toothpick or a little scrap of wire and like I said you really don't need a lot here but what you're going to want to do is add a dab of glue there right on top of the knot and you can kind of see that I'm just sort of pressing it into the Griffin silk because it is a fabric so it'll kind of soak it up and while it's drying there all I'm going to do is secure it secure it with another knot so you kind of put your knot right on top of it and that'll be nice and tight and again just a little tiny dab of glue just to make sure that those ends don't fray there right there now I recommend leaving your loom just like this for at least 20 minutes before trying to take it off and at least 24 hours before you try to wear it you really want that glue to have a nice strong bond but for the purposes of my video I'm going to show you what it looks like to trim off onto your loom okay or trim it off of the loom so I'm using flush cutters for this part because I like to get a nice flush cut there and sometimes if you have some big scissors can be a little difficult to really get it in there so all you're going to do is just slide it out of the loom the same way you put it in just very gently so go ahead and set your loom aside I'm gonna move my beads out of the way there but now that the last finishing touch is you can clip off the tails of your core and again you can use flush cutters or so there's for this as well so there you go so be sure to let it dry but you are all set with your loom bracelet and I'm just going to show you what our finished product looks like here and you can do several maps you can also do just the one there if you prefer but this is the cotton cord wrapped loom bracelet and these are exclusive kits brought to you by beadaholique I hope you enjoyed this video you can find many more videos and all of our exclusive kits at beadaholique.com you

You recently viewed

Clear recently viewed