How to Make a Wire Bail for Domino and Scrabble Tile Jewelry

SKU VID-0076
Designer: Julie Bean
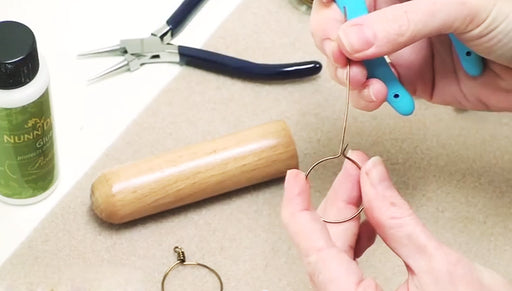
In this video, learn how to make a custom wire bail for mixed media products such as dominos, scrabble tiles, and bottle caps. Step by step instructions on how to make the bail itself and then attach to the tile. This project uses 18 gauge craft wire and allows you to make a bail any size you need to fit your piece.
Audio Transcript
Note: This audio transcript is auto-generated and may not be completely accurate.
Hi, this is Julie with Beadaholique.com and today I want to show you how to make your own custom bail for domino tiles. You can also use these for scrabble tiles or bottle caps as well. So these work great for a lot of different mixed media pieces which don't already have a hole drilled into them. So the items that your going to need is a ruler, a steel bench block. I have it on a rubber pad here to absorb some of the impact. I've got some E6000. We're going to use this glue attach our bail to our domino tile. I've got a chasing hammer, a pair of chain nose flat nose pliers, 18 gauge craft wire. It comes in a variety colors. I chose a silver tone but you could you gold or copper. I have a pair of flush cutters and finally a pair of round nose pliers. So what you're going to need to do to begin is clear off your workspace. This requires quite a bit of tools and I'm gonna cut three inches of wire for the that I want to make here. Now if want to create a larger one cut a little bit more wire. If you wanna make a smaller one just cut a little bit less. Just going to line this up with my ruler It doesn't have to be exact. I'm just doing about three inches Just snip it. Put my wire away. That's not going to be needed anymore and the same with my ruler. Now I'm just going to try to use my fingers to straighten out the wire as best as possible. Once you've done that take your round nose pliers and we're going to do a technique which you've probably seen another video by Beadaholique.com which is how to create a spiral head pin. We're just going to do the same technique. Go ahead and we're creating a curve. I'm just working the wire around my pliers. You see that I have a hand motion like this. I'm grabbing the wire rotating it and I'm actually pushing the wire with my nondominant hand around. And once I've got one full kink and just a little bit more. I'm going to now take my flat nose pliers and this is a really fine tip one but I'm going to put it towards the back so I can grip it and I'm just going to push that wire around a little bit more and then release move your pliers still having a good grip on them I'm just creating a spiral. I'm letting this hand do all the work and actually keeping this hand steady and I'm pushing my wire. Once I've made a few spirals and I'm happy with it I'm going to do the other side. Grab my round nose pliers I'm going to create a little curve another loop and I'm doing it the same direction so both of my swirls my spirals are going to be facing upward. So it's the opposite of creating an "S" So I've got that right now. Now I want to take my wire and put it about the midway point on the furthest back part of my round nose pliers because that's going to be the widest point take my wire and bend it like so. I've create a nice like hook just like that. Now wire is great, you can manipulate it all you want. I want this to look like it's standing a little bit straighter up take my pliers curve it a little bit here we go Just a little pinch. If I want to alter shape at all just put my round nose pliers back in there and go like so. Time to flatten it. I got that nice shape going relatively flat. I'm going to just try to make it a little flat of my fingers before I hammer it. I got the flat side of my chasing hammer carefully tap it Keep doing that until I get it fairly flat. Now go to the other side making sure not hit my fingers and just tap my spiral as well. There we go. You see it's now nice and flat. I want to actually place that onto the domino. I'm going to take the curve part here and I'm going to lift it up a little bit So you can see in the example I want that curve to go over the top of the domino tile in the front. Just a little decorative flourish. You don't have to do that I think it adds a nice little extra touch. Open up my E6000 just a little bit on the back you can use a wire, a scrap piece of wire applicator as well if you want. I got glue on it and just realizing I went ahead and I twisted that in the wrong direction. What I want to do is go like that easy enough. Now it's going over the top Just pressing it into place on the back. We have a custom made bail which would work very well with scrabble tiles and bottle caps as well. Now if you have a domino tile, scrabble tiles or bottle caps and you don't want to make your own custom bail but you want to really quick easy and lovely bail to use I would suggest using an Aanraku bail. Aanraku bails come in a variety of shapes and sizes. They also come in different finishes. You have the pendant style one with the hoop going to side and then you have the earrings style with the hoop facing forward. I'll show you really quick how this looks. So you would just put a little bit E6000 onto the glue on tab then you would just put your pendant, your tile on top of it let it glue in place. Works great for earrings as well. I'll show you the side profile. Here is the back It goes up and over the top which makes it have a real nice finished appearance and then you suddenly have a little bail which you can attach your earring hook to or a jump ring or whatever you want to attach to it. So those are some great choices you can make your own custom bail. It's not very hard and you get a lot of flexibility on how you wanna make it look or another great option is the Aanraku bails which are quick and easy and give you that desired hoop which you can then attached to the rest of your jewelry pieces. Go to Beadaholique.com for all of your beading supply needs!

You recently viewed

Clear recently viewed