How to Make a Knotted Waxed Linen Wrap Bracelet (beads on the outside)

SKU VID-0252
Designer: Andrea Morici
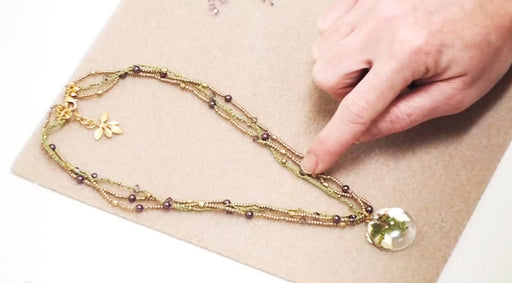
Learn how to make a knotted waxed linen wrap bracelet with beads on the outside. The warm brown of the waxed linen blends beautifully with the color of the antiqued copper seed beads in this handsome unisex wrap bracelet. See also How to Make a Knotted Waxed Linen Wrap Bracelet (beads on the inside)
Audio Transcript
Note: This audio transcript is auto-generated and may not be completely accurate.
Hi. This is Andrea for Beadaholique.com. In this video I'm going to show you how to make this waxed linen wrap bracelet. Okay what you're going to need for this project is some waxed linen. I used the brown color but it comes in brown and off-white and a black color. You're gonna need some seed beads or other beads with at least a one and a half millimeter large hole. I have some 8/0 metal seed beads in the antique copper finish. I love these metal seed beads. They're very cool. You're gonna need a clasp and in this case we're gonna use a button. This is a five-eighths of an inch steampunk sundail antique copper button. Love that. So for this video I'm just gonna make a bracelet that wraps around only once but as you can see you can make it as long as you want so you can wrap around multiple times. Totally up to you In generally the rule of thumb is you want the linen to be about three times the length that you want. So if you wanted a bracelet you would need your outer two threads to be three times as long as you want your bracelet. So I'm going to cut two pieces of this linen. Thirty-six inches. I'm adding a little bit extra. The reason I'm doing this because it's always better to have too much than not enough. So I'm going to cut a second one at thirty six inches. Now once again these are your outside strands. These are the strands that are going to be doing the weaving on the outside so they need to be longer than inner strands. Now for the inner strands those are not going to be doing any weaving they're just stationary. So they only need to be as long as you would normally used to make a strung bracelet. So if you want a bracelet that's seven and a half inches long I would recommend cutting your inner thread. Once again I'm being generous here. Let's say fourteen. You're going to have extra but that's alright and again this is for just a single wrap bracelet. If you wanted this to wrap around multiple times you'd double or triple or quadrupled this amount. Here I have my two inner strands or my course strands. What I'm going to do I'm going to place the two outer strands on either side of this. The two long strands are here and here and then the two inner shorter strands are right in the middle. I'm going to move my clasp. I'm going to scoot my seed beads over. What I'm going to do next I'm going to tie a knot about four inches down. Just a simple over hand knot. I love this wax linen and it does take a little bit of time to get used to because it's kind of sticky. It's literally waxed so it's so great to work with especially for knotting. So here we go. I've got my longer strands and my shorter strands in the center. Now normally what I'd do is I would tape this to the underside of the table. Mind you it has to be a table that is a work table if you don't want pull the finish off of your good dining room table but that's why I do it on the underside. For our purposes here I'm going to do it on top of the table. Si I have a roll of duck tape. Tear off a piece of this and I find that it sticks better when you spread out your linen a little bit because you'll have more of a surface to cling to. You want to burnish that down because the waxed linen is a little bit slippery. Now I'm ready to work. Now the knotting technique I'm going to be using is called a cobra stitch. It's generally used a lot for macrame and different decorative purposes. It works really well with this waxed linen. It's really pretty knot. So to begin I'm going to take my left hand outer thread and I'm going to make an 'S'. I'm going to take my right thread over the bottom loop of the 'S' behind my two inner core threads and up through the upper loop of the 'S'. This is a little tricky for me because I'm used to doing this not on top of the table. So as you can see there's a knot being formed around the two inner core threads. I'm just going to tighten both sides of the outer threads until the knot pulls up snugly to that top. Now you're going to reverse that. So you're going to take your right hand outer thread. You're going to make a backwards 'S'. You're going to take your left hand outer threat and put it over and through the bottom loop of the 'S' behind the inner two core threads and up and out from behind there through that upper loop of the 'S'. You're going to pull that tight. Now we're gonna add some beads. I'm going to add a bead to each of the outer strands and push it all the way up to your first knot. And once again I'm going to do that cobra knot and make an 'S' go in front behind up through I'm gonna knot. You want to hold your inner core threads study while you're doing this too. I'm going to reverse that. Reverse 'S' in front behind up through and pull tight. Now it's time to add to my beads. One to each outer thread. And do you cobra knot again. A little note here you want to keep your two inner core threads parallel to each other. You don't want them to cross or bunched up. The reason I use two is because it gives a little bit of a wider width to this bracelet. You don't necessarily have to use two you can just use one but I like the width that it gives. You always wanna knot in the same order. So if I did the 'S' with my left side first I always want to be that in between adding each bead. Okay I'm going to continue with this for a little while until I have a full bracelet and then I'm going to show you how to finish it off. Okay as you can see we got most of the bracelet completed. The actual length right now as about six-and-a-half inches long and that's just about perfect for me because that's right about a little bit longer than snug around my wrist and that's what I want because the clasp is going to add that extra length needed to fit nicely. So I'm at the end of my bracelet. I've got my two inner core strands. What I'm going to do I'm going to switch the direction here. So the two inner core strands are gonna be on the outside and vice versa. Without removing the tape what I'm going to do is I'm just going to flip my bracelet over the best I can. I'm going to take those two core strands and tie a surgeons knot. We have a video for how to do that. Basically it's just a simple overhand knot. You're going to double it but the second time you're gonna wrap one more time around. I'm going to pull this tight and the beautiful thing about this waxed linen is that the wax actually helps hold the knots in place. So I'm going to flip it right side over again and I'm going to do the same thing so I don't just have a lump on one side of my bracelet. I have my two outer strands left over here and they're fairly long as you can see. What I'm going to do is I'm going to do just a simple, I guess it's kind of a half hitched knot. What I'm going to do is I'm going to have my right hand strand. I'm going to pull this taut. With the one on the left I'm gonna make a four. I'm going to put up through the loop of that four and pull tight. I'm going to continue to to do this. If you ever made friendship bracelets as a kid you're going to recognize this knot. And while you're doing this it's going to twist and you can allow it to twist. What we're gonna do eventually is make it so that all of those knots instead of twisting around are going to go the same direction. At this point I'm going to stretch the knots out and make sure that the knotted part is on the same side creating a little ridge here. I'm going to test the length of this. Now this is the loop that you're going to be inserting your button through so it has to be large enough to pass through this way. And that looks like maybe if I just stretched my knots out a little bit more it will work. That looks like it'll work. Just gonna make sure the knots are evenly spaced. Now I'm going to join the end of my knotted section with my previous knot here. Just to kind of secure it I'm going to other surgeons knot with the two shorter lengths. Then with the two longer lengths I'm going to do the same thing. What I'm doing here is I'm just trying to make it secure by knotting it but also trying to make it even and not too funky and lumpy. I think I'm ready to trim. Alright and there we have to loop end of the bracelet. So now I can remove the entire bracelet. I just have to add my clasp which is a button and we will be done. Once again I'm going to separate the outer strands from the inner strands but this time I'm going to use the inner strands. I'm going to thread both of them through the loop on the back of the button. I'm going to fold it down like this and use the two outer strands to tie a surgeons knot. You can tie them around to the other side as well if you'd like. Now I'm gonna take the two inner strands and I'm going to tie other surgeons knot or two. You'll kind of get a feel for how secure you think this is. You might determine that you need to tie one of the inner core threads to one of the outer threads and vice versa but I think right now what I got I'm pretty happy with. So I'm going to go ahead and trim. And there you have it folks. Go to Beadaholique.com for all of your beading supplies needs!

You recently viewed

Clear recently viewed