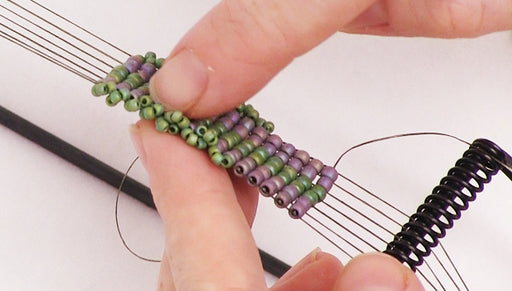
Audio Transcript
Note: This audio transcript is auto-generated and may not be completely accurate.
Hi, this is Julie with beadaholique.com for your flower so i've got a pretty little yellow Toho size 8o then for the petals I'm doing white Toho's again size 8 oh and then for the leaves I've picked a green 1100 ho of course you can choose whatever colors you like so just remember you'll need to size 8 OS and 1 size 11 O's and then you're going to need a stringing material and I've chosen wildfire point zero zero six and white is a really nice sturdy stringing material here's my clasp and it just snaps together so I'm going to need that separated out for this project then you're going to need a needle I have a size 10 right here and a pair of scissors so really like basic supplies which is really nice it's nice to not have to have a lot of different material as you're working with so let me show you how to make this you're going to first need to string your needle with some of the thread you're going to need about 40 inches of this thread so go ahead and place the thread on the needle and one little tip is if you have difficulty threading your needle go ahead and flatten out the tip of the thread and you do that by just pinching it between your thumb and your forefinger and take your nail and just scrape it along the edge of that thread and that's going to flatten the tip for you and then it should be easier to thread the needle I said it should be easier to thread the needle usually is there we go so now take one half of your clasp and you'll notice has a little loop on the end and that is a closed loop which is really nice we're just going to place our thread through it have a tail of about six to seven inches and then tie an overhand knot and make another knot and one more for good measure so this is going to take the place of a stopper bead so you'll see in my little example here I used a stopper bead but I didn't need to do that because we're going to actually attach it right on to the clasp so now onto your needle go ahead and place eight of the little green size eleven o seed beads four five six seven and eight so I've got those right on my needle and I'm just going to scoot them all the way down to my clasp now what you want to do is you want to go back up through the third seed bead so one two and on that third one you want to go up through it so I'm going to lay this down on the table here so you can see what we've just done we've basically created a little loop so hold those seed beads down towards the clasp and just pull and that is our first little leaf you can just take your finger and just pull them down so that they stay nice and tight up against that clasp now go ahead and take two more seed beads on your needle and pull them down and now we're ready to make our first flower for the flower we're going to go ahead and string on our petals first and you'll need seven of them so seven white eight oh two hoh's so let's see I've got six and seven pull those down so they rest up against your leaf now go back through the first one you strung on so again we're making another loop there we've got our petals and now we need our Center so go ahead take one yellow seed bead pull it down and actually position it in the center of your cluster like so and now you want to go through either the third or the fourth of the petals so it doesn't really matter which one is going to create a little bit of an uneven flower which is what we want is going to look nice that way so either the third or the fourth and just come out the other side and there you've got your first flower so we're going to repeat the process again with the leaves so again eight of the little eleven OC beads so four five six seven and eight pull those down go back up through the third one so you've made a loop and then string on two more so one two and that completes your next little leaf segment and now we need to make another flower so seven more of the white beads four five six and seven and then go back through the first one to make a loop and now we need our Center so we take the yellow one and you want to position it in the middle if you just pull it across and then go through the third or the fourth one and when I say one the third or the fourth white seed bead or petal however you want to call it and we've made another flower and now we're going to repeat I'm going to do one more here on camera and then I'm going to go ahead and finish this off off-camera at least the flower and the leaf segments and then come back when I'm ready to attach the other half of my clasp so I've got three seed beads four five six seven and eight pull them down go back through the third one to create my leaf two more to complete the green segment and now another flower so seven more of the white seed beads three four five six and seven let me just double-check it okay and then back through the first white bead to make a loop and now grab another Center bead pull it to the center and then through the third or fourth petal come out the other side so now we've got three of the little green segments and three little flowers and you're going to keep beating for however long you want your bracelet to be the clasp is really only going to add about half an inch so if you want seven and a half inch bracelet you're going to beat about seven inches of flowers and leaves or what you can do is what I'm going to do is I'm just going to put it on my wrist and measure that way to see how long I want it to be so I'm going to do that off camera just so this is not a terribly long video and then untangle this too and then I'll come back like I said when I'm ready to attach the second part of my clasp and also to show you how to weave in your tails I finished my bead we're going to show you how much I have here so I have a pretty petite wrist so this is about six-and-a-half inches of beadwork a little more than that if you stretch it out and then with the clasp it will be about seven inches and now we're ready to attach the other half of the class but before we do that I want to quickly take note of how many beads I have left over so you can see the beads here but also see how many beads are in the tube so you of course can make a lot longer of a bracelet you can make a necklace or you can make multiple bracelets with just three tubes of beads this is really fun so to attach the other half of our class we're going to go ahead and take our needle and put it through the little loop at the end of the clasp and then we're going to go back through our beadwork so just hold the clasp in place be a little finicky right here take your needle and go back through your green beads and pull and now at this point we're going to tie a knot so just I passed under my threads so that I have a loop and now I'm going to take my needle and go through the loop and tie a knot and I'm going to repeat now I'm going to go back through some more bead work and I'm just going to retrace my thread path whoops make sure that doesn't get caught up on my little clasp there we go so just going through my beading to another juncture where I can pass under another thread bridge and tie another knot and keep going so I usually like to have about three knots just to make sure that everything is nice and secure and by passing through your beadwork you're able to actually hide your knots within the beadwork now I'm just going ahead and going through a few more beads and now I can trim off my tail so that side is now secured so remember you left about six inches to begin with on the short tail when you began your bracelet is at this point you're going to go back thread your needle on to that tail and we're going to go ahead and weave the tail into our beading so just retrace your thread path again and I do like to add a few more knots on this end as well oops I pulled my needle out that's okay just pull that not rethread your needle again go back through your beadwork and I'm going to do one more knot right here and go through a few more beads just to hide that tail and then I'll trim the tail and there we go and our bracelet is now complete so you can see we've got the clasp which hooks up to itself now we have a really pretty little daisy chain bracelet that was very easy to make with a lot of leftover supplies which is always fun so this is a great bead weaving project it comes together really quickly and it's just really pretty you can find all the supplies for it as well as other bead weaving tutorials at beadaholique.com you

You recently viewed

Clear recently viewed