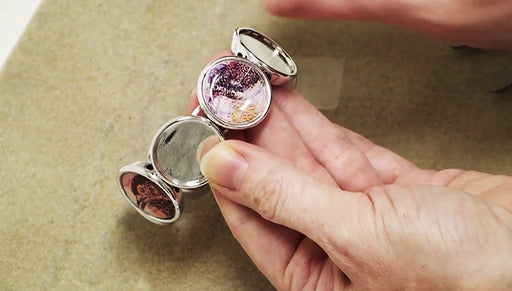
How to Make a Crystal Clay Filigree and Crystal Chaton Compact

SKU VID-0081
Designer: Julie Bean
Learn how to make a gorgeous beauty compact using 2-part epoxy Crystal Clay, silver plated filigree, and Austrian crystal chatons. This easy project looks stunning and requires no additional tools then those that come with your Crystal Clay.

The brand name for the crystals shown in this video is no longer available. High quality Austrian crystals are now available under the PRESTIGE™ Crystal Components line.

Audio Transcript
Note: This audio transcript is auto-generated and may not be completely accurate.
Hi this Julie with Beadaholique.com and I want to show you how to make this lovely compact using crystal clay and chaton mix put out by Swarovski Crystal On the inside is a mirror and then I got this lovely piece of filigree bedecked with crystals. I'm going to show you how to do this but we're going to this one in pink what you're going to need is a compact it's got this nice little indent to the bezel setting on the front you need a piece of filigree. This is silver plated. You can see it fits perfectly within that bezel You'll need a chaton mix. They come in a variety of sizes and shapes and colors in there You're going to need some Crystal Clay. Crystal Clay is a two-part epoxy clay This one is cotton candy pink and then if you're curious on this one here is a sage green no tools are required for this project. Everything you need is gonna come in your packages two optional items that I find to make life a little bit easier is this little triangle tray where I put my crystals into and a magic pick which is gonna help you to pick up your crystals again those are optional. You don't really need them to do this project. It's just a preference So first you want to go ahead open up your clay pull the whole packet out and set the box aside On the back side of the packaging there are step-by-step instructions on how to use the clay which is very handy You have part A which is your color and you have part B which is your hardener Once you mix up you're going to have about hour to an hour and half work time and then there's gonna be no baking required. They're just going to air dry They are going to cure twelve to twenty-four hours on their own In with your kit you get this little sample pack of chatons which are lovely but we're not going to use these for this project so you can set them aside for another project you're gonna get a tooth pick with a little bit beeswax on the tip now this is going to do the same function as the magic pick. It's gonna help you to pick up the stones. I find the magic pick works a little bit easier so I'm going to use it. You could definitely use the beeswax to pick as well and you're also going to get a pair of gloves so before putting on your gloves, wash your hands really good get any kind of dirt, lent, anything off of your hands because you will be touching the clay with your bare fingers at some point and if you have any dirt on your hand it's could actually embed into your clay. So make sure they're really clean but for the first part we definitely want to put the gloves on I also take off rings any that I have on just because I'm gonna be rolling the clay in my hands and I don't have any objects interfere with my clay. The easiest way to go about this is just open up your package Eyeball about how much clay you're going to need You'll get better at estimating as time goes on. I find I usually take too much clay off instead of too little so I usually like to have another bezel setting handy so I can put my extra clay into in case I mix too much so it doesn't go to waste pinch off a little bit about like that. May be a little bit more put this clay aside Wrap it back up and put it back into its baggy with this amount here I wanna roll it into a ball I'm not rushing here. I have a full hour to work with this. I don't feel any pressure. There's one ball and to measure you could use a scale but you could make two equal balls and it is important you have equal parts of the part A party B roll part B into a ball put it to the side of part A those look pretty even to me I'm going to part my hardener away Normally I would take the time to actually put those back into plastic bags right now but not going to worry about it. I'll do that afterwards squish the two parts together if you've work with polymer clay this is very much like what you do when you mix colors so what you're trying to do is you're trying to mix them so it's one solid color without any marbling or striations See how I have that big streak right there it's not ready It's sticky. It doe have a sticky consistency to it and that's why I'm wearing gloves One thing to note is if you're doing a round shape you're gonna wanna form this into a round ball if you're doing an oval you want to end up with a egg like shape Square, a little bit more square shape. So whatever shape your setting is shape you're going to want your clay end up in when you're mixing it so that looks pretty good to me I don't see any streaks I might do one more squish for good measure I'm trying to smooth it out so I don't have any of the wrinkles or lines where I squished my clay together okay that looks good. I'm going to put it in the middle of the compact I'm going to take off my gloves don't rip these off. You're going to want to use them for the rest of your clay. Take them out carefully and set them aside Pat your clay down in the middle and flatten it out This is why it's important to have clean hands and just work your way from the middle out, just pushing I actually want my clay to be a little bit more raised in the center then at the edges. So I'm gonna go a little bit thinner as you go towards the edge I'm pushing from the middle too if I feel I need a little bit more clay and I'm just gonna go up to that lip. I'm not going to go over the side. You see it's a little bit rough looking so I'm going to go back and finesse it a little bit more so that it's nice and uniform just pull pushing it gently all the way around right up to that edge when you were happy with how that looks what I want you to take your finger and rub it on the top. We want to try to get rid of some of those fingerprints also if there's any obvious lumps to it remember how I said I want it to be thinner here and look bigger here so I'm going to make sure that I feel a little bit like a raised dome I'm not going to worry about a bump but if there's any lumps or anything along the edges that's what i want to get rid and you just get rid of them by pushing on them push towards the middle so I'm not pulling the clay I'm just smoothing it it starts to look a little shiny because I don't have that texture of my finger print any more so it looks smoother I got a little lump right there uneven just pat that down go back and do some more smoothing I have a little mark right there. Just pat it out smooth it over Once you're happy with how that looks, take your filigree piece you're going to position it so I want to have this even with the little clasp right here. I'd like to have that in line so I'm going to just carefully lay it on top make sure it looks even to me then I'm gonna press it down press on top of the heavier pieces so I don't put any more fingerprints in here you'll actually see epoxy clay pull up a little bit which is good. It's almost having like a pillow effect you want to push it in enough that the clay does seep through the filigree holes a little. That's going to help to keep the filigree in place once the Crystal Clay is dry so we have that part done now I'm going to add our stones. I have a chat on mix right here. It's really nice because I do have all those colors Open that up Put these into my tray The triangle tray is nice because one it contains it but you can shake it up and get the crystal to turn to the other side so I want to show you how this works with the toothpick I'm going to start with the center stone and the toothpick picks it right up and I'm going to place it in the middle push it into place. It's kind of a big stone so I can use my finger just push that into the middle that's how the beeswax toothpick works. A magic pick works very much the same way it has a bigger handle. I find this is a little the easier to work with when I'm doing a lot of stone placing but you absolutely can do this project with just the beeswax toothpick pick up a chaton and i'm going to place it into my clay press it so that the edge of the chaton is just a little bit below the edge of the clay I'm going to do that all the way around with the design I want you can place these however you want I'm going to do another row. I'm going to choose a little bit darker pink I'm going to add even another color. This pretty purple You can see I deviated from the pattern I had on the green one and that's part of the fun of Crystal Clay using these chatons You really can just really let your creativity flow and whatever the inspiration take you It's so easy to just place these little stones into the clay and so once your all done and you have all the stones how you want them go ahead and lightly just press down on them you don't want to get fingerprints in there again. Make sure they are set and none wiggled out while you're placing the others We're going to set this aside for overnight, twelve to twenty-four hours and then it's ready to go and that is how you make a compact using crystal clay and chatons

You recently viewed

Clear recently viewed