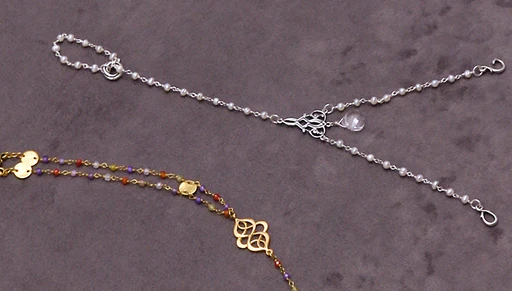
How to Make a Bracelet with Vintaj Patina and Filigree Links

SKU VID-1265
Designer: Kat Silvia
In this video you will see from start to finish how to make the Lady Gwendolyn Bracelet. This bracelet uses Vintaj Patina on Natural Brass filigree and links to create a one of a kind vintage style design.
Audio Transcript
Note: This audio transcript is auto-generated and may not be completely accurate.
Hi, this is Kat with beadaholique.com and vataj links so I have here a few colors of patina and I've pulled out the rose gold and the white gold now if you have an orchestra Gina I'm going to go over how to use it in this video but for the project here I have four pieces of my filigree and then I have four of these other sort of really cool kind of art deco links and I'm going to just going to link them together but before I do that I'm going to actually use the patina on them so all you'll need to complete this project is the components you see here will use a lobster clasp and then I have some beautiful vintage jump rings that have a little score on them so they look like little ropes so that even the jump rings have a little interest to them I have a couple of pair of chain nose pliers to help me with those jump rings a paintbrush and I'm going to be using a little cup of water to rinse my paintbrush in-between my colors and I'm also going to be using the vintaj relief block so I'll show you exactly how that works a little bit better but let's go ahead and get started talking about the patina so what I want to do is let me take one of my pieces here and I'm going to be using a paper towel just kind of underneath it there and what I want to do is this is the rose gold color so you just shake it up a little bit and we're just going to put a little bit onto my surface there okay close it back up and now very simply I'm just going to get some on my paintbrush you don't want to get too much and I'm just going to kind of hold it down and just kind of DAB it now a vintage patina dries very quickly so you can kind of see that it's filling up a lot of those holes there and you can see that I didn't put a lot of patina on my paintbrush but I've almost got the entire thing completely filled up we go you just kind of you can see that I'm just kind of pressing it in there and I'm actually going to cover some of my rings to so you can just kind of see the full effect now this is a full coating of patina now you can do it a couple of different ways and I'm going to show you an alternative version here and for this you'll need a secondary paper towel kind of at the ready so here's what we're going to do with this one I'm going to dab again but I'm going to dab dab dab dab dab kind of all over and then I'm going to wipe it away so I'm just going to kind of repeat step two take a dip dab dab and wipe it away now like I said because the patina dries really fast this is the version where you want to kind of work a little quicker so you can see how different those pieces look this one is sort of that full coating of patina and this one just has a little bit sort of to give it actually a patina look where it looks like it's been aged just a little bit so I'm going to actually focus on doing this technique so what I want to do is so let's say you try that and didn't like it you can just take your patina and just add right on top of it and just add more patina so this is the great thing about the vintaj patinas is you can actually just sort of continue to build the color to your desire so let's say you weren't happy with just a little bit and you wanted to do a full coat you can absolutely go back and add more so I'm going to continue to do this for my other pieces that match this I have two more of these sort of diamond art deco pieces so I'm going to continue to do this and then I will meet you back here in just a moment to show you how to do the other pieces with a different color okay so I'm just finishing up the last little bit here of my last piece and I'm just going to kind of scoop them off to the side and like I said it does dry very quickly but you're going to want to allow it to dry fully before moving on so I'm just rinsing my paintbrush now and I'm just going to kind of make sure that I get all of that rose-gold off of my paintbrush all right I'm just going to slide these out of the way just a little bit so they can kind of be drawing while I'm showing you the next part alright just kind of set up my filigree pieces now you'll notice with these that there's you know a very open weave to them and that's going to look really beautiful against the skin but I want to give it a little bit of a pop so what I'm going to use is I'm actually going to use this white gold which you can see it's actually not that far off from the vintage brass but it's just going to give it a really nice little shine to it and I'm going to bring that out even further by using the relief block so shake it up and we're just going to do the same and we're just going to pour a little bit onto our surface you can see how little I'm using so this might appear like it's a small bottle but you're going to get a lot of use out of it alright so same thing just get a little bit onto your paintbrush here we count and now you just kind of DAB it on the top there and you can see that beautiful filigree just start to pop and that gorgeous so you can kind of see how different it looks it's not really changing the color color of it but it's just kind of adding that beautiful gold to it and I'm just adding it on the top now be careful with your filigree pieces you want to make sure that you're adding it to the top and not the bottom they do look a little bit different let me just kind of flip one over there so you can see that this is the bottom here and this is the top so just make sure that you're painting on the top here welcome to paint both I just make sure that you're giving enough time in between before you flip it over because you don't want it to stick to your surface that's just kind of dabbing oh so slightly on top all right here we go it looks like I missed it a little dollop in the center of my other one there here we go alright so I'm going to rinse my paintbrush really quick I'll let that dry for just a second don't want to let it dry too long and what I'm going to do is I'm going to take that first one I did and take my vintaj relief block and I'm going to be using the dark gray side here on the side of it and both are is the same and now I'm just going to brush it over the top of it and all that's going to do is reveal a little bit more of that filigree so you need to see it kind of pop out just ever so slightly you can see this with a lot of the other vintage pieces and it just it creates just such a beautiful look so you just rub it across there you can see it's coming off a little bit in my fingers but that's absolutely absolutely fine alright so we have some really glowing pieces you can just see how they've transformed just with a little bit of patina on them and it's so easy and the great thing is is that you're not going to be waiting forever for your paint to dry all right now what I'm going to do is I'm going to bring back my pink pieces here kind of rearrange my work surface for just a moment alright now I'm going to take my pink ones and I'm going to do the same but I'm going to go really really lightly on top there just to get just a little bit of that out I don't want to do too much because I don't want to get rid of all that beautiful pink so just ever so slightly and we're just taking it kind of just around the edges there just to bring out some of that beautiful beautiful style I'm going to continue this with my other pieces here and then we are going to put it all together alright so now that I have all of my pieces ready to go all I'm going to need to do is to bring over some jump rings here and I have my class ready to go and I'm just going to kind of arrange them and just do an every other type of technique here just so we can have a little bit it just fun with it alright so now that I know the structure that I would like for my bracelet I'm going to go ahead and start putting it all together so just take a jump ring and hold it with your chain nose pliers and I'm going to start first by looping on my lobster clasp and looping on one of my filigree and this is the pink one so I'm just going to close that up and now just kind of lay it out make sure and this is where you want to be careful that all of your filigrees are laying right side up of course now they're all colored so it's a little bit easier to see but I'm going to hook on my filigree and actually exactly what I just said I want to make sure that my filigree is going to lay correctly so just link it up with a jump ring and you want to make sure that your jump rings are nice and flush there we go alright so just continue to add jump rings and I will meet you on the other side to show you how to do the last move and to finish it off alright so I am just adding my last jump ring here and my last piece of filigree making sure it gets on that jump ring there we go and now to the end of my piece here what I'm going to do is I'm going to add one jump ring to the filigree use a really thick jump ring so you're going to want a good pair of pliers just just a little tip alright so now here's another tip when we go to close our bracelet up it will fit nicely to just leave our jump ring as is but if you wanted to extend it without having to add another link you could just add two more jump rings because you're going to want to make sure that your orientation of your jump ring is going to fit the clasp otherwise you're going to end up with some twisting so if you feel the needs that you need a little extra space you'll have extra jump ring so go ahead and add not one but make sure that you add two jump rings to your class so let me just unclasp this so we can take in the beauty of our work today and look at how gorgeous that is with the white gold and the rose gold patina we have many many more colors of the vintage patina and some other very beautiful filigree pieces for you to choose from to create design just like this and you can find all these tutorials and more projects at beadaholique.com you

You recently viewed

Clear recently viewed