How to Embellish an Itsy Bottle with Rhinestone Cup Chain by Becky Nunn

SKU VID-1028
Designer: Becky Nunn
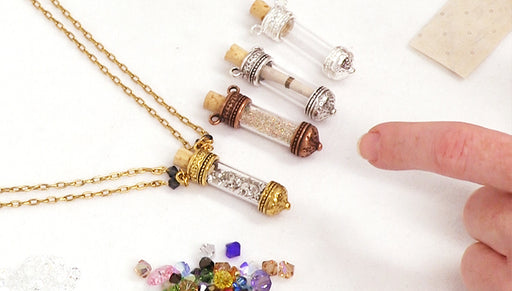
Learn how to embellish the top of a Nunn Design itsy bottle by embedding ball chain and rhinestone cup chain into epoxy clay. This technique is easy to do and there are lots of adaptation possibilities. This video features Beadaholique guest designer Becky Nunn of Nunn Design.
Audio Transcript
Note: This audio transcript is auto-generated and may not be completely accurate.
hi this is becky nunn with nunn design and I'm on location here at beadaholique these it see bottles using the it see channels that we have here a little bit of rhinestone chain and a little bit of faceted ball chain and we have so crystal clay I've already mixed my two part right here you'll also need a pair of flush cutters and maybe like a toothpick would be helpful so the first step we're going to do is we're going to take our crystal clay that we've already mixed I took equal sized balls of the part a and B and mix them into some epoxy clay about mmm I think I'm going to need about a small pea-sized ball and this is already mixed and if I need more at it but this is probably what I'm going to need maybe this is too much but anyway I'm going to go ahead and just roll it into a nice round ball and this is to make that claim I sand smooth and then I'm going to snake it out into a little bit of a rope snake like that trying to keep it a little bit even now I'm ready to start laying it down into my channel so how you do this is you just start to use your thumb to spread that clay and I'm using my thumb to push it this way and to push it this way and to push it forward this way and this finger back here I'm using to rotate so it's a combination of using a couple motions at the same time and this is something that you just kind of get the knack of so when you first do your first one just just know that sometimes it just takes a little bit of practice and for me now I have to use my glasses because it's much easier to see then when you mix the clay you have 90 to 120 minutes to work with this and this is a very small surface you can take your time and get this just right another thing that I'm making sure of is that I putting the clay down into the channel here as evenly as I can alright so i have an overlap about right there so if you have an overlap you have excess just go ahead and pull it off and then you can blend that edge together I also can feel that I have a little bit of excess see how it's a little bit mounded right there and if you do have too much you can just go like this little bit and you just pinch off that excess the whole goal is to try to get the whole surface covered and to try to have it as even as possible now once i have it inside of my channel you can roll it in between your fingers like this to also even it out alright once you have it all in I always like to wipe off my hands to get that excess clay off of my fingers and then go in and remove any excess clay that might have got on those sides when this clay hardens it really hardens and it will be hard if not impossible to remove that cement like clay off of the edges see how it came up over the side right there so by using the wet wipe we're removing that clay all right once your claves in that channel and you've done your best to clean up what you could you ready to start embedding your chain so I'm going to start with this faceted bead chain first and i'll show you i'm going to slightly press it down inside my channel right there on the edge right inside of that inside edge right there then I'm going to keep on wrapping around gently pressing it down into the clay then when i get to my starting point i can either pull harder and i'll have a slight gap or press and contract it you see what I'm saying so that that that those ball chains line up as best as they can and be consistent I'm going to go in and then cut off my excess and then blend those together now you can't see where the starting point is and the ending point is and then I'm ready for my next layer I'm going to go ahead and do yet another layer of this faceted bead ball chain starting slightly pressing down turning slightly slightly pressing turning getting to my starting point again looking for where that overlap is trimming pressing to make it look seamless then going to do one more and then I'll lay in my rhinestone chain all right so I have my first three layers in it's already looking pretty cool and I'm ready to put my rhinestone chain in so this rhinestone chain typically has like a little bit of a end that might stick out so I'm going to try to trim that off if I can if not I'll see how it sticking out right here that's what I'm after that little tongue little piece of metal all right so I'm ready to start putting on my rhinestone same as before I start and this one I'm going to want to have it tighter so I'm not pulling my rhinestone chain I'm constructing it together lots of time 90 to 120 minutes so take your time and if you don't like it you can pull it off wipe it down start again got until my place where my overlap is and depending on how much my space is I can pull it and can you know make it more expanded or constricted and the reason why we didn't cut our chain beforehand and have the strips all ready to go what is because depending on how much clay you put in there it could be one or two beads worth of difference or it could be one whole rhinestone cup of difference so it's nice just to go ahead and lay it in and then trim to size all right now we're ready for let's see is this going to be our final are we going to have one more after this I think this is going to be our final layer although I don't know looks like we might be able to do a second now let's just make this our final layer yep so one last round and this is where our overlap is happening one ball not enough you can go back in trim that extra one ball press it in to it overlaps all right and then I'm going to go ahead and just gently roll it in my palm like this to try to make sure that it's all of the aspects of that ball chain or embedded into that crystal clay because if it's not then it will usually detach you so you have to make sure that it's embedded there enough kind of like a mosaic to make sure that it is fully embedded in there and then my last step is that I would go over this piece with a wet wipe and again clean off those sides to make sure that all aspects of that are cleaned off and make sure that there's not any excess clay on my top and then we would just put the items that we would like to into our little piece here I use feathers you can use even the bits of the ball chain some ass and anything you like a little lock up your little firstborn baby's hair just something special you would put a little bit of glue inside here and then glue this on to make a fun little keepsake pendant this is becky nunn with nunn design and i hope you've enjoyed learning how to make these they're really really fun and I I just love them the more I make the more I want to make thanks for joining us you

You recently viewed

Clear recently viewed