Audio Transcript
Note: This audio transcript is auto-generated and may not be completely accurate.
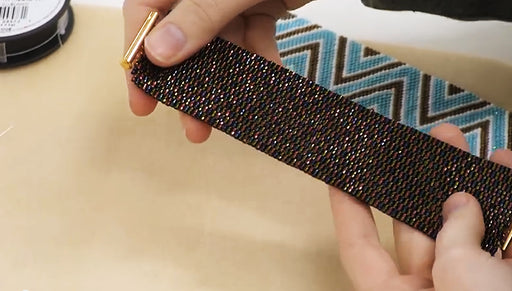
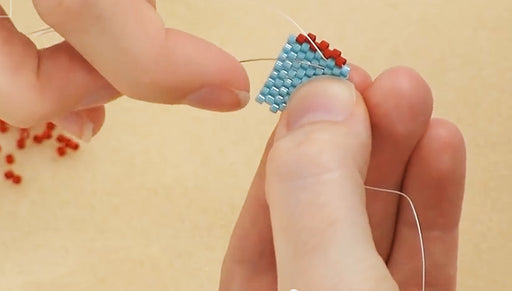
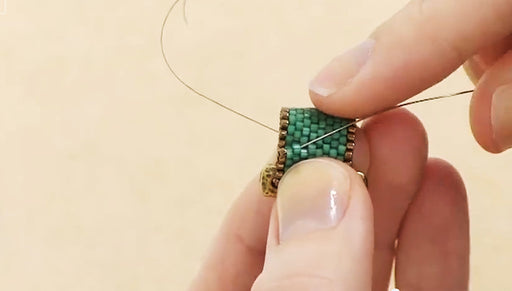
Hi this Julie with Beadaholique.com and I want to show you how to do this bracelet I'm actually going to make a companion piece to it in the form of a collar necklace but I finished the bracelet first and then as I was about to start the collar I decided I really wanted to do a video showing the different techniques here so this video is going to be long. It's gonna show you how to do all the different things to make this particular design and I'm going to do a collar versus the bracelet. It will be the same exact technique for the bracelet. For this project again you'll need six different types of beads. I have them all in black. I think this is really stunning in black I've got little Muyuki delicas size 11/0 I've got some bugle beads, 6 millimeter bicones, 4 millimeter bicones, 3 millimeter Czech glass rounds and 2.5 millimeter glass round beads. You're going to need more beads then what you see here of each style but these are the six different types of beads you need to make this design and if you go to beadaholique.com Follow the links underneath this video you'll be able to pull up the actual project full ingredient list for the bracelet and also for the collar that we're gonna make and it'll show you exactly how many beads of each you're going to need but I wanna show you the different techniques in this video you're also going to need some wildfire thread I'm using black. It's size .008 and I did the .008 versus the .006 to give it some body and structure to it. I wanted it to be able to to stand up a little bit better so those are the supplies you're going to need and then you're gonna need a needle. I have a size twelve and a pair of scissors so I will start by making this main band and this is just a right angle weave which we do have another video for but I just wanna show you how to do it because I do something a little different where I add 3 round beads and then bicone up top So in a project like this, especially since we're doing a collar versus the bracelet, just count on needing to add more thread as you go. So work with a comfortable length I'm working with probably about forty eight inches here. That's what I'm really comfortable working with if you are comfortable working with more cut yourself some more, if you're comfortable with less, cut yourself a little less just know you're going to have to tie off your thread and add more as you go for a project like this and we have a video on beadaholique.com showing you how to do that. So I just threaded my needle and now I'm just going to find a little stopper bead I have this spare pink one on my table thread that on to begin with and make a simple knot and now this is a knot I can easily just pull out later It just slides but I wanna leave a tail It's going to be long enough for me to rethread that tail back onto my needle on the end and weave that tail into my bead work a six inch tail or so is going to be more than fine start with right angle weave pick up one, two 3 of my three millimeter round beads and pick up one four millimeter bicone, slide that down to the stopper bead now go back through but in the opposite direction of the first bead you strung on I just made a little loop. Go back through my other two round beads one, two and I want to show you the pattern we're trying to create You can see here we've got all these little round beads and then in the middle we've got the bicones and then at the top we have the round beads again. That's what we're going to create so to do that we're going to need another bicone to go right beside, what will be beside the one we already added Add a bicone and since we've already got this one bead here we need two more rounds because you're making little clusters of four go back through you're bead except so now we're making a change. Now we need to get our thread over to this bead. So we're just going to do that by going back through a bicone. The thread is still not where we want it. We gotta go through one more bead now we're where we want to be so we'll see what our pattern needs and now we need the round beads on the bottom, the bicone up top. Again we only need to add three because we've got our fourth already so one, two, three Pull it down, put it through my round beads. I'm working on tension as I go. You can see me kind of pull the beads down a little bit, just make sure they're nice and tight on there and now through one more bead our thread is where we want it again. This time we need to add a bicone followed by two more round beads and pull and this is just a basic right angle weave. Sometimes referred to as R.A.W. and that's what people are referring to with this bead weaving stitch I'm going to do one more so you get the idea and your gonna keep doing this for however long you want your necklace or your bracelet to be. If you're doing a bracelet you might do it about six inches, seven inches note that the particular clasp in this project will add about half an inch to your design so if you want a seven inch bracelet make this length of six-and-a-half inches. I've actually already sped ahead a little bit because I wanna now show you how to do the top row Go ahead bead that as long as you want it to be when you're done you're gonna end up with something like this and you'll notice over here towards the end I've added another thread and I haven't taken care of my tails yet I like to actually do that at the very end so I've just continued, I've added a new thread and I just continued along my way and I have this nice long thread that I can put a needle on let me show you how to do the second row of right angle weave on this piece and one note before you go up top to the next row you want to do a little bit of thinking ahead so if you look at the way this pattern is we've got these diagonal of the bugle beads and in order to do that and have it look a little neat and end nice with the bugle bead on each end. You have to make them connect to the units of four different round beads at the bottom. So one, two, 3, four and that's like a cluster that gives you that nice even look to it There was four, there's four, there's four and at the very end you only need 3 so what you need to do is when you think you have the length you want you're gonna count your beads. So there's a cluster of four there's cluster of four, cluster of four cluster of four. Do that for the entire length if you end up needing to add one more, add one more if you need to take one away you can just pull out your bead work and take one away so you end up with fours until the very end where you'll need three. Once you've determined that let's go ahead and jump up and make our second row of right angle weave Thread my needle my thread exited right where it would've been perfect if I was going to go ahead and add more along this stretch but that's not what I want to do. I want to go up to the next row. I'm gonna go ahead put my needle back through the bicone you can tie these off now if you want if they bother you and they are in the way. Totally a preference thing I just like to do that at the end. So now I need another cluster up top and sense I already got the bicone which is going to by my first bead I need 3 round beads. Go back through the the bicone. I want to make a loop Go back through one of my beads on the side I'm going to make the second cluster and if you look at this you can probably tell you already now have two beads your of next cluster of four so we only have to add two more round beads. I've added two and going through my bicone. Make a nice little loop now I need to get my needle back over here. So I'm just gonna go around my beadwork and again we're just going to make a cluster of four go through the bicone again. So those are the first two beads I'm going to this one more and then you can get the idea. Then you could bead along the entire length two more beads back through your bicone you need that to exit where you can work with it you'll just keep doing that all the way along the length of it. See that what's you got and that's what's it's going to end up like. I'm going to take a pause. I'm gonna finish this and I'll come back and then show you how to add the bugle beads. I finished my second row of right angle weave and this is what we've ended up with which is actually quite pretty on its own but I do want to add the embellishments. For this next step you're gonna need your bugle beads and your 2.5 millimeter round beads and I do not have enough thread to continue on just doing it with the thread that I used for this part of the project. I have to start a new thread but if you do you have a thread that is still a good length, go ahead and work it into your beadwork so that you exit this end bead right here or on the other side right here but since I don't have that and I tied off the rest my of threads that were short to have a cleaner look. I left this one. I don't know if I'll use it at the end. We'll just see but It's not a big deal if you want to tie that one off too so again I cut just length that I'm comfortable with and I'm going to want to exit right here so I'm gonna work my thread into my beadwork so that I do exit right there. I have to kind of look at this and be like okay I want to exit here, come around here, up here down here. So I'm going to start here you can kind of trace your thread path figure out where you need to start again we do have a video on how to add a new thread and tie it off the old ones leave a tail that's long enough to work back into my beadwork later and I'm just tracing my steps I didn't knot that, that's actually pretty secure. So that's gonna give me the tension that I want and I'm exiting where I need to exit. So now what we're going to do is add our bugle beads take one bugle, one 2.5 millimeter round and another bugle bead and I'm just gonna skip over one of my lower hanging three millimeter bugles and go into my beadwork now I'm just going to go through some of my beadwork all of that is just positioning your needle and thread where you want it so that I exit one of my down facing. Only work with as much thread as you're comfortable with. You really will need to had more as you go. I feel like I probably cut a little too much here I'm and now it's getting a little tangled but it's just a matter of being patient, working that out okay so when I said downward facing I meant the hole itself was facing down and these here are facing sideways. So you can refer to it however you like this is kind of a made up stitch so I wanted to do a video on it so that you can see how to do it. I'm just picking up now another bugle, another little round bead, then another bugle bead skipping over one of these lower hanging ones going up through another bead along the edge here and pulling so I'm just making these little drops. I'll do the same thing one more time and then I want you to go ahead and do the entire length the same exact way. Again I need my needle to exit. See I have a little tail right here this is from where I worked in a previous thread see and I can just trim that with a scissor or a thread zapper at the end. Not a big deal another bugle I got a little different type of seed bead in there small czech glass and another bugle and again go up through one of these along the edge just like so. You want that round bead to be at the bottom I'm just gonna continue along the entire edge and then I'm gonna show you how to join these together so that they end up with this great diagonal pattern. We're getting there with this necklace. We've added all of our bugle beads and now we need to join them together in nice little points to get the diagonal effect we want for this design so what you need to do at this point is you need to see you what length of thread, how much tread you have left on your needle because what I want you to be able to go all the way through here to connect all your bugle beads and do your little trim here as well with a single length of thread. It's not impossible to do it having to add thread but it's going to be easier if you have a single length even though I've got some thread left here I'm going to stop with this thread I will incorporate that into my beadwork later. I'm gonna grab another thread and I want it to definitely make sure it can go through there and then the fringe work here, that's not a straight line. I need to account for that and I just wanna make sure I have enough here so I'm going to add a little bit more Thread your needle on and you're gonna have to incorporate this thread into your beadwork and this time I want you coming out exiting this little bead right here leave that tail long enough to incorporate it back in and I so that tail I gotta work back in later. This is a lot of steps to do this design to be honest. I think it's lovely when it comes out and it actually does not take that long but you are having to do a bunch of different steps. It's not just like doing an even count peyote or something like that you know you're kinda having to work with the beads and go back through them multiple times, incorporate new threads but the result's really pretty and hopefully it'll be a springboard for you to create some of your own designs doing beadwork like this I'm going down that bugle, go through this bead here and I'm right where I want to be now so at this point Here are some of the beads I'm going to be using for this step again more beads than what I have here but I want to show you the different types they're all from that original selection I said at the beginning of the video. To join our little segments of bugle beads. You're going to take three 11/0 delicas and connect them to the next bugle bead segment going through that little 2.5mm bead now we've got a gap here we're gonna fill that with one seed bead one little 2.5 millimeter round and one 6 millimeter bicone. Repeat on the other side so bicone another little round bead and another little seed bead Ill show you this one more time and then I want you to do it for the entire length of the necklace and then I'll come back and I'll show you how to add the final little fringe to it three delicas I need to add a delica, a round a bicone, another round a delica just connecting through these little beads on the tips of the bugle beads so hopefully you can see how that starting to form. Just do that the entire length and then we're gonna add the last final little decorative element and I'll explain to you about the clasp. This is where you should be at now when you finish this segment with the larger bicone beads and now I just need to add the final element along the edge to do that you should of when you finished this stretch here you should be exiting the last small little round bead attached to your bugles and what we're going to do is pick up 3 delicas, a 4 millimeter bicone and three more delicas. You have those on your needle gonna slide them down and then you're gonna go up through the little Delica which is on the other side of this diagonal segment. The bugle beads is probably the best way to describe it. Go up through it at this point you're gonna... see how that tension came a little loose at this point you want to make sure that that tension is nice and tight just by pulling it. Made that first little segment so now I'm gonna retrace our steps. Go back through these beads here until we exit the little delica bead make sure your tension is good. You can see I'm pulling it. Now we need to do another little segment of Delicas and a four millimeter bicone three on your needle, a bicone, three more slide that down. Go up through the delica and through the other beads too if you can go through more than one at a time, great all the way through to that delica on the other side and of the round beads but before you get to your bugles and pull you're making a little pointed arrow beneath your bugle beads. See how this makes a nice darted arrow shape. I'll do one more and then I'll talk to you about the clasp because you'll just continue this all the way along the way 3, a bicone, 3 skip over all those bugles go into the Delica on the outside of them and just pull so that is how you're gonna finish the actual decorative beading of your bracelet. To make the clasp you'll need to watch two different videos. One is "How to Make a Beaded Bead Using Right Angle Weave Double Needle Method" and its gonna show you how to make a beaded bead with bicones around and you're going to use the same technique just use your Miyuki 11/0 delicas and then to make the loop and then attach your beaded bead you're gonna need to watch the video: "How to Attach a Button and Loop Clasp to Your Beadweaving" and that secures it as the clasp. You can see I just attached it right to my beadwork via two delicas the same size and then over here you can see how the clasp is just a loop of beads. I just wove its tail back into my beadwork but that is what you're finished project looks like. Here's the bracelet and then you can assume what the necklace is going to look like. It's just a longer version of this exact same pattern. I know this is a long video. I know it's a lot of different steps it's a fun project, just be patient. It actually does not take too terribly long once you get into it and just go step by step in following the directions in this video to make this project. You could find both these projects on our website. One is the Isabella Collar Necklace and the other is Isabella Bracelet where you can find full ingredient lists, all the different quantities of the beads you're going to use and everything else you'll need to know for these particular projects. Go to www.beadaholique.com to purchase beading supplies and to get design ideas!