|
Toho Round Seed Beads 11/0 #711 - Nickel (8 Grams) SKU: JSK-0343 $6.99 |

|
FireLine Braided Beading Thread, 4lb Test and 0.005 Thick, Smoke Gray (15 Yards) SKU: XCR-1285 $6.65 |

|
Magnetic Clasps, Round 6x4.5mm, Silver Plated (4 Sets) SKU: FCL-6808 $4.35 |

|
The Beadsmith English Beading Needles Size 12 (4 pcs) SKU: XTL-3006 $3.99 |

|
The Beadsmith Tools, Thread Snips 4.25 Inches Long (1 Piece) SKU: XTL-5614 $2.85 |
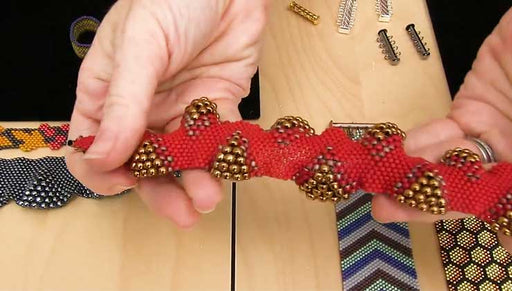
hi this is Rachel with beadaholique want to show you how to bead weave a bracelet using Argos Cheops and Tino's part Puka beads so this is the pooka traveler bracelet and if we're familiar with the czech glass - hole beads this feature is three of the par Pico line of multi hole beads so this bracelet features the key ops which are these pointy triangular beads on the tips and the T nose part puka which are the trapezoid shaped beads right under the key ops and in the middle we have the Archos part Puka beads which are these Crescent like half circle beads and all three of these bead shapes work together really nicely as you can see in this bracelet so this bracelet was actually inspired by the T nose shape of part puka bead and I have a bunch here laid out for you to see and these are really fun beads they are a little trapezoid shaped bead so as you can see they have a long side and a short side and they have two parallel holes running from the bottom to the top and these measure about 4 by 10 millimeters and they come in a really beautiful range of colors so we have some pretty opaque shiny beads we have some satin suede pastel colors and some metallic colors like this matte silver and really nice lustrous colors and these colors will match a whole bunch of other shapes of Czech glass beads that we carry so you can make beautiful designs incorporating all different shapes so I'm going to show you how to make this bracelet and for this project you will need a couple of different types of beads you will need some key ups part Puka beads and I'm using the opaque green turquoise color you'll need some Tino's part bucha and this is the shiny silver color you'll need some Arcos beads and these are also the opaque green turquoise you'll need some touhou 11 OC beads and I'm using nickel you'll need some smoked fireline you only a magnetic clasp this is just a silver-plated clasp you'll need a beading needle and some thread snips so let's get started so I've gone ahead and cut a length of fireline and I threaded my needle and on the other end I just added a little stopper bead just one of my seed beads with about a four inch tail so the first thing you're going to do is take one of your key ops beads and string it down through the point so this is a two hole bead with two holes going down from the point to the base so I'm just going to go down through the point and I'm going to take one of my Tino's beads and string this from the short side to the long side so you can see that the key ops just fits on top of the short side of that trapezoid like a point so I'll string those down and now I'm going to pick up one Arcos bead curving toward my needle one two ho seed bead and another Arcos bead through the outer hole curving away from my needle so it looks like that I'm gonna pull those down and next you're going to string another tneows bead and this is going to be from the long to the short side and I'm going to string another key op speed up through the base toward the point a lot of geometry with this part pukka beading line so this is what your strung beads should look like now and the next thing I'm going to do is just sew down through the far side of this unit so I'm going to take my needle and go back down through the point of that last key up speed I just strung and the Teno speed I'm just gonna hold the beads in place and drag my needle through I'm gonna pull them down to the stopper bead okay so that's half of your first unit there and the next thing I'm gonna do is add a couple more of these Arcos beads so I'm going to add one curving toward my needle another Toho seed bead and another arc o speed curving away from my needle all through one of the holes on the end so now I'll move those down and you can see that they just fit nicely between those two Tino's beads so now I'm going to sew out through that next tinos part bucha bead and the second hole of the original triangular key ops bead that I strung and I'll pull my needle tight not to get my thread tail caught up in there so that is my first unit of beads for this bracelet and now just to secure it I'm going to go back through the original side of beads and it's just a straight line so I'm just sliding my needle through this straight line of bead holes here I'm gonna go back out the other side and something that will happen when you're pulling your thread is that it may not want to sit perfectly on top of the point of your key ops beads so for this bracelet just the side which is the front in the back and then slide those thread bridges to the back of your beads and you will not see them on the front okay so now that I'm here I'm going to go back through just a few of the beads on the first side and we're just going in the loops here reinforcing this foundation unit so I'm just going to now string through the second hole of the key ops bead on this end and the tinos and the Archos and I'm not going to put my needle through that seed bead in the middle there so just those three beads and pull that tight and make sure your thread bridge is slid to the back of the bracelet and now that my thread is coming out of the Archos bead I'm just going to follow this curve around and sew out through the far hole of this bead okay and now over here I'm going to start stringing the beads for my next unit so I'm going to string one Tino speed long side two short side and I'll just string these down so you can see visually how the unit's going to shape up so this will sit there now I'm going to take another key up speed and string it from the base to the point and it will sit there and now I'm going to sew down through the second hole of these two beads so I'm going to just slide my needle through the second hole of the key ops and the Tino's and pull that tight and make sure my thread bridge is on the back of the bead when I pull and now like before I'm going to add my Arcos beads so I'm going to add one Arcos curve toward my needle one seed bead and one Argos curved away from my needle and slide those down now over here I'm going to add another Tino's alongside the short side and this will bridge the gap between the second bead unit and the first and I'm going to string another key op speed from the base to the point and this guy will sit like so so now I'm going to just sew back around through the second hole of this bead unit so I just went through over the point of the last key ops that I added through the hole of Latinos through the whole of this Arcos and what I need to do in here is add a seed bead so I'm just going to extend my needle a little bit outside of that one art go speed add that seed bead and then slip my needle through the second Arcos bead in the middle out the T nose and out the key ops on the other side and I'm gonna pull all of that tight okay and now I'm going to sew down through just the first three beads so through the key ops through the T nose and through the first Arcos and not through that seed bead there get your thread bridge on the back of the bead and now like I did before I'm going to follow the curve and so out through the far hole of this interior Arcos bead and now I'm ready to add my third bead unit so I'm just going to keep doing that and make the bracelet as long as I want it to be and I will see you back here to finish it and add on the clasp so I've gone ahead and done the majority of my beadwork now and I'm just adding on the last unit of beads I'm gonna do the majority of this unit just the way I showed you throughout the body of the bracelet but for the very last step there's gonna be one different part so I'll show you that when we get there so just like I've been doing I just strung a tinos part bucha and a key up spar puka and then went around the point of the key ops and back down through to Tino's and now I'm going to string an Arcos a Toho seed bead and an Arcos just the way I've been doing for the majority of this bracelet now my second Tino's and Mikey ops get those oriented the right way around the point of the key ups through the second hole of the Tino's and the Archos and just gonna poke my needle through and add a little seed bead and then through the Archos Tino's and key ups on the other side okay so now I'm going to string back around through just the first three bead holes here through the key ups the T nose and the Archos and I'm gonna skip that seed bead now for the majority of the bracelet at this point I would follow the curve of the Archos and string out through the outer hull of that Arco speed but instead of doing that I'm actually going to string up through the middle hull of this Arco speed I'm just gonna tighten down my thread bridge so put your needle up through the middle hole and out toward the outside of the bracelet and then I'm gonna sew back inward through the outer hole of that our Coast bead so now my thread is coming out inside the middle row of this bracelet and what I'm gonna do here as you can see on this end I already added half of my clasp so I'm just gonna repeat what I did there I'm gonna pick up one seed bead and then string the loop of half of my clasp and pick up one more seed bead and I'm going to sew through the outer hole of this adjacent Arcos bead and pull that tight and now the clasp will just sit nicely nestled between those two Arcos beads and now I'm going to sew around in a loop to reinforce it so I'm going to sew through the middle holes of both of these ending Arcos beads and over here I'm actually gonna make a little knot to start securing off my thread and I'm just using the thread bridge that was already there and just make a little knot and I'm gonna sew back through this loop so through the Archos through the first seed bead the loop of the clasp and then through the second seed bead and out the adjacent Arcos bead and then I'm going to sew through the middle hole of this first Arcos and not the second because this is a great place to make a little knot for security so I'm just going to sew down and up creating a loop and then just poke my needle through and create a little knot there and now I'm just going to weave in my thread tail I'm just gonna go down through this Arco speed and that next seed bead and this is a good place to just cut off my thread tail so now your bracelet is done these instructions make about a six inch bracelet and I actually used up all of my Arcos beads in this bracelet those are these semicircular beads in the center here so if you want to make a bracelet that is longer than six inches you would just need two packages of Arcos beads but that is how to make the pooka traveler bracelet using Arcos part polka tinos part puka and Cheops part Puka beads you can find all of these beads and more supplies at beadaholique.com thanks for watching you
Related Videos


Beadaholique Live Class: Peyote Stitch Bead Weaving
Join Kat and Julie in this Beadaholique Live Event Event as they walk you through even and odd count peyote stitch in bead weaving. They also shar...
View full details

How to Make Tubular Peyote Stitch Tassel Earrings
In this video, you will see from start to finish how to bead weave these earrings using tubular peyote stitch with Miyuki round 11/0 seed beads. Yo...
View full details

How to Embellish Peyote Stitch Bead Weaving with Brick Stitch Accents
Expand your bead weaving skill set by learning how to add brick stitch embellishments to the edges of your peyote stitch jewelry. This tip will all...
View full details