
|
Miyuki Delica Seed Beads, 10/0 Size, Opaque Red Luster DBM0214 (8 Grams) SKU: DBM-0214 $4.69 |

|
FireLine Braided Beading Thread, 6lb Test and 0.006 Thick, Crystal Clear (50 Yards) SKU: XCR-1278 $13.99 |

|
English Beading Needles Assorted Variety Pack SKU: XTL-3004 $4.20 |
Related Videos

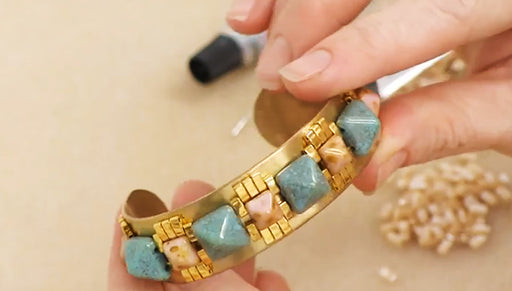
How to Make the Mayan Revival Cuff Bracelet
In this video you will learn how to bead weave pyramid and half-tila beads to create the decoration on the Mayan Revival Cuff Bracelet. After you h...
View full details

How to Make the Water Lily Bead Woven Bracelet
This video tutorial shows you how to bead weave the Water Lily Bracelet. The design features 2-hole piggy beads mixed with seed beads and 2 sizes o...
View full details

How to do Brick Stitch with Half Tila Beads
In this video, you will learn how to do brick stitch bead weaving with Miyuki Half Tila Beads. This is a more advanced technique that will be easie...
View full details