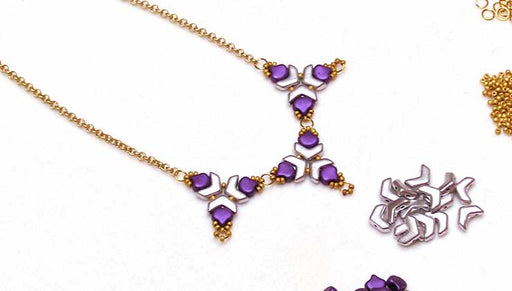
FEATURED IN THIS VIDEO
Audio Transcript
Note: This audio transcript is auto-generated and may not be completely accurate.
Hi, this is Kat with beadaholique.com pleated one up here so i'm gonna be showing you this technique now it's really fun and it's so easy to personalize you can see I've done kind of a cool little splash of color there we're gonna make this design a little bit different on the one that I'm going to do here and we're going to be using some Nemo size D now I wanted to bring out these two colors to show you that if you wanted to coordinate your colors we do have a nice gold and we do have the nice gray silver so if you wanted the threads to disappear a little bit you can go for the gold in the silver but I'm gonna use the blue because it's going to bring out my design a little bit so this is gonna be part of my design element but that's totally up to you we have lots of colors of the Nemo size D alright so we're gonna be using that and then I have a big eye needle here I have my miyuki delicas I also I'm gonna be finishing off this necklace with a little bit of chain some jump rings and a lobster clasp and then I have some GS hypo cement and that's just gonna help me secure the little knots that I have that are gonna be going onto the back of our piece and then for tools I just have a pair of scissors you can also use snips if you like and then a couple pairs of chain nose pliers I have a regular chain nose and a bent chain nose and that's just going to help me later when we go ahead and complete our necklace but let's go ahead and get started and I want to talk to you a little bit about this medallion in particular now as you can see this is a really nice large medallion but what's really unique about it is if you come in nice and close you can see that there are two tiny holes on this side and two tiny holes on this side so these are actually going to be our anchor points so I'm gonna start here work my way over here tie off and then I'm gonna start again and work my way down here now the only reason I want to do that is for two reasons one to make sure that both sides look the same because that's going to create a little thread bridge there but also so that you I have to deal with all the thread going all the way around because this does take quite a bit of thread we're gonna be using about six feet to just do half of it so instead of sitting there and pulling through all 12 feet I'm gonna make it nice and easy for you so but if you want to do that please go for it all right so first things first let's go ahead and cut off our thread and I'm gonna use like I said about six feet it's easier if you just simply go for the amount of thread that you think you're gonna need and maybe even a little bit extra it's harder to add the thread you know once you get going it's possible but we just want to make our back look nice and clean with those knots all right so what I'm gonna do first is I'm gonna open up my big eye needle and I'm gonna slip through my name oh yeah and just bring that down leave about a foot or so on the other side that's perfect alright so now I have my thread here I'm gonna work all the way to the end so what I want to do is I want to pick up my medallion here and excuse my fingerprints and some of the smudging I'm gonna try to keep it as fingerprint light as possible but if you do get some fingerprints on it don't worry you can just wipe that away at the end all right so what we're gonna do is we're going to come up through the first interior hole there on that one side and I'm gonna bring my thread all the way through making sure to not snag it we don't want any knots like just happen there we go oops I think I already have there we go all right so let's pull our thread all the way through there we're gonna leave a tail of about a foot or so because we're gonna tie that off later but to begin we're gonna go through that second hole that's right next to it and bring all of your thread through there again hopefully nothing is going to catch of course my thread is quite coiled there just from being on the spool you can kind of stretch it out with your fingers all right there we go all right so now I'm gonna flip it over to the back side so I have the cords coming out of those two holes so I'm going to take both of my ends and now I'm just going to tie an overhand knot and just bring that right down to the center there and I'm gonna do that one more time just to secure it tie an overhand knot all right there we go so now I'm gonna kind of flip it back over here and I'm gonna take my needle and I'm gonna come up through that first hole there the one closest to the outside of the medallion all right and let's pull this through all right so now we're ready to start adding beads so for my pattern here I'm gonna create a row like I said of red beads and each of these channels will fit thirteen beads so you can come up with some really cool patterns there so I'm just going to pick up my thirteen beads so one two three eight nine ten twelve thirteen all right so now I'm gonna kind of slide these down towards the end here of my cord alright so they're gonna lay inside just like that but I want to take my needle and I'm gonna go through that Center through that big center there take it to the back and then I'm gonna come up through that first hole on the outside there all right and my there we go maybe it should just pop right up there all right so now what I'm gonna do is I'm gonna kind of push it forward with my finger just a little bit so I can push them through that channel you can kind of see from the side hopefully I'm just gonna push them up and then I'm gonna catch all those beads with my needle and I'm gonna just gonna run it all the way back through and your needle will probably come out on top and that's fine so we're just gonna pull that all the way through could you imagine pulling 12-feet through here alright so we're gonna pull that and we're gonna kind of make sure that those beads sit back into that channel they might kind of get out of the way there all right so now again I'm gonna go through the center so I'm gonna go through making sure to not catch any beads this time well what we're doing is we're just kind of creating almost like a little figure eight with our thread and this is just helping to secure those beads in there alright so now I'm gonna come up through that first hole one more time and actually flip it over just to make sure all right there we go so I'm coming up through that hole oops I'll make sure everybody gets out of the way here we go all right so we're just gonna do that whole thing just one more time but this time we don't have to go through the center because we've already established it so what we're gonna do is we're just gonna take our needle we're gonna run it along those beads come out on top I should have used some beeswax or thread protector it's a little tip I'm having some nodding issues but I'm just going to go through the front there and down through the hole yeah you can always use some beeswax on your name oh that may have been a good tip for me but that's okay we will press on so I'm gonna flip it over to the back and again I'm just gonna kind of use my finger just to press up those beads just to make it a little easier to run my needle through there we're getting some a lot of thread in there which is what we want we want it to look nice and stable we don't want it to look kind of anemic so we're just gonna kind of bring our thread there and we're gonna come out on top so again right now we're looking at the top of the piece alright so this is the last pass through that entire row and what we're going to do now is I want to make sure that we go down through that first hole there so this is true after you've completed every single row because this is the pattern that we're gonna establish on the back of the piece so now if we go ahead and flip it over we need to get to that next hole so what we're gonna do is we're just gonna create a little thread bridge going through that next hole from the front or excuse me from the back to the front because we want those threads on the back I'm going to show you what that looks like as we sort of continue on so now we're where we were we're coming out at the front all right so I'm gonna set that down for a second I'm gonna bring in my other piece here so you can just see what I mean so the front we just have all those threads just coming straight out to the side but on the back we have those threads that look like they're connected and you can see my little tiny knots on either side but you can see that they're just they have that nice little thread bridge going all the way around there so it starts to become part of the design because that way then this can be a little bit more of a 360 design even though there is a back and a front alright so let me show you that whole thing just one more time so we've got so now we're ready for our second row so we don't need to do our whole Anchor Point again so we're just ready to dive right in so for this one I'm gonna pick up 13 of the blue beads here all right so again just gonna slide these guys down and on this first pass we're gonna go through that big Center there and you'll know right away if you've picked up the right number of beads that will sit perfectly in there these Center lines are designed specifically for the Miu key delicas 11 . so or 11 oh all right so back to the front back so you can do a lot of really fun designs with these all right now we're just gonna run all the way back through all of our beads making sure we catch every single one of them and now we're just gonna sneak our needle down through the big Center they're having it come out towards the back okay and now coming up through that hole in the center and now we're gonna go through all of our beads one more time now you could if you want you can just go through once it's entirely up to you I like the stability that the two offers just makes it a little more a little bit stiffer in there so they don't wobble around too much but again it's your call but this is how easy it is and you can just develop a lot of fun really cool patterns like I said so these are gonna be thirteen beads across and you're gonna have 24 rows in this particular design we do have some other designs which are really wonderful as well and those you can do five or however it is we also do have bracelets and cuffs and rings that use the center line technique alright I'm just trying to get my needle through there come on there we go sometimes you just gotta wiggle it through alright and because this is my last pass I got to make sure that I am going to the back oops I'm sorry going through the hole to the back so that I can come up through that next hole and we're ready to start our next row alright so now I'm gonna start a row that is gonna be all turquoise so what you do is you just continue to do it all the way around here and when I get back to this last one right before we get to the next two I'm going to show you how to tie it off and we're gonna need to add a little bit more thread there alright so I'll see you back here on the other side alright so I finished this last row right here before I get to the little section there with two holes so I'm on the back so I'm just gonna flip it over so you can see the back so you can see that we have our nice little thread bridges that just connect all the way around so now what I'm gonna do is I'm just gonna take this cord here and I'm gonna go underneath one of the little thread bridges that's sitting right next to it there and I'm just gonna kind of try to catch that with my needle and go underneath keeping the needle on top there and I'm just gonna let this come to a nice little loop and then I'm gonna take my needle and go back through and this is just gonna give me a nice little tiny little knot there all right I'm just gonna repeat that one more time just want to make sure that I get a nice secure secure knot here right back through catching that loop and there we go alright so now I'm just gonna very carefully just take my needle and I'm just gonna try to go through a few of those beads here and it looks like I'm gonna get to go all the way through which is what I wanted there you go now there's a lot of thread in there so this is a little tight so just be patient we don't want to shred the thread that's in there there we go alright cuz all I wanted to do is just kind of secure that knot so now I can come in with my little snips and I'm gonna snip it on the outside here there we go alright so that is one now I've added a little needle to the other side here so going back over us we're still on the back side here to that red threat or that red line there that we created with our beads I'm gonna actually just do the same little thing we already have a little knot here so I'm just gonna go very carefully next to the one right below it there oops all I'm doing here guys is I'm just doing the same thing sometimes it's hard to catch that little thread bridge there because we've woven it so tightly which is what we want to do but we're just gonna try to do this just I hope I like the added security it provides there we go and for this one I'm just gonna do it once cuz we already have a lot of knots happening right there and then again I'm just gonna go back through that strand of red there if I can just kind of catch my needle underneath there and get it through a few of those beads and I'm just kind of wiggling it through all right there we go sometimes it's really tight that's okay I'd rather have the security so just be patient with it you know it seems like it's really difficult but it's actually it's very simple it's just a matter of just getting it through there all right so now what we're gonna do is we're gonna kind of repeat that whole process on the other side so we're gonna start here and I'm gonna go all the way down now on my bottom row here I'm gonna do all red so that I have a nice little sort of spray up here of the colorfull and then I'm gonna do all red down here so that's the whole thing we're just going to repeat that entire process so I'm gonna go ahead and do that and then I'm gonna come back and show you what the finished product looks like and then we're going to add our chain and make it nice and beautiful so we have our finished medallion here so the last thing that we need to do this is the front side so let me flip it over so you can see the back we have our little knots there so just to add a little extra security what we're gonna do is we're gonna come in with some GS hypo cement and this has a really nice little pinpoint to it as you can see right there so we're just gonna add a tiny little dab of glue on the back here and on both sides right there all right so while that's drying let's go ahead and construct our necklace really quick make sure we close our glue all right so we're gonna come in with our two pairs of chain nose pliers now the jump rings I'm using here these are a five millimeter 20 gauge jump ring so we're just gonna give it a nice little gentle twist and I have two feet of chain I wanted to make a nice long necklace I feel like with such a big medallion you want to go for the long necklace all right so I'm gonna slip on one side of my chain slip on my lobster clasp and close that up and to the other side I'm just gonna add another jump ring and again just giving it a nice little gentle twist to open it up slipping on my jump ring to the other side that was the cut piece of my chain so my little link was just cut there we go so slipping it on to that last link at this side closing that up and then finally what I want to do is this is the back so we're looking at this backside here I always like to put the lobster in the right hand for someone who's putting it on so just keep that in mind so we're just gonna open that lice little jump ring flip it over there and then I want to slip my chain right down into the center so it can float freely and then we're just gonna close that up and then we have our necklace that is all finished there you go there are two medallions so you can see how much fun you can have with those patterns I know at times during the video you're probably thinking oh that's a little tedious but the result is so pretty and honestly yeah it's just because those channels are so slim that we really want to show off all that metal so you just sometimes have a little trouble getting your needle through there but that's why we like using those big eye needles they can kind of bend and move with that so to have no fear this is actually very simple it's very fun and you can create tons of colorful patterns it's a great way to use up some extra seed beads because as you see it doesn't take a lot all right thanks for watching guys you can see more videos and tutorials by heading over to beadaholique.com and of course you can shop everything you see here over at beadaholique.com

You recently viewed

Clear recently viewed