Beadaholique Live Class: Right Angle Weave 101

SKU VID-1613
Designer: Design Team
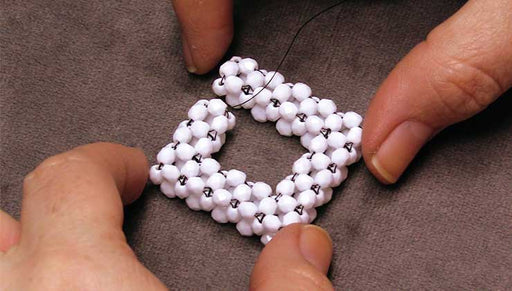
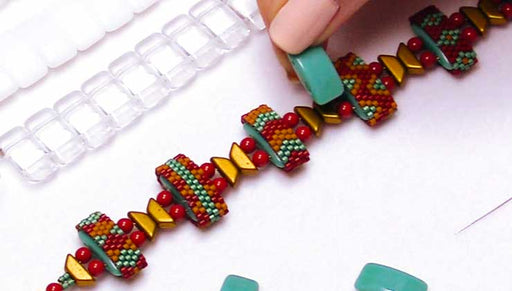
In this Live Class Beadaholique designers, Kat Silvia and Julie Bean, share their expertise in Right Angle Weave. Try using two-hole beads, embellishing with extra bead woven elements like rose montees or even trying your hand at Cubic Right Angle Weave. A world of beading possibilities await you in Right Angle Weave.
Audio Transcript
Note: This audio transcript is auto-generated and may not be completely accurate.
hi everyone welcome to our beadaholique studio I'm cat Silvia and I'm joined by Julie bean and today we're going to be talking all about right angle weave so we do these classes once a month and people have been begging us to the right angle weave so we are finally getting around to doing it in a class and this is gonna be wonderful it is February so it's a great time to renew those New Year's resolutions like you may have wanted to do some more crafting so we are here for you yes and we love right angle weave it's so versatile it's a wonderful stitch it is and it's a pretty good intro stitch if you are wanting to get into bead weaving you've never done it before it works up really quickly it's not those teeny tiny little beads you know challenges with your eye sight or that's a little intimidating to get into something with like little 11 o delicas these are a little bit bigger beads usually so it's just really fun oh there's so much you can do with that yeah and we're gonna actually be showing you two different versions of right angle weave one you can do that's really basic and another one you can do that incorporates two whole beads because those are really fun so you can actually always continue to expand your knowledge of right angle weave but in this class we're gonna focus on kind of more of a 101 more of the basics you know our favorite tools our favorite beads that we love to use and everything that you're gonna see here is available to buy at beadaholique.com so we have beads we have tools we have needles we have thread we have everything you're gonna need to create wonderful projects yeah and it's gonna be a lot of fun and we know you probably have some questions so if you have not joined this before one of the things that we do love about being live here is we have a Brian who is at the computer monitoring questions and he will ask them on your behalf of us so we can answer them here live and get you those answers right away or maybe help you work through a problem you've been having with right angle weave or something even curious about so do ask those questions and also leave comments and if you've not joined us before you probably don't know that when you ask a question or leave a comment it enters you for a giveaway I'm so good and every live class we do do a giveaway so here is our giveaway for this class so to get you guys fully started and ready to go we're giving you one of our right we've kits now this does involve those two whole beads so this is going to be more advanced but what we are also doing and you can see the finished example here of that kit it's beautiful little kit there and the other thing that we're giving you is we're giving you some of the Czech fire polish these are four millimeter beads it's a beautiful mix we're giving you a few different strands there we're gonna give you some seed beads and a clasp because you're gonna be able to follow our tutorial and make this entire bracelet and one of the other tools that you're gonna need is you're gonna need some way to clip off that thread so we are giving you guys a thread sap tool this is really really fun it's a wonderful we have several in our space there didn't you each have one on our desk but this giveaway could be yours and all you need to do to enter is just leave a comment during our live feed and we will announce the winner at the very end of our live class so stay tuned and hopefully you'll hear your name but if you don't have a question that's okay just say hi that still enters you let us know where you're tuning in from let us know if you've tried right angle weave before or what your favorite beat is and just let us know in the comments and that enters - you twist mm-hmm so why don't we look at some of the variety of projects you can create with right angle because they all look different and there's like Kat was saying earlier there's so much you can do with it so if we want to just start with kind of like the basic which is what I'm gonna be showing here in just a few minutes how to actually do but here is a really simple basic right angle weave bracelet and Kat was able to make this really fun diagonal stripe pattern and she didn't actually change her technique at all this is still right angle weave with little four bead clusters which is what I'm gonna be showing you it just was a matter of which beads she picked up when to create that diagonal stripe and now you can create regular horizontal stripes you can do a lot with this and then if you want to embellish it just a little bit you see this bracelet here which is what we're gonna give you the supplies with the giveaway for she just added a little seed bead and again she actually did not change her technique at all she just added a little seed bead between it and made sure she consistently did that and then if we move over to here we see we've got some to hold right angle weave now believe it or not this is still writing the weave yeah and so Kat if you want to talk a little bit about this because it's gonna be what you're gonna be doing I'm gonna demonstrate how you can use the super duos here which are these pink beads that you can see in conjunction with seed beads and these are round beads now you can see on my example over here I used the fire polish beads just to give it a little bit more facet but it's the exact same technique but you can just see how different this really looks but this is still right angle weave and it's still just as easy I find so I'm gonna show you guys how easy that is so that's a great little thing to use with two whole beads yeah and then if we continue on you see over here this actually been embellished now this is actually just the same right angle weave I'm going to be teaching you on the backside and that created a foundation that you could then embellish and those are little Rose motifs and you can see the little Rose Monte's here and this is a great example so it has a nice little crystal on the front and on the back it has a little crosshatch pattern so you can actually drive your needle through there going either way and attach it as you can see here right on top of the right angle weave so just again there's so much to do with it with just learning the basic foundation and then you can embellish it and speaking of embellishing even further you can do cubic right angle weave now I'm not gonna be teaching this in this class it's a little bit a little bit more advanced but we do have video tutorials showing you how to do it now cubic right angle weave will allow you to create sort of dimensional pieces here and this is a great little example I did in a video and you actually did the white on the with the black thread there so you could see that beautiful thread path but of course you wouldn't see that if you wanted to use crystal as in my example here that I made a little necklace and we can see that we have the crystal let's which are very similar to the Rose Monte's that I embellished this cubic right angle weave necklace so this is sort of to the next level but I just wanted to bring this out here and show you guys what's possible once you learn the basic right angle weave technique so it's fun to see the variety and I actually want to also hold up this right angle weave piece right here which is using check for millimeter fire polish against your 4 millimeter crystal bicones yeah so these are swarovski crystal bicones and you can just see how much tighter the weave looks but it's the same size bead here that we're seeing it's just because the bicones have a little pointed edge to them they kind of come together and sit really nicely and nice and tight as a cluster of four now we get a question a lot here at beadaholique the reason I wanted to bring this out is I'm going to show you that these bicones are four millimeters and these ones over here are six but you can just see the massive size difference of these two pieces here side by side it is the same it is four rows across but just the massive difference that two millimeters per bead will actually give you so I just wanted to bring that out to show you because we do get that question of a lot of oh can I just do it with six millimeter beads you absolutely can it is going to be very large but you can do it yeah and that reminds me I know I crochet a bit and you know they always say like when you're starting a crochet pattern you know you do like a little sample swatch mm-hm and that's what that reminds me of you sometimes before you start a project you make like a little sample swatch to see what your scale is gonna be yeah we do that we do that a lot with bead weaving especially but you know kumihimo but this is a great little thing this will sit on my desk you know just to is that frame of reference and it's a good thing to kind of pull out you know because you can also see in my example here that I did with the cubic reticle you it's four millimeters versus two millimeters and it is a massive difference yes and it's so funny because it's I think it's hard to conceptualize that it really is yeah until you until you work it up like I didn't even know that was gonna be that bad I was like oh my gosh this is getting really big okay so sample swatches are good yes very very good alright so we're gonna talk you know as we go through the class we're gonna probably show some more examples here and we're gonna talk about more tools but let's go ahead and dive in to the basic right angle weave okay Julie take it away alright so this is the basic right like cat so the basic right angle weave and this is one that you can then embellish with seed beads you can undo a top stitch on top of a lot you can do but this is a foundation row or it could be the whole bracelet just as is as cat's bracelet example right here so you're gonna thread on some thread on a needle now I'm gonna be using fireline we like to use fireline for this it's one of our favorites I would say absolutely and this is a six pound weight now it does also come in a four pound which is gonna be thinner and it comes in an eight pound which is going to be thicker and you're gonna choose your thread wait for a lot of different things one is the thicker the threads like an 8-pound it's gonna be a little stiffer mm-hmm also if you have a project you're gonna do like say this one here and pull out this example so this here has that basic row in the back but it's been top stitched and a lots been done to it if you think you're gonna do a lot of embellishing I would go with a thinner thread like the four pound because think of all the different passes you're gonna have to do going through those beads time and again so you wanna make sure there's a room within the bead so that's just how you're gonna pick your thread I am just using a standard beading needle here this is what I'm using and it's a size 12 that works well for me and I've just got that thread on here so I'm gonna pull out some beads which hopefully will show up pretty good here on camera it's got these pink ones and then I'm actually going to step up to some white ones so here's the little sample swatch I already made ahead of time and this is what I'm gonna be showing you how to do so you're gonna start by making a cluster of four beads so we're just gonna pick it up on our needle lips or let it slip right off one two three four and you see that they're just on the needle we're gonna slide them down our thread and we want to leave a tail of a good eight inches or so because you want to be able to weave your tail in at the very end and we're just going to tie a knot to bring them together as a little cluster and this is in place of using a stopper bead some people do you stopper beads but I feel like for writing go we've cat and I were discussing this before the class this works really well it's nice it's secure you already have a knot in place you don't have to remove anything yeah all right so we got a cluster of four and that is our basic unit okay so now we're gonna pick it up and we're gonna go through a bead and that just secures it a little bit more it also tends to hide that knot a little bit all right so we've got one cluster of four now we want a second cluster four but the cool thing is you already have one of your four beads attack so that is your first bead of your second cluster so now you're going to go ahead and pick up three beads this time and you're gonna go through the beads see it's just creating essentially a loop you're gonna pull that and there is your second cluster a force you see what we've got now if we want to go straight across to make a nice line we got to get over to this speed here because this is a side bead so what we're gonna do is we're gonna take our needle go through the top bead Thank You Kat mm-hmm happens all the time and then go through this other beads so that we're exiting the bead that we want to be exiting and a good thing to remember with right angle weave I think cap said this earlier today to me is if you lose kind of where you need to be just follow your thread path yep and work your way back to where you're exiting the beads you want to exit all right so now again we have that first bead of the next unit which will be our third unit so we only need to pick up three beads so one two and three okay so now we're gonna go through that bead again and make a little loop and now we want to end up with this bead we want to be exiting that bead again so we just work our needle through I'm gonna lay this down on the table so you can see what we've got all right so there's cluster 1 cluster 2 and cluster 3 so we've got 3 clusters of the right angle weave and we're just making a nice little strip and you can just have a bracelet like this mm-hmm you can make a nice thin little one I'm going to do one more of this base row cluster and then I'm going to show you how to step up to make your second row so again we just need 3 beads make a little loop now on this one we want to get up to the next row which is what you see right here so we want to be on top of here which means this bead that now becomes the first bead of our top cluster so we're going to work our thread through so we're exiting that bead and I'm going to pick up a different color here so you can actually see a little more clearly what's happening so again I have my first bead of that top cluster so I only need to pick up three beads and we're going to make a little loop and there we go and if you wanted to do a different pattern like Kat did with her stripe you just pick up your beads accordingly yeah you don't actually have to change all right so now we're gonna be working this way so this is the bead we need to get to so we're gonna go up through that side bead through the top bead and then down through this side bead and then I'm gonna lay this on the table so you can see what's happening we actually not only have one bead of this next cluster but we have to because we're gonna attach it to this top bead here so we're gonna take our needle now we're just gonna go through that top bead and we've now got two beads for this next cluster so we only need to pick up two so one and two again make that loop so everything is nice and attached and now we're gonna go through this it's a bottom bead of this cluster but it was the top bead at the last one and then from here we're actually going to go up through this side bead again you're always just working on positioning your needle where it needs to be okay again we've got one two beads we need two more one two go through you've got your next cluster and now you're just gonna work your needle so it's where it needs to be exiting so which is all the way around here and again this is a good reminder of keep in mind which thread weight you want of how many passes you're gonna be doing because you are going through these beads a couple times as is so if you are gonna do any top stitching or embellishing you're gonna probably want to go with that four pound yeah because you are probably putting at least three or four thread passes through there okay this is going to be our last one for this row so again we just need to and then I'm going to show you where you need to position your needle to do a third row so if you want to go up here you need to be exiting this bead right here this top bead so just work your needle around and then I am going to show you just to help you know just if there is any confusion you're new to this you would at this point pick up three beads mm-hmm I'm gonna do it in pink so we can see the contrast okay so now because we've only got one bead of that cluster you would just pick up three beads and there is your cluster and then work your needle so you're exiting the side bead and you would just continue and that is your basic right angle weave there's something so elegant about the way it comes together and it really is you as long as you keep moving in that right angle and just following your thread path it's very simple it knows it's very satisfying in terms of it's very geometric it's very kind of easy to understand and the way you explained it is beautiful oh well thank you and it's fun it's really it is just it's soothing cuz yeah just going and almost like a circular motion absolutely I'm so yeah so definitely that is your foundation and you can do so much on top of it yeah very nice so alright Pat alright I guess I'm up so do the two whole version of that and for this I'm going to be using some of these super duo's now these are really awesome little beads that kind of look like little beans when you look at them the side there and they have two holes there so those are gonna fit nicely and then I'm going to be using some round 11 OC beads here and then I have some round direct beads so instead of using something faceted I'm gonna use the round beads and again I'm gonna be using that same size twelve beading needle and I'm also going to be using a six pound just for demonstration purposes here normally I would recommend a four pound for this because we have the tiny seed beads and you are going to be going through them a couple of times I'm gonna try to keep mine very simple but I wanted this to show up on camera nicely for you so that you can see all that's gonna happen so I'm gonna start very similar to the way Julie did by starting to pick up my beads but my positioning is gonna be a little bit different all right so I'm gonna start by picking up one of my super duo's one seed bead one of the Czech and then a seed bead and then a super duo a seed bead just going back and forth here but what you want to do is you want to make sure that your gonna have four super duos and four Czech I know I'm gonna get tongue-tied here for super duos and for check because I'm gonna kind of treat them as though they were the units that Julie was working with so this is sort of just adding in just that extra bead all the way through and you just want to make sure that a seed bead is through the rest of that all right and one more seed bead all right so let me just double check gonna count twenty two four one two three four beautiful alright so again I'm gonna do the same as Julie so this is very similar I'm just gonna bring them together with an overhand knot and I'm just gonna secure that one more time I like doing this technique as well it gives me a really nice firm starting unit it just sort of makes it a little bit less floppy for lack of a better way to put it alright so this is probably what yours looks like now the great thing about super duos is you can keep them on the outside if you want but I'm gonna take mine and I'm gonna flip them so they kind of go towards the inside there and flip them in and flip them in so now you can start to see the unit that we're going to start to create but I'm going to do a similar technique is I'm gonna kind of go through a couple of beads here because I want to be coming out a super duo so let me kind of pick this up I'm gonna take my needle and I'm gonna go through the seed bead I'm gonna just gonna call it the white bead the seed bead and then I'm gonna go through that super duo without catching that next seed bead there all right so now I'm coming out of that super duo now I want to connect the four of those together but to do that I need to create a little thread bridge so I'm going to take my needle and I'm gonna go backwards through that second hole of that super duo and this is gonna create a little thread bridge now if you're using the crystal or let's say I was using black super dues you wouldn't see it in fact even on the blue you don't really see it all that much which is great so now I'm coming out from the center of that superdude and I'm actually gonna kind of put this down so you can see really close as to what's happening here I went through the super do and I'm coming out this way so now to connect those four I'm gonna use little seed beads one in between each one so I'm gonna pick up one of my seed beads and then go directly across to the next super duo and I'm gonna go through that second hole there and this is gonna bring all four of those together I'll get my hand out of the way in just a second you can see this first units temperamental I find that's away with a lot of feelings oh is that starting unit yeah a little bit challenging but then you have such a nice foundation to do the other unit and that's and that's what's nice it especially you know when you're trying to grip something so tiny but yeah once you have this nice starting unit it just becomes it starts to fall into place really nice and easy so all I'm doing is I'm picking up a seed bead and I'm going through the next hole of the next super duo there we go I hang up one more and now I'm coming back and I'm just gonna go through that same super duo I started with and now I need to kind of get out of this unit so what I'm going to do is I'm going to create a thread bridge and I'm going to go through the first hole of that super kind of going back the opposite direction and my unit is nice and tight so sometimes you just got to wiggle your needle in there all right I'm gonna give it a little tug there we go so now I'm coming out of that super duo but I want to add on another unit now you have a couple of options here and one of the examples is actually that bracelet there I mean bring that over here so I'll show you guys kind of on this example so you can see that on Julie's piece here sorry the best way to explain is side by side I know visuals are great visuals are that's why we're here so what you can see here is if you look at the units that Julie did they're going side to side and up and down here but if you look at my units here what you're seeing is it's actually diagonal so those check fire polish beads are kind of creating a side-to-side crosshatch pattern but if you kind of turn it like this you'll notice that those units are the same so if you just look at that unit it's exactly the same the only difference is that you start and that seed bead is your anchor bead so there's two different ways to kind of do this type of thing so what I'm gonna teach you here is to use that white bead as that anchor bead as in my example here I'm going to show you that but you can also turn it to the side and use the superdude as your anchor bead so I know this is getting a little bit more complicated but it just goes to show you that just by turning it around you can actually do the exact same stitch it just depends on which bead you want to come out of all right yeah and I would give a little tip if you are brand-new to right angle weave do a little even if you're not gonna make a bracelet and do a little swatch of standard right angle weave first absolutely just to get used to kind of the flow and the technique and then go on to the so it's kind of like wheel of kumihimo here at beautifully you start with the basic eight warp braid without beads yes you've learned the technique and then you embellish with beads so it's always a good idea to you know if this is completely new to you it will make more sense and will flow exactly if you start with the basic mm-hm and we do have videos showing you how to do the full basic and how to do this version as well so it'll walk you through nice and slow in the class I just here I want to just kind of show you some of the options that you can do because sometimes we don't get a chance to really talk through all of that in our in our videos alright so now we're coming out that super deal I'm gonna go through one seed bead and I'm also gonna go through my white bead here and make sure to not catch that second seed bead all right so now we want to add on another unit here and the next unit I need to start with a seed bead because I already have that white bead now in Julie's example she uses this as her anchor bead and then she added three more well I need to add three more of the whole unit here so for me that's gonna mean a seed bead a superdude a seed bead a Czech seed bead Oh super do that seed bead round seed bead super do seed bead round seed bead and super do so you can see that I have this happening here and don't forget to add that one extra seed bead because we're completing that whole unit but the thing is is you're only needing three of the white beads but you still need four of the super duos so if you're ever kind of confused or before you kind of commit to it just hold your thread up there and go oh does that look right do I have all the beads in their rightful place and if you do go ahead and go through that white bead there this is again that anchor B that we're coming out of and this is going to pull that unit together just like so and now we need to get to another super duo so I'm going to go through that seed bead there pull that snug and I'm going to go through the bottom hole of that super duo and this is where I'm going to create that little thread bridge and just kind of flipping that over so I'm going back the other way and then we just can kind of turn our little super duos in there and add those seed beads to create that second little round and I can tell us already easier to do that second one because you have the first one to hold on to it exactly it's not kind of flopping around in my hand yeah and through the last one there there we go now you can go through this super duo to kind of create that thread bridge going back the other way but you'll notice that we're gonna be not really where we need to be because if we're creating a row that's going this way I need to get all the way back over here to this this white bead but if you're creating your next row going up you can stop here at this white bead and create your next unit in the same fashion that Julie did hers so that is very basically how to do the sort of modified right angle weave by using two whole beads there you go and like you mentioned there's so many two whole beads out there you don't have to necessarily use the super dues yeah you can use you know whatever to hold beads you want it's kinda like a puzzle like you know how are you gonna want to lay them out how are you gonna want to work the side beads well and I want to draw your attention down here so we use super delos a lot but we actually have these super duo duets and what's really cool is if you look at a side of one of these there's sort of half coated on one side so you can get one color on one side and one color on the other side so you can create really cool geometric designs and sort of like an eye illusion trick happening there with is which is actually really fun so those are fun to play with too because then you can kind of just see how it develops and see how your right angle weave goes so very very fun if you're just joining us we've done our right angle weave we've done our modified right angle weave here with our two whole beads but I just want to show you this is the example that I was showing earlier and this is it looks like it's a little bit different but it's very very much the same and you can see it side by side there but these are both right angle weave one is just a little turn to the side yes and it's just great and this one just has a little bit of extra metallic element there with those seed beads so very fun and I think this might be a good time for people are just joining us to review the giveaway because you're gonna get the ingredients you need to make this bracelet and the giveaway today yes you're gonna be able to make that bracelet from start to finish and you'll also be able to me this bracelet and this is one of our betta Holly kits now we sell all of our kits at beadaholique.com and this is a great introduction for all of our kits we have a full tutorial video walking you through you know threading your needle to finishing off the clasp and everything in between and it comes with a beautiful box and printed instructions as well so if you guys are interested in the kits but all you need to do is leave a comment to win this one here and to win all the ingredients and a wonderful threads app to help you with all of your bead weaving projects so get those comments in and I think we're gonna be announcing a winner actually it's probably just a few minutes yeah definitely get those comments in and we can't wait to see who wins and you listen that's just someone to play with yes okay so one of the other things that I wanted to talk about is some of the tools that you know we haven't gone over quite yet so we talked a little bit about fireline and the thread that you're gonna want to use either it's you know four six or eight most common is probably four or six yep but we also have a couple of options when it comes to tying off your thread so I like using these little guys these are my little snips yeah I have these nice little scissors and you can get in really nice and close to snip off your thread so this is a great little tool to have we also have these wonderful scissors from tulip beading and if Julie wants to grab those yeah they're really really nice again they have that nice little sharp point you can get in really nice and close to your bead weaving and snip off your tails and these are my go-to one I love these guys and then we have the threads up now this is your favorite this is one of my favorites yeah here I'll use it alright so it has this little guide because you push up this button and the tip while you have it in the up position there it's actually heating up so you don't want to touch that but what this does is this is a little thread zap so that when you come in and I'll just kind of show on the edge of my thread you'd usually do this much closer the beads it just kind of zaps off your thread and I'll do it again and that's so fun yep so it just kind of heats it up and you can see I don't know if you can see this on camera actually but it forms a nice teensy tiny little ball at the end and what that does with the fireline is it just kind of seals it so imagine that's close to you're not you're not is not gonna pull through there it's gonna be really nice and sealed so it's a great option also you know I love using this one it just it just makes it so nice and easy so this is very similar to the thread zap here again this one is the same you just kind of hold that button and this one has just a removable top and then it has that same little tip there and you just zap off the thread so you can kind of see that happen in or in the little photo right there but this is a great tool for for any bead weaving project anything that you might use fireline for it's wonderful and now I want to show you some clasp options because you've made your beautiful beadwork and now well you gotta be able wear it so I'm gonna pull over some of our examples here cuz I do want to show you different clasp options and you have a lot of different ways you can finish them too so these are little tube clasps I'm gonna pull them over here so and they're different sizes and you can see that your loops can go in different orientations so so many choices and what's fun about these examples is they all seem to have finished it a little bit different so you see that seed beads are a pretty common way of finishing it off to the actual clasp here and you can just basically again work your needle to where it needs to be and add your seed beads so you can go through the loops whether they are going this way so to the side or if they are flat and facing you so different options there and what you're going to want to do is you're going to want to line up your beadwork with a potential clasp to kind of see where the loops are gonna fall and on the example over there I actually I I showed how to taper right angle weave so that you if you're not using seed beads you need to have a way to attach it there so I actually just used an extra little unit there and the four millimeter bead fit perfectly in between those two loops which is awesome very happy to discover so tube clasps are great and then there's also other options too so here if you don't want any metal component this is actually just basic a little button and Lou so the loop was created with the same beads from the bracelet design and then just a nice 8 millimeter check fire polish so that's a nice way of being able to finish it so again this tapered a little bit on this end and then we just did a little button and loop and then we have another option about magnetic clasp we love our magnetic clasp yes this has a very nice sleek look to it we're just gonna hang out yeah they do that and the coasts come in different finishes so you'll be able to match it but they can just disappear into the design that's what I like about them they're really nice and teensy-tiny so your beadwork is front and center yeah and then over here this example we even have a toggle and that was that example where it's just one strip of right angle weave so you can just see how slim that really can be yeah so what we're not really seeing here too much our jump rings mm-hmm it's usually just stitched in place whether you are using seed beads or whether using a czech fire polish or whatever beads you're using but a lot of different options for clasps and we do have the tutorials on these bracelets as well as videos showing you how to attach different classes right angle weave you could do a jump ring but if you did want to do a jump ring I would say to do a closed jump ring and then attach an open jump ring to it because if you sew on an open jump ring it's very likely that that will eventually the thread will slip yeah and if you look how thin your thread is and this is a six pound you wouldn't want an open jump ring attached to that right that's a really good point yeah so if you did want to do something where you wanted to do it like a chain extender to the end of it or something so on a closed jump ring and then attach it to that yeah great tip yeah all right let's look at our giveaway one more time and then we're going to announce a winner for it so this is your last chance to enter the giveaway here and we will be calling a winner here in just two three minutes so yeah let us know what your favorite thing to do with right angle weave is also if you guys are interested and you can head over and join us on Facebook I have been posting some of our wonderful pieces from our fans so you guys have made beautiful jewelry so we now have a customer gallery over on Facebook so if you've created something right angle weave or not if you've made one of our project we share that as well but just let us know and just send us a little photo and maybe what inspired you and we love to share that with everyone and you guys have created a beautiful community for us over on Facebook so be sure to join us there we love that and again if you saw anything here that you want to learn more about maybe you want to learn the sizes of maybe you want to dive a little bit deeper into what it is head over to beadaholique.com we are an online bead store we have thousands of items on sale its stolen many and that's what we pull all of this from so when you look at these live classes and you're like where do I find that because that's actually a question we get we do have people say well where can I purchase that head over to beadaholique.com we have everything available for you and we have a great customer service team so if you guys have questions about oh is this gonna fit with that or I'm not quite sure where to start you know reach out to them and they are there for you and they very often ask questions of us yeah we are here to guide you as well we want you guys to have a wonderful beading and crafting experience so that is why we're here so you might not realize it but you are often talking to us sometimes when you have a little bit more complicated beading question that we're like we'll test that out we often do that oh yeah and you know we get great um great video ideas from you guys and everything so keep commenting we love hearing from you absolutely oh my gosh the inspirations that we get questions it's like Oh that'd be really cool how do we do that I know and I'm like ooh I got the video so we love you guys thank you for joining us and let's announce the winner all right all right so Bryan okay um so the winner is sorry I'm trying to see around the camera tamesha harris so congratulations to Misha you have won this giveaway we hope you have so much fun with it and if you can please contact us yep so you just email us at service at beadaholique.com service at beadaholique.com and we will get your information and ship this beautiful giveaway to you and the happy beading yeah all right thank you everyone for joining us we hope you learned a lot keep if you have more questions keep posting them we will be checking after the fact so we can continue to answer those questions because we definitely want to help you on your beading journey yes so thanks so much for joining us guys and we will see you back here very soon have a great weekend everyone okay bye bye

Customer Reviews

Based on 1 review Write a review

You recently viewed

Clear recently viewed

Customer Reviews

Based on 1 review
100%
(1)
0%
(0)
0%
(0)
0%
(0)
0%
(0)
C
Cat
I am just learning, I love your site and all of the tutorials

I enjoyed you ladies, tutorial was easy to follow! I love Beadaholique!

Cathie