How to Make an Adjustable Slider Bracelet with an Austrian Crystal Fancy Stone Focal

SKU VID-1554
Designer: Kat Silvia
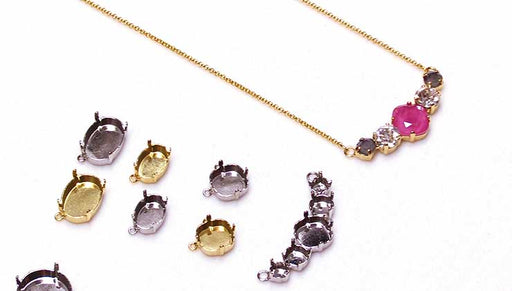
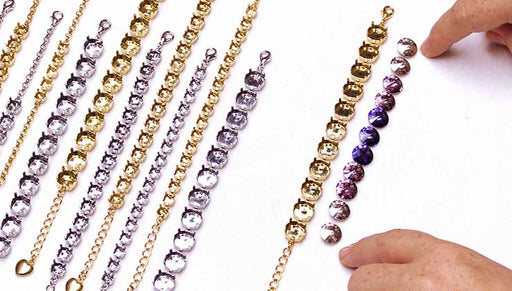
In this video, you will learn how to set a Austrian crystal Rivoli into a connector setting from Gita Jewelry to make a sparkling focal for an adjustable clasp bracelet.

The brand name for the crystals shown in this video is no longer available. High quality Austrian crystals are now available under the PRESTIGE™ Crystal Components line.

Audio Transcript
Note: This audio transcript is auto-generated and may not be completely accurate.
Hi, this is Kat with beadaholique.com Guiteau jewelry and that is a beautiful setting that uses Swarovski crystals so I have brought out a few of the links here that we're gonna be sort of talking about but I'm going to be using this one down here and this has two little links on the side and this is going to fit a forty seven stone size or forty seven SS Sourav ski Rivoli so really beautiful so that's gonna set right in there and I'm going to show you how to do that but just here are some of the other options you have you can have some different shapes and larger circles we also have some embellished links as well some that are gonna fit those beautiful cushion stones and we actually also have a couple over here that are going to use glue so this is an if you wanted a non prom setting you can actually just do a nice little glue in so each of the settings does tell you exactly which stone size works for it so be sure to check those descriptions alright so for our project today here I have one foot of silver chain and then I also wanted to bring out these cute little skulls here today so we're going to be working with these we're gonna be adding these as the little embellishments to the ends of our chain so this is just some charm chain and I have about two inches there like I said I'm gonna be working with that forty seven stone size I have my adjustable slider clasp which has that nice little silicone in the center which is going to help grip all that chain my connector and then the last piece here is we're gonna be doing some four millimeter 21 gauge jump rings as our little closures on the ends here so we're gonna be using those as well so for tools I have a little scrap of wire and you're gonna see how we're gonna use that I also have some popsicle sticks now if you have the big ones or the little ones this works just the same but I just wanted to bring both out to show you and then I have a couple pairs of chain nose pliers a bent chain nose plier and a pair of flush cutters so if you have everything ready to go let's go ahead and get started alright so I'm gonna take my one foot of chain here and I'm actually going to kind of fold it in half and I'm gonna cut this I'm just gonna find that Center link and just give it a nice little trim all right so now I'm gonna set these two pieces aside and the next thing I want to get ready is I want to get ready my little stone setting here so I'm gonna be taking that popsicle stick and all I need to do is just set my stone inside and allow it to be sort of flush with the setting there and now I'm just gonna kind of come over top and grip it with my finger take that popsicle stick and what we're gonna do is we're gonna do a little rolling motion over that prong in order to get it to fall flat there so just really simply just gonna kind of roll it over and you see how easily that bends so now I'm gonna go all the way across the stone and I'm gonna do that same same thing again and just again just sort of press that down and the popsicle stick is great to use because it doesn't hurt that stone at all so I'm just gonna go around and do the other setting or the other prong of the setting and the final one so now we have that beautiful stone set right in there and he's not going anywhere it shouldn't be loose at all you can kind of jiggle it around and you shouldn't move all right so I have that all set to go I can set my popsicle stick aside so now what I want to do is I want to take my two lengths of chain here and I'm going to be opening and closing two of those jump rings to attach this together so I have a bent chain nose plier and a chain nose plier you can also use two chain nose if you like opening that jump ring slipping it on to my chain slipping on my little focal there and closing that up making sure I have a nice good closure and I'm just going to move to the other side and repeat that okay close that right up all right so now we have what we'll lay on top of our bracelet just like so so now we're gonna focus on the clasp all right so you have two options when you do this you can bring both together and fit your clasp on top like that or you have the option to crisscross your chains and then it will sit like that I'm gonna do the crisscross method for this one but both will work all right so here's what we're going to use our little scrap of wire here this is gonna kind of work like a little needle for us so what we're gonna do and I actually have a little too much there I'm just gonna trim mine off a bit there we go so I'm gonna thread it through the last little link in my chain there and I'm just gonna kind of fold it together to get a nice little sort of needle on the other end and now I'm just gonna slip it through the hole of my adjustable slider clasp now this one should go on pretty easily and once you have one through there you'll see that it's it's not super stiff all right so now I can just remove that so now what we want to do is do that crisscross motion so I'm gonna use my same scrap of wire and kind of link that on and I'm gonna go through the other side going in the opposite direction so here's my tail here I'm gonna go through it going this way now make sure that you're not catching any links on the inside because you'll see that it won't go through all right and now we're just gonna kind of pull that through all right and now you can see that we have our bracelet so one side is coming out one end and the other of course the other end all right so now we have to add something to the ends of this chain so that it doesn't pull through but before we do that what you're going to want to do is just kind of work the chain to a length and like we said we started out with a footed chain so you have six inches on either side of that focal there and what I want to do is I want to make it large enough to slip over the biggest part of my hand here I think I need a little bit more a little bit more on the other side trying to keep those ends even there we go alright so that slips over my wrist at that point okay and it just depends on how big your hand is it's kind of like fitting a bangle so you can just measure with a tape across the knuckles there to see how how big it needs to be all right so now what we're gonna do is I've got my size there and I have my two ends coming out here all right let me set that up there you go all right so now you can kind of see so what I want to do is I want to add some of those little skulls to the end there so I'm actually gonna come in and trim my chain pretty close to the top there and I just want to make sure that both ends are even there looks like I have one that might be a little bit longer let me just adjust this is the hardest part about this is just getting that sizing sizing done right all right there we go all right so I'm just gonna come in and I'm gonna trim off here and I'm gonna trim off here all right now before a little slip through I don't need to worry about my sizing anymore so I'm just gonna pull those out there we go alright get my chain set aside there we go all right now you can add as many little dangles as you want if you just want to add one or two you can do that just on the ends there I'm gonna actually kind of add a little bit here so I'm gonna go and do about three jump rings worth of the chain so I'm going to cut that fourth jump ring just like so and you see that when you cut one of those jump rings you actually leave off a couple of the little dangles but we can actually put them back on and I'm going to show you how to do that so what I'm going to do just take another jump ring open it up I'm gonna slip on one skull and then I'm gonna slip on the jump ring and then I'm gonna slip on the other little skull there so now they're back on and now we can just add this back to the end of our chain there and close that up so now you can see that we have our little skull dangles on the bottom there so now I'm just going to repeat that on the other side here and again I'm just gonna count three jump rings and I'm gonna clip the fourth one which is right here oops with my flush cutters of course alright and you can again see that I I lost two there but here's how we're gonna save them again just gently opening that jump ring slip on one and the reason I am doing this is so that they each fall on either side there there we go slipping on that jump ring and then slipping out my little skull there we go adding it to the end of the chain and then closing that up there we go so now when you wear it on your wrist you'll have these little skull dangles hanging from the bottom there and you can just sort of adjust as you need to but if you end up pulling it all the way it'll create a nice little stopper there on the bottom now you'll have some extra little charm chain left over you can also add some little little guys there to the end so let's let's do a little bit more embellishment here so I'm just gonna cut off one more of those jump rings here just to have a little fun because why not alright so now I have two little extra skulls there and just rotating my jump ring there we go opening it up and I'm just gonna add one little jump ring with a skull to the other one up here at the front close that up so we have just a little extra happening in the front you don't have to do this this is just I realized that I had two inches of that chain so I might as well use a little bit more of it you can also use these connectors to make earrings which could be really fun so you can actually make a beautiful set if you wanted to all right so there we go just some fun little skulls there up at the top up next to my Rivoli and my little charm chain hanging from the bottom but that's how easy it is to use these connectors and again these are from geeta jewelry first Roth's key crystal and they are just so wonderful so all you need to do is just pick your favorite stone pick some charms just some chain down here and make it work so I hope you enjoyed this video you can get all of these supplies and see even more tutorial videos by heading over to beadaholique.com

You recently viewed

Clear recently viewed