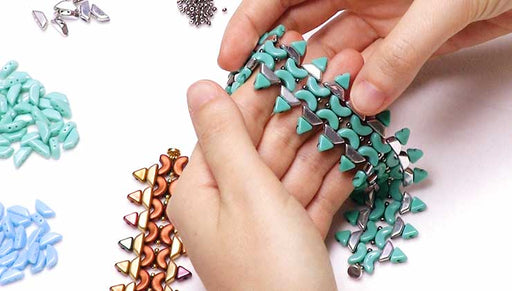
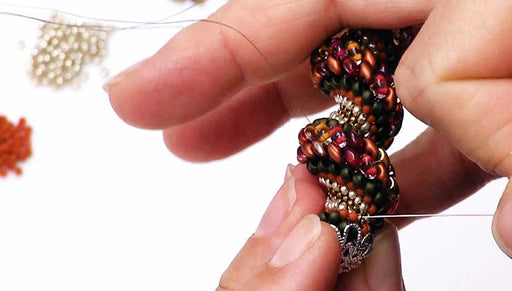
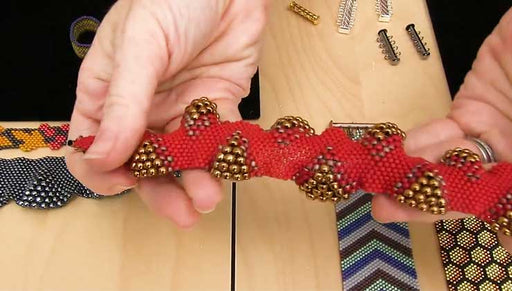
How to Create a Tapered End using Decreases in Peyote Stitch

SKU VID-1353
Designer: Julie Bean
In this video learn how to create a tapered end to a peyote bead woven bracelet. At the very tip of the tapering, a jump ring and clasp is added. This is a technique that adds a nice polished finished look to your designs.
Audio Transcript
Note: This audio transcript is auto-generated and may not be completely accurate.
Hi, this is Julie with beadaholique.com i'm just going to show you how to attach a magnetic clasp so this side is down ec is that nice tapering effect and because it's odd count we have a definite center row so we come to a nice even point and what i'm using at least in this pattern here are my yuki delicas size 11 oh my thread is a four pound fireline and my needle is a size twelve beading needle now this is the pattern and this is a free pattern on beadaholique.com you can go ahead and look up this project and we'll have the name of it in the description of this video so you can search for it now here is the other end now this was the start of my pattern if you're familiar with doing peyote you know that you have like just a flat edge here and that's where you're gonna be able to then finish it off and add your clasp so I've added a new thread already into my beadwork exiting this edge bead going towards the center now if you're not sure how to do that we have a lot of videos well we actually have a specific video on beadaholique.com showing you how to add more thread to your bead weaving you can also have planned ahead and started with a tail that's about three feet long and it's more thread than you're gonna need but it's always nice to have more than too little at the beginning of your project as well so exiting this edge bead going inwards this is an up bead in your peyote we're going to now add another metallic because we do want to create this nice diamond effect so what's nice is because we exited an edge up bead the first bead that we just added is actually a natural taper so that's nice did it all on its own for us just I'm just gonna work across to the other side now okay so now we need another metallic so there's our taper on the other side but our thread is not positioned where we'd want it if we were gonna continue and not taper what we would do is we would add another bead and it would sit right here but that gets rid of our tapering effect so we're gonna go down a bead and we're gonna go through it and through the next bead so at a diagonal going upwards and pull now we're gonna jump down and go through two beads here as well and add AG and I'll going this way so we exit the second one down from the top here so when you're doing decreases in peyote and creating this tapering effect it's all about getting your thread and needle in the right position and that's what we just did so it almost felt like a little X a little crisscross now we're gonna go up through both our edge beads and we're gonna add another one and you can just start to see that nice stepping up tapering effect and then we're gonna work all the way across to get to the other side hey we want another metallic one and in this case you can just go through the bead next to it and now we're gonna do the same thing but we don't have to go all the way to the edge we can stop wherever we want to stop it relative to where we are in this process so we're gonna go down a bead and then remember go up so then are you going through two so we're gonna go down and up through those two and pull just kind of help your thread along if you need to now we're gonna go down the bead so we're just doing the same thing we did on the other side just in Reverse and not going all the way to the edge here we go so we're going up through this two maybe in Reverse is not the right word just on the other side okay and now we're gonna go up through both of those beads that are creating that nice tapering effect and now we're ready to add another one so hopefully starting to make a little bit of sense us really all about just positioning you're positioning your needle and thread the way it needs to be accordingly to where you want to add another bead let's work our way across and we need another metallic alright so now we're gonna go down through the beat below it and again add a little diagonal so going up through to step down a bead and then go up through two and now go through these two topper ones again and now we're positioned where we want to be to add another one of our nice tapering edge beads we're adding another one same process so we're just gonna step down a bead then go up through two step down a bead go up through to then go through your two top beats and we're almost there we're getting there so we need another metallic and another metallic we're really close and the same process so step down a beat go up through to step down a bead go up through two now go through these two top edge beads and we're ready for our final bead now in this case because it is our final bead it's our point and we are actually done with this we have no more to add and for this particular technique I'm going to teach you here we're just gonna put a jump ring through this one so we can finish this off and tie it off however we want and what I want to do is I just want to run my needle and thread all the way down through the edge and pull and then weave in my tail if you're not familiar with weaving in your tail with bead weaving basically you're just retracing through old thread path so you're not jumping over anywhere so I wouldn't just suddenly jump into this bead I want to go to beads which are next to each other and I want to zigzag a little bit too so that my thread is always hidden and you can do this for quite a while if you want I like to tie little knots so I like to be able to just try to sneak under a little thread bridge tie a knot and pull it down and then go through some more beads so that my knot just disappears into the center of a bead and you can do that several times whatever you like until you feel secure if you then go back here you're gonna see that this guy is not going anywhere I'm really tugging on him here so he is nice and well-placed and I'm just gonna trim my thread and now we're gonna add our magnetic clasp and our jump ring so to do that we've got two pairs of chain nose pliers and we're gonna grip our open jump ring so that the slit is up top it's gonna grip it on either side and we're going to thread it through that top bead just like so nice and neat and tidy I really like this technique I often use it if I'm making jewelry for myself especially if I'm perhaps connecting like an earring hook or something I have a little jump ring attached to a top pinnacle bead and it's actually just sneaking through it and then I attach my earring hook I like this technique so there we go we've got it attached we have a tapered end I want to show you what this looks like so I think it's a really fun way to finish some peyote especially if you are doing odd count and you have that option where you're gonna have a nice Center bead and it's just a nice finishing touch and when you do add the jump ring through that end bead you do get rid of any type of excess gap here because you're really labels able to keep everything nice and tight so I hope you enjoyed this video we do have many many more on different bead weaving techniques both on our YouTube channel so please subscribe to that or at beadaholique.com you

You recently viewed

Clear recently viewed