How to Use the Wrapit Loom Professional Series Duo

SKU VID-1279
Designer: Kat Silvia
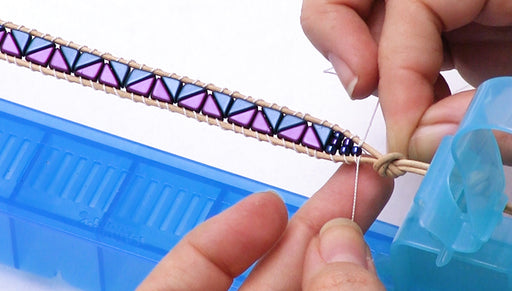
In this video you will see how to use the Wrapit Loom Professional Series Duo to make wrapped bracelets. This loom features an extension that allows you to make longer bracelets to wrap twice around your wrist. You can even use it to make choker necklaces too!
Note: The Wrapit Pro Series has been discontinued. Two regular Wrapit looms are now needed for the extra track to make long wrap bracelets.
Audio Transcript
Note: This audio transcript is auto-generated and may not be completely accurate.
Hi, this is Kat with beadaholique.com foxes on my table here but this is the one i'm going to go over here this is the professional series duo and as you can see this will allow you to make longer bracelets so i have two examples here of what you can make now this one is that double wrap so you're going to get a nice length out of it and then I have this one here and this was used on the regular wrap at loom and you can see that my track is a little bit shorter and that's really the main difference between the rapid and the professional series so let me go over just really quickly what you're going to get with the professional series duo so you're going to get two of the bases here you're going to get your starting clamp and your ending clamp you're going to get two tracks that will show you how to put together you're going to get a little bead stand which you can use to help you out this is works best for the 8oc beads and then you're also going to get three trays as well just to help hold your beads on your table so you're going to get all of this with the professional series duo and you'll be able to make these beautiful wrapped bracelets so I'm going to start here by just showing you exactly how to put this together I do want to point out that you will also get a pamphlet with your duo that will show you in a little bit more depth how to use it but just to kind of delve in here the beautiful thing about the professional series duo is that you'll be able to add tracks to make it nice and long so I'm going to start by kind of putting my two tracks together here and they just fit just like so you just cut it kind of squeeze them in there and don't worry about getting them to flush you don't want to bang them together but this will be just fine and then I'm just going to flip it over here and to this side on my second square I'm going to add one of the feet and I'm just going to move down and do the same thing on the other side there we go so now I have my big long trap ready to go to that starting point I'm just going to attach the bottom piece here right like so on to there until it clamps in so I have this attached to the front end there and you'll have a little rubber band around here so if you need to replace that you can do so and you'll also notice that there are some little rubber bands around the feet and that's just to help keep your loom from sliding around and you can use any type of rubber bands if these ever snap on you from youth you can just add another little rubber band and that I'll add a little rubber foot to it so it won't be sliding around on you and then you're going to take your tail piece and slide it onto your loom now the reason why I was saying that you don't need to worry about this being too flush is that you'll most likely have yours back here if you're creating a longer piece so if you need to create a shorter piece you can actually just detach this and use it as the regular rapid loom but for our purposes here mine's probably going to land back here somewhere so we are going to create a full project and I'm going to kind of swing this around for you to really watch me do this and to do that we're going to be using some leather cord I have some four millimeter gemstone beads I'm sorry I have some six millimeter gemstone beads I have a button clasp I have some Toho demi round seed beads I have a pair of snips and I'm going to be using Jesus hypo cement for this project today you can also use an e 6000 or a super new glue and then I have two strands of my size for Griffin silk so I'm going to create my table a little bit and then we're going to go ahead and get started so I'm going to start by showing you a couple different ways that you can size your clasp now I have an example here that has two open spaces for my button closure and this is done just in case you're giving it as a gift and you're not quite sure which one they're going to use and what size are going to be the sort of adds just a little extra link to it or you can do something similar to what I've done with this bracelet here let me just kind of show you that I had one open button closure so I just am using two knobs so I'm going to show you just a little difference that that is going to create for any design that you'll create with the rapid loom so to get started I have two yards here of my leather cord which should be absolutely more than enough but just to err on the side of safety I'm going to go ahead and fold that in half and bring my two ends together I'm going to slide on my button closure here and bring it down all the way to the center now I'm just going to tie a very simple overhand knot and I want to get I want to kind of you can see me just sort of scooch my knot nice and up close towards that button you want to leave a little bit of space because we're going to have a little closure on top of it but you want to make sure that your button is nice and secure so go ahead and get that a little tug there we go so we're all set to start now and now what you're going to want to do I'm going to size this for my wrist here which is about a six and a half inch so the way to sort of do it on yourself is just to kind of take your leather wrap it around your wrist and wrap it twice you can see I'm leaving a lot of nice good slack because I want it to be a little loose there we go alright and I'd say that's that's a good spot right there as to where I want my button closure to be alright so I'm just going to kind of hold that with my fingers there and make sure that your leather is nice and straight so I'm just straightening it out and right where my fingers are I'm going to tie another overhand knot and this you're going to want to keep your fingers right where they are if you're using a lighter color court you can always mark the sauce with a pen and make sure that your cord is going to stay right there now the reason we don't add glue to these knots especially at first is that you want to make sure that your sizing is correct you also want to make sure that your two cords are nice and even because you're going to be putting beads on the inside so you don't want them to be skewed one way or the other all right so I'm just going to test that out real quick and I think that is just about perfect so I'm very pleased with that so now about the size of your button closure from the other knot is where you're going to tie your second knot so you can kind of see it's usually about three-quarters of an inch to an inch and you're just going to tie another overhand knot again making sure that your cords are nice and even and give it a little tug and just to test it make sure that your button slips through nice and easily and there we go so now I'm all sized and ready to go now if you want to leave another knot for your button closure here all you're going to do is repeat the same distance to get that second knot so about right there now you don't have to do the step if you just want one button closure so I'm just going to go ahead and repeat just to give my we're some options so now just go ahead and slide that down and I give it a good tug and I'm just going to test my button one more time and I think I'm happy with that so we are good to go so now we're going to set it up in our loom and actually get ready to loom so go ahead and to the top part of your loom here and you're going to kind of use the little teacher to open that mouth slide your button in and go ahead and close it down now keeping your cords together so they're not turning around you're going to move to the other side and go ahead and slide it into the little nut that is right there just move this up just a little bit and I'm going to turn my loom around so you can actually see what's happening here all right so I have split it into the second in between my first and second knot here so that it's right in between those little grooves that come down so now in order to get that tension to do our weaving we're just going to kind of pull it back almost like a rollercoaster and we're going to get a nice springy tension holding there now I just want to show you and kind of point out that I definitely let you know that you'll have more than enough with two yards so this is the excess of leather that you'll have so if you really do want to make something that is going to be much longer you'll be able to do that so I just wanted to kind of point that out to you in case you had questions all right I'm going to set this piece aside here for just a moment and I'm going to take out two skeins of the Griffin silk sighs for now Griffins look if you haven't used it before it comes with these little twisted wire needles and they are flexible and you can just kind of bend them just like wire I'm going to go ahead and take these both off the cart and because it is such a long rapid loom we are going to be using two as opposed to the one that you might be using for the regular left wrap it looms alright so now I'm going to take my two ends that don't have the needles attached to them and I'm just going to tie them together with a little surgeon's knot we go give it a nice little tug there we go and now take those two ends there and I'm going to tie one overhand knot just on top of them all right so now you should be able to give that a nice solid tug and we should be ready to go now I will let you know that we will add a little dab of glue to this when we're all done but this is what we're going to start with all right so now moving back to our loom and I'm going to move back up to the top here I'm going to take my cords and sort of lay them across you're going to have a lot of cord to work with at the beginning but don't get frustrated and just don't get tangled so I'm going to take my cord here with my knob lay it across the top and now I'm going to take the one that is on my right hand side put it down through the center and pull it out and I'm going to repeat that on the left-hand side so that left cord down and out through the center and you just want to keep your knot right on top of your piece here so this is what your rapid loom should look like so we have our knot right in the center and we have our right side wrapped out and our left side wrapped out so now what you're going to do is you're just going to kind of scooch that up towards the top there keeping that not firmly in the center you're going to take your two cords and you're just going to tie an overhand knot and again just being careful not to get too tangled here I know they're a little kinked so when you bring your knot down you're going to want to make sure that your other knot is on top because this will sort of be the backside of where we're going to start today all right now I have my not all nice and tied up there so really close to that leather not there I have my surgeon's knot with the overhand knot and then I have my two cords with the overhand knot so we're going to repeat by taking our right hand cord down to the center and out and repeat on the left down through the center and out alright and now we've come to the fun part where we're going to start adding our beads so I'm going to start by adding the a toe Demi round I'm just going to pour a good amount on my table there just kind of set that aside so with my right hand needle move some items out of my way pardon me there we go alright so move to the end with the needle and you can either pick up pure seed bead with the needle or just kind of place it on top these will have really nice large holes for you so I'm going to string this down and I just have my seed bead in my finger there and it kind of disappeared and I'm going to move my cord to the left and take my left needle and we're going to go back through and I'm now going to hold on to that seed bead and pull my left cord through and I'm pulling it to the right so I'm just Criss crossing over and what's going to happen here is you're going to see it and it's going to fall right in the center of my racket loom now these first ones you're going to need to kind of scooch up there manually to make sure that you have a nice base and now we're just going to repeat the same and this is always going to be your first step taking your cord out to the same side don't crisscross these ones taking your cord out to the same side of your loom now we'll get a little bit less messy when you get a little bit further down you'll have less cord that you're going to be working with all right so now because I want to keep expanding the space in between my two leather cord I'm going to pick up two of the CDs and string them across here and now I'm taking my needle that was on the left-hand side and stringing through both of those seed beads and bringing my cord to the right and just Criss crossing and bringing those two seed beads right into the center again and if you knock your which is having I just knocked my little back piece there and it you just have to just readjust it alright and repeating again and this time we're going to add three of those Demi round Toho beads now this could vary depending on the type of beads that you're using but it's the same process and this is it you just keep criss crossing back and forth and I'm going to show you the pattern I want to set up by adding in those gemstone beads all right so just criss crossing and you can see it start to open up really beautifully alright sing down and out and around and down and out and around alright so now I'm going to open it up even further so what I'm going to be doing is I'm going to pick up one of my Demi round and then I'm going to pick up one gemstone bead and another deming round there we go and same thing you just go ahead and slide that down pulling your cord all the way through and now you always want to make sure that you're going through all the beads here and there may be some gemstones in this particular case where the cord won't fit through so you'll just have to try another gemstone sometimes that happens just because gemstones are drilled a little bit differently than say a Czech glass bead so just be aware that that might happen with this particular bead all right the same thing and now you can see that we're going to need to open up that leather a little bit more so just kind of scoot shim on in there all right beautiful and now you can see that we have a nice big opening to continue adding gemstone beads so I'm going to do a couple more here a little bit faster so you can see the pattern start to develop and all you're really going to need to do is just continue to add your beads in the same manner it's a really fun technique of just adding beautiful gemstones to a leather cord and wrapping them around alright and you can see that I've chosen a multi color of gemstones here so you can just sort of choose whichever color you think would look best next so just get your semi round your gemstone bead and your Demi round on there and take your needle and go through and like I said these needles are just wrapped wire so they're not incredibly stiffed you can actually kind of tug on them a little bit which is nice but if you're having trouble getting through a bead just be patient it'll it'll go through all right and just going to pull down a little bit further okay and now it should be sitting in there nice and easy so just give it a little tug and just wrap it around all right I'll do one more with you here and then I will leave you on your own to complete the rest of the weaving of the bracelet and then I'm going to show you exactly how to take it off and finish it fully I don't want to leave you hanging all right so one Demi round one gemstone and another Demi round bringing it across and taking me other needle from the left-hand side through all three beads there beautiful and bringing it across now if you're more comfortable doing a left hand side first that's absolutely fine you can continue to do that all right so this is where I'm going to leave you I will see you back here when I get a little bit closer to the other end so I've worked my way down the length of the bracelet and I'm coming close to the end here so when you get to about this point you'll need to see if you can fit another of your main beads in there before you start tapering off just as we did in the beginning or if you want to just start tapering off right away I think I can fit another bead in here but what you want to also be aware of is that while I've been weaving the length of the bracelet there's been a lot of tension especially on that leather so I'm just going to kind of kick back the back piece here and let it kind of relax for a little while and you can kind of let it relax either overnight or even just a couple of hours will help but you can already see that some of those beads are kind of jetting out and that's just because all that spring action has kind of come together so just sort of with your hand you can just kind of eat in them out just a little bit just kind of an all I'm doing is just kind of giving them just a little tug to get them because I want them to lay nice and round around the wrist so I'm just kind of pulling them down just a little bit you can see towards the end here I'm getting some more as those beautiful spaces so and this is just - like I said make sure that it where nicely around the wrist all right so I have actually let this relax for a little while and I'm going to go ahead and finish off now I think I still have enough room to add one more row so I'm going to do that really quick here before I start doing my tapering off all right so just same pattern that dem around got gemstone and that Demi round making sure to go through all the beads all right and just kind of squish that guy in there and I think that's a perfect tapering off triangle that I'm going to be showing you all right so just like we did before make sure you're going down mountain around and because the space gets a little smaller it's a little easier to just kind of poke your needle through all right so now we're going to pick up three Demi round just three last one wanted to come too so just three and sliding that all the way across putting my needle back through all three there and giving a nice little tug now this one will sit a little bit wider because it's a little bit more difficult for it to kind of taper in than it is to taper out like we saw on the other side but just repeat and go through and down through the center and now we're going to add two dummy rounds going across and just go right through those two with your needle all right and you'll see it's tapering off really nicely now and for the last one we're just going to do that single Demi round this will give it a nice clean finish again making sure that your pores are looking nice and picking up my final Demi round string it it down criss crossing back through and there we go see it tightens up nice and triangular at the end there so now to officially finish go ahead and pretend like you're going to add another bead so you're going to do your loops again so go down and around to the right and down and around to the left and now very similar to what we did on the beginning we're going to take our two cords and tie it just a very simple overhand knot and bring that down to the center and pretending like we're going to add another bead the space is a little tight so you'll just get your cord down through one more time and making sure it goes through that little tiny corner that we have left I'm going to kind of get my cords out of the way so you can see and down and out and again we're going to tie another overhand knot there we go and now we're going to start with our gluing so go ahead and take your hypo cement then I'm going to be using for this you can also use e6000 if you're going to use e6000 you will need either a toothpick or a scrap of wire just to help you but the GSI postman is really nice because it gives you a nice little application tip so I'm just going to add a little dab of glue down here and then quickly tie an overhand knot right over that glue and that will help secure it in place and I'm going to do another little dab on my final knot and I'm just going to take that glue and just go up a little bit on the sides there of my cord to make sure that it won't fray now while I have my glue I'm going to direct your attention up to the top here where we sort of added our knot earlier and I'm going to do the same thing I've just adding a little bit of glue and add it up the sides just a little bit just to make sure that I'm securing that I'm just going to put the cap back on my glue right away so it doesn't dry up on me and go and set that aside all right now I do recommend letting your glue and your bracelet dry like this for a little while but I just want to kind of take it out right now to show you exactly how it's going to look so you can go ahead and kick your back and let it slack right there and you'll be able to pull your knot out and you can pinch the jaws at the top here to let your button slide out I'm just going to move the limb out of the way here we go so like I was saying you have plenty of extra cord here if you want to make a little bit of a longer bracelet you are limited by your tracks that you have here now I haven't tried it just yet but something tells me that you could even add a third track if you wanted to if you wanted to purchase an additional loom so you had an even longer track to work with but you'll just have to play around with the lengths and styles that you want so just to finish off I'm just going to take my thread snips here and I'm going to snip about an inch off of the leather and set those aside and I'm going to sit my tails here and snip my tails up at the top here alright any notice I did leave a very small tail just because you don't want it to clip too close to pull through but this will be the back side of your bracelet so you really won't see it all that much and then you just wrap it up and get it ready to wear and I'm going to slip it through my second hole there and that is my beautiful gemstone double wrap bracelet using the rapid land Professional Series duo so you can make fun wrap bracelets and you can also make the original wrap bracelet as well I hope you enjoyed this video you can find all of these supplies and more tutorials at beadaholique.com you

You recently viewed

Clear recently viewed