Audio Transcript
Note: This audio transcript is auto-generated and may not be completely accurate.
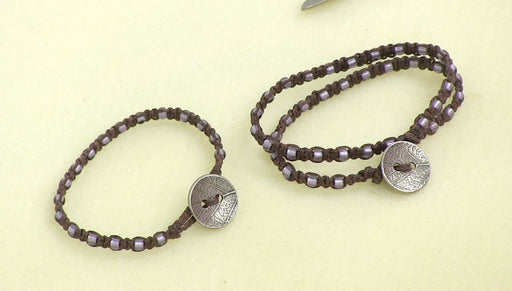
Hi this Megan with Beadaholique.com and today I'm going to show you how to make a beaded macrame wrap bracelet with the beads on the outside. So this is one of our exclusive kits. We have them in a couple of different colors. There are two different versions of our beaded macrame wrap bracelet kits, there is a version with the beads along the inside and then there's this version with the beads along the outside so comes in your kit is a spool of waxed linen cord, a tube of size 8/0 seed beads and a button and I'm just going to show you one of the colors today. I'm going to show you the black and white one. I feel like the contrast gonna is going to be a little bit easier to see. So some of the additional things that you will need is a pair of scissors, you need a ruler and then you're going to need some way to secure your work to your work surface. You can either use a macrame board which is a really helpful tool that we do sell at Beadaholique.com or you can also use a clipboard or you can tape your work to your table which is what I'm going to do. So I'm taping this to the table because this is just a messy work table as you can see. If you are worry about damaging the finish of your table please don't tape onto it. So your supplies that you get in the kit will allow you to make your bracelet wrap around as many times as you like. You can do a single wrap, a double wrap, a triple wrap you could probably do four. So you want to first decide how many times you want to wrap around. So this example that I have here is a double wrap, it wraps twice and then there's a little formula that you're going to use to figure out how long you need to cut your cords so the first thing you're going to do is decide your wrist measurement. So if it's for you can measure your wrist or if you want to offer standard sizes, standard women's bracelets usually seven to eight inches but what you wanna do is measure your wrist and add half an inch or use a standard size multiply your wrist measurement so either your plus half an inch or seven or 8 and multiply it by the number of wraps so for me I have a 6 inch wrist I want my bracelet to be six and an half inches. So for a single wrap that would just be six-and-a-half, for a double it would be thirteen and so on. Then you're going to subtract an inch for the clasp. So for me I'm going to just go ahead and roundup to 6 inches even though subtracting an inch would give me an five and an half I just like to have a little bit of extra thread. So make it a nice round number and then we're going to measure our cord the first piece of cord you want to cut is gonna be ten times the number that you've come up with I'm going to use six inches to make it a nice standard 7 inch bracelet. So I need sixty inches which is just five feet for me it's faster to just measure 3 4, 5 feet If your ever not sure cut more. You can't add new thread on in this If you're ever unsure how much to cut just cut extra so then you're going to want a piece that is four times the measurement plus one foot. So I need 24 inches just two feet plus one foot take both of those pieces of cord and I'm going to slide the button on this button has a shank I'm just gonna slide it right through the shank if you're using a button that doesn't have a shank, all you're going to do is put the cords up through one hole and back down to the second so take the cords through and what you want to do is you want your button to be at the center point on both cords you can take them individually, make sure that that button is at the center line them up in a nice flat row with the longer cords to the outside and then holding it in that row you're just going to tie an overhand knot in four cords loop around and pass the button through you want to pull that knot to about half an inch below the button and pull it tight then you're going to take your longer cords and pull them to the outside and put your shorter cords in the middle and this is the point where you're going to either use a macrame board or a clip board or tape your work down to your table I'm just going to put my button face-down and tape across the whole thing I'm putting it face down because I don't wanna leave tape residue on my surface of the button but it would come off, it's not that big of a deal. You want to get it nice and secure and tape all the way down to the knot but don't tape below the edges of the knot because you want your macrame knotting to start right at the end of that knot and now we're going to make macrame square knots and there are many names for this, it's the same thing as a cobra knot so if you're familiar with that that's going to be exactly the same thing first take your left string on the outside and pass it underneath the two centers strands then you're going to take you're right outside strand and pass it underneath this one that we just brought over continuing to hold onto the right strand pass it over the center and through the loop on the left and your kit does come with illustrated instructions if you find it easier to look at a still illustration and my hands won't be in the way of those tighten that knot all the way up until it sits snuggly against your overhand knot that's half of a square knot. Every square knot has two halves, so that's half and then the next time you're going to do similar thing but we're going to go the opposite, instead of going underneath our center strands, we're going to go over our center strands with the left cord take the right cord bring it over that piece we just moved, under the center strands and up through the loop pull that tight, make sure your center strand is still straight, don't get twisted pull that tight, that is one square knot you have to alternate starting your left cord going under and and over to get your square knots to stay nice and flat if you just keep going under or just keep going over they will twist so we're going to do another square knot next, so you take your left cord under the center, take the right cord under that, over the center and through the loop to finish that knot take your left cord over the center, take the right cord over that under the center and through the loop Now we're going to start adding beads. So you make two square knots and then you start adding your beads. I'm going to use the corner of the bead mat so my beads don't fly everywhere going to grab your outside long cords slide one of the beads onto each one of your outside longer cords pull them up all the way next to the knotting and I'm just going to continue to make another square knot. So under, under over and through and when you pull that tight it's gonna pull those beads right down flat up against the center and finish your square knot over, over under and through up tighten that up and that's your first bead section we're going to do beads between each square knot now I'm going to add another bead onto each of my outside strands and pull them up next to enough the knot I'm going to make a square knot going under, under over and through and then over, over, under and through I wanna show you once more. Add a bead on each of the outside strands, slide them up to the knot and make a square knot, so under under, over and through over, over, under and through you're gonna continue in exactly that way until you've reached your desired length and at the end instead of doing one square knot you're going to do two. So here I have my bracelet. I'm just gonna do a single wrap for the purposes of this demonstration and so I have measured that I have from my overhand knot to my last knot here I have the desired wrist measurement that I want minus an inch for the clasp. I'll do my second square knot after the beads and then I'm going to do my clasp. I'm actually just going to move my tape up you may need to if your gonna do a double or a triple wrap, you may need to move your tape and it's okay to put tape across your cord and your beads if you need to just make sure you're using like a masking tape that's gonna come off and not like duct tape So you should have a decent amount of cord left at the bottom. I have about a foot on all of my strands and that's great we're going to make a loop for the button to go into like a toggle clasp and we're going to do that using half hitch knots so I'm going to for now just work with the right hand side of my cords. So I have the right center and the right outer cord and I'm going to make a half hitch knot. It's a very simple knot. Make the outside cord lay flat, take the inside cord and you're gonna make a number four It looks like a number four bringing it over that cord, then all you do is take this tail and go through the loop and pull that up snug to the top you going to continue and you don't wanna alternate going under and over just overt Make that number four and bring the tail through you wanna just keep going. These knots will tend to twist around I'm going to go ahead and tape over my piece instead That'll hold a little better. These knots do to tend to twist around as you tie them so you just want to go back in and move them back into place. The good thing about the waxed linen is it's very moldable you're going to want a piece of knotting that's about an inch and a half long. You can go back and kind of pull your knotting out a little bit. You don't wanna see gaps but as long as its solid you can kind of spread it a little bit and get it to lay nice and flat and I am switching to my left hand a little bit. I am able to do that if you're not just wanna be pulling it across to that side. I love to keep the knotted part to the center and the soft loop part to the outside. It makes it turn nicer because we're gonna turn that into a loop once you get your knots to be an inch-and-a-half from that last macrame knot to the last half hitch knot we're to fold that in half curve it around. Go ahead and untape that from the table. We want to check and make sure that our button is going to fit so fold that around and bring these two cords we've been knotting with to lay parallel to our macrame knots and just that in place with your thumb tightly and check to make sure that it's gonna fit and it will next take that center cord that's sticking out that way, bring it to the left, then you have this other cord to the right now we're going to tie a surgeon's knot to hold that in place set that down. Surgeon's knot is just like tying a regular knot which should be like that. Instead you're going to take this side and loop it through one more time, pull that down across all the cords and pull it really tight take the cords from our loop and wrap them behind and back over so that we keep our knots on the same side we're going to make another surgeons knot, so again just going to bring the cord through and then bring it around bring it through the loop more time pull that one really tight also it's just going to give you a clean finish on one side just going to wrap and both of your knots are around this side. Pull those knots really tight the waxed linen is nice. The sticky nature of it is going to hold those knots really securely so you don't need to glue them the way that you would with other kind of cord. I'm going to trim you wanna trim close to your knots but not right on top of them. You want to get them probably about a sixteenth of an inch and then where they stick out again that waxed linen is nice and sticky. You can just mash them down and they disappear just like that and that's how you make the loop that you use to close your bracelet Put your button through the loop to close it. That's how you make a beaded macrame wrap bracelet with the beads on the outside. Go to www.beadaholique.com to purchase beading supplies and to get design ideas!