How to Measure and Assemble a Regaliz Flat Cork Cord Bracelet

SKU VID-0561
Designer: Julie Bean
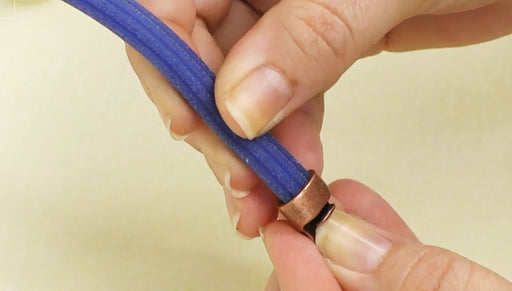
In this video, see from start to finish how to measure and assemble a Regaliz Flat Cork Cord Bracelet. These fun, on trend bracelets are a great alternative to leather and give you a similar look. The video shows how beads will add extra length to your cork and how the clasp will actually have you subtracting length from your cork. Gluing of the ends is also shown in the video. Always order a little more cork then you think you need and then slowly cut it down to fit your wrist. For more information on working with Regaliz and other leather alternatives, view our Regaliz Product Guide.
Audio Transcript
Note: This audio transcript is auto-generated and may not be completely accurate.
Hi, this is Julie with beadaholique.com and I want to show you from start to finish how to make a Regaliz flat cork cord bracelet. I have a few examples right here finished ones. There's a lot of different things you can do with it. It comes in a five millimeter and a ten millimeter width. I'm going to be doing a ten millimeter here in this video but I'm showing a couple different options. So you're gonna need your flat cork cord. I have nine inches right here which is what I would want to start with. I'll tell you in a moment how I ended up with that and then I've got a clasp which has a glue in recess on both sides and I've got three beads in terms of tools I've got a cutter and some super new glue. I have a pen and paper because I wanna show you some math on how I figure out how much of to cut of this and I've got a ruler and I have a bracelet mandrel. You're not gonna need a bracelet mandrel because you're gonna be doing this against your wrist probably but if you do have a bracelet mandrel it is handy First off let's talk about how much Regaliz cord you're going to need to cut. So a seven and a half inch bracelet which is pretty standard it's not your wrist size when you're doing these. You want your bracelet size which is going to be larger than your wrist size and you can see I'm just gonna overlap this right here. This is seven-and-a-half inches on the bracelet mandrel. When we put it on the ruler it actually equals 7 and a quarter inches so that's our first number that we start with seven and a half inch bracelet you plus one quarter-inch just off the start without any beads. That gives you seven and three quarters-inch of the Regaliz flat cord that you're going to need now when we add the beads you just slide these on they slip-on. Some could be a little tighter than others so when you're scooting them along just inch them carefully When I put the beads around it's also going to slightly change how much of the Regaliz cork I use you can see they create a little gap it's to right there when I put this down on my ruler again we went from seven and a quarter inches to eight inches. The beads added another quarter of an inch. So now we're at eight inches one thing that we've found which is kinda hard to explain even if you we're to have twice as many beads on here it still seem to only add about a quarter of an inch it was only when you really chalked it full that it started to increase that number so you know don't feel you have to order an extra like four inches because you've got extra beads. I'll have you order more than what you think you're going to need anyways but that is kinda good to note that double the beads doesn't necessarily equal double the amount here so I've got eight-inches and now we have to take into account the clasp. So the clasp has a little glue recess on each end and the overall clasp measures 21 millimeters, each recess is five millimeters. So since we've got it on each side we have two times the five by two which will give us 10 millimeters. We're gonna subtract that ten millimeters because it goes in from the 21 which gives us 11 millimeters. I know this sounds really confusing but this is just so you can figure out how much you're going to need to cut. If you're just doing it for yourself, you can measure against your wrist you can do this a lot more easily just by cutting down a little increments but if you're making them to sell or as gifts you want to be able to do this math. Okay so we need to take the 11 millimetres and mine is from 8 inches. Here we have inches and here we have millimeters 11 millimetres is not quite half an inch and I want to ere on the side of caution so I'll round down so I'm actually going to minus just 1/4 of an inch from my eight inches which gives me seven and three quarters inches and the reason I did that is because I'm actually going to be cutting cork away to allow for my clasp I'd rather ere really on the side of caution here and round down instead of rounding this up to half an inch which should be like 12.75 millimetres or something like that. So seven and three-quarters inches is what I want to cut. Remember I started with nine inches I did that because whenever you're ordering the Regaliz cord I want you to take whatever number you end up with, roundup to the nearest inch and add an inch. I rounded up to 8 inches and I added an inch, so ordered nine-inches just to be on the safe side. I'll put this against my ruler and at seven and three quarters I'm going to make a mark and I'm not going to worry that I actually made a mark because this is going to go into the recess of the clasp so we're not gonna see it. I'll take my cutter put it over that mark make sure my fingers are carefully away cut it and here we go that's seven and three quarters. Now I'm gonna put my clasp in it without glue. I think that's going to be a little bit big because remember I rounded down on my clasp instead of rounding up but I wanna see how I did I'm going for a seven-and-a-half inch bracelet put on a mandrel. It's just a little bit big so what I can do is just very carefully just cut away a little bit more cut very little at a time Once you make a cut it's permanent. You're not going to be able to add more back in so I want you to be cautious about that slip it on. I'm almost there you'd just be doing this against your wrist if you're making this for yourself little bit more and we're right there. We're at seven-and-a-half inches. So now be it'd be time to glue our clasp you're just going to remove the clasp, take the glue remove the cap, go ahead and carefully put a drop inside of the recess on one side of your clasp, kinda swirl it around a little bit in there just to make sure it covers all the sides. Now go ahead take one end of your flat cork, put it into the glue. We're just gonna hold it there for just about a minute. It actually doesn't take that long now once that side is done you'll repeat the same action on the other side. Go ahead put a little glue in the recess, swirl it around a little bit just so it covers the sides and then put the other end in there push them in nice and snug. Now just let that dry I'd say let it dry for 24 hours just to be on the cautious side and that is how you make a Regaliz flat cork cord bracelet. Go to www.beadaholique.com to purchase beading supplies and to get design ideas!

You recently viewed

Clear recently viewed