How to Make the Marguerite Earrings using Vintaj Patina and 2-Part Resin

SKU VID-1762
Designer: Alexandra Smith
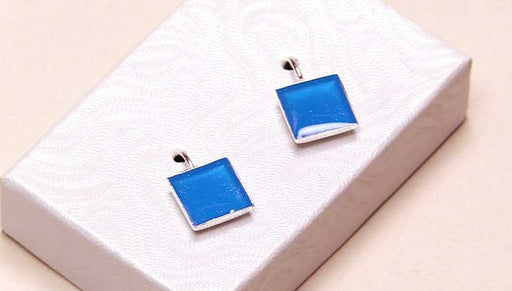
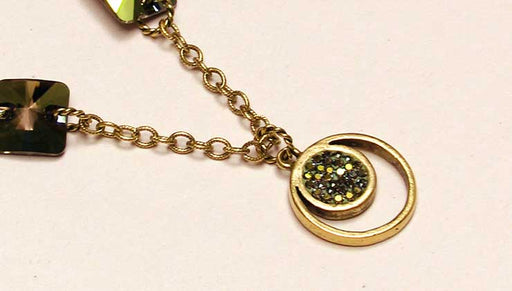
In this video, you will see how to create a pair of earrings using Vintaj Patina and 2-Part Epoxy Resin. First you will see how to paint your bezel and flower charm, and secure the design using E6000 glue. Then you will see how to pour resin into your bezel.
Audio Transcript
Note: This audio transcript is auto-generated and may not be completely accurate.
hi this is Alexandra at beadaholique you to show you how to make them Marguerite earrings using vintage patina and two-part resin so here you can see we've got some supplies and a finished project that I wanted to show you and this one is the amphibia necklace and what you can see here is a little frog charm that's been painted on the inside with green overlaying a blue bezel that I painted with vintage patina as well and then a separate little leaf and what happens with the resin when you pour it over like that is it just creates a really neat sort of shadow box effect the way that the resin magnifies and it's kind of sets things in relief so it's a very fun way to play with bezels and charms and paints and I wanted to show you how to make a pair of earrings using this technique these are the Marguerite earrings and what we have are an eighteen point five millimeter bezel I've got a little flower charm some earring hooks with drop detail I've got several vintaj patinas in the marbled okra and opal light and for our project we'll also be using a paintbrush a little bit of water we've got some toothpicks and post-its be 6-thousand glue to set the charm and for tools I've got a pair of cutters and flat nose pliers second step is going to be after we glue will be pouring the resin but to begin what I want to do is bring in a paper towel and my charm and bezel I'm gonna bring in my toothpick and paint brush and a post-it note and we'll get started on the painting you can see I've covered the work surface here with some butcher paper also you always want to do that with patina and resin and if you'd like to wear disposable gloves in a face mask you're welcome to do that too so to begin what I'm going to start with is clipping off the little loop on the charm and I'm taking my flush cutters just with the tip through the and on one side and then the other just getting that off for there you can barely even see where it was if you wanted to take a file to that you could although once you pour the resin on onto these things it sort of hides any any tiny little flaws there might be so it's forgiving in that way all right so I'm gonna start by painting my Daisy I'm gonna shake this up really well this is the marble white just put that on my post-it note a few drops out there the paper helps it to keep from seeping through and though we have a few layers of protection which is good let me bring the toothpick in because that's gonna help me stabilize my charm while I paint it just hold that down and go in on the petals here I'm inside two hours I'm working but with the vintaj patinas really nice it just it's easy it's permanent and creates a nice sort of enameled effect that you can brush off if you want to get a more relief look or you can do more if you want it to be thicker it's quick-drying yeah let me turn this around here it didn't notice when I was painting and you can see here as I work that it would be a nice effect also to leave this edging of the center in that oxidized but I got a little bit of seepage with my paint and decided to stay consistent with that so I'm gonna go ahead and fill it in so we got our white I'm gonna rinse my paintbrush I started with the white so that any residue from my water wouldn't affect that white color because I'll be coming in with yellow now don't need much of that and of course you can go over these multiple times to get a darker hue so again just gripping with my toothpick I'll get that Center of the Daisy I learned that this type of Daisy is called an oxeye Daisy and in French that's where the what the name Marguerite means is Daisy okay a little bit more here make it match the other one and I'll rinse that off I'm ready to go in and get purple for the bezel the background for sort of fun spring motif and here I'm gonna take my toothpick and kind of stick it into that loop as a handy way of stabilizing you might have seen the table wiggle just a little bit and when we work with the Reds and we want to make sure we have a real stable platform that is level and we'll talk more about that just get this all into the bottom of that tendon lots of different styles and finishes on these you can choose from gonna want to make sure I don't have any streaking or gaps in that background again the resins gonna gonna hide a lot of that but I'm gonna do a nice thick coat on the bottom here make sure I get all against the edge took my bristles up underneath that lip I'm trying to stay off of the edging just to keep the look of what I did and the other one fixed a little bit all right so we're gonna let our patina dry for about I give it about 20 minutes or half an hour make sure that's nice and dry before we go ahead and glue the Daisy into the center of the bezel okay so our paint has dried and we're ready to add a little dab of glue and set that charm in let's get a tiny bit out on my post-it I'll take my charm and you can actually see I painted both sides as I was practicing so I'm going to take and dab glue on the one that I don't want featured Center that flower and the glue will press out toward the edges once I get it in here so I'm just gonna drop that into the center and then check it with my eye and see where I might want to slide it and press it it looks good all right so we got our two earrings we're gonna let let that dry and then we will pour the resin now if you're new to two-part epoxy resin please visit our video on how to mix and use that and I will be mixing it off-camera I'll bring that in when it's ready to go and we will fill the bezels so now we're ready to pour the resin I've mixed that off-camera and what I want to show you first off is I won't be adding the earring hook until after this is cured for three days time but I wanted to just show you what that's going to look like I think this little dew drop at the top is going to be a nice accent so when I'm ready to do that I'm just going to take my pliers and slide that loop off to the side like I would a jump ring and then I can slide on my my charm when it's nice and dry so first off let me bring in our mixing Cup with equal parts of the resin to the hardener what I've used here is the easy cast two-part epoxy resin and I've mixed it for two minutes and let it sit for ten and now we're ready to drizzle it in also gonna bring in a toothpick because sometimes this craft stick feels a little cumbersome if I'm wanting to add just a bit more so we're gonna go very slowly and try to avoid dripping so I'll slide my craft stick off the edge come over and straight off the top of my Daisy it's gonna let that resin slip to the sides of the bezel as it likes and it's self forming so what it'll do is control its own travel in a sense once it knows where the edge is it will adhere to those limits and create a nice domed effect so I just want to add slowly sure I get all the spaces filled and since there is glue and space underneath my charm there I may get some air bubbles which I will show you how to get rid of when the time comes here now I'm down at the level of the table and I level with the piece to see how much more resin I can add before it starts to collapse which is what I don't want so I think I've added enough resin to that one I'm gonna move over and start the next looks like I won't need a toothpick after all and I'm curious to see what sort of magnifying and enhancing effect this resin will have on the daisies I liked how my little frog turned out his eyes happen to be peering up just above the level of the resin which doesn't bother me because it gives it a very aquatic feel so Oh my resin dripped a little bit now I've had that happen before where you'll see that the resin is now off the edge of my piece but I'm not going to panic about that because I know after it dries for about 24 hours I still have some flexibility to come in there with cutters or pliers and it'll pretty easily come off if I just squeeze against the edge of the bezel and pull that extra bit of resin now I do see a bubble and there is some more doming that I want to do just a little bit on that so I think I've got them where I want them now this resin is seeping a bit I'm gonna scoot it over to get get rid of that and I think that's gonna give me enough leeway all right so this bubble seems to be rising on its own I see another one here and what I'm gonna do is bring in this barbecue lighter and always be careful when using a flame I'm just gonna dip that heat over the top of each of these bezels and get those bubbles to rise to the top and pop this one's a little bit stubborn I may need to wait a minute or so before it actually rises to where I can reach it without melting the plastic underneath the stubborn one all right so let's see if with my toothpick I can come in and just give that a little dab encourage it to move there we go all right so that's at the top now oh there okay so I'm gonna let these sit and tomorrow I'm going to lift this up I'm going to take my pliers or my cutters and just scrape off this extra resin and then let it sit some more and it will be fuel it fully cured in three days time I want to be sure that the area is well ventilated that it stays about 70 to 85 degrees and that there's no dust or debris I could take a shoebox or something a cup to go over the top to protect those as well so I hope you enjoyed this video all these tools and supplies are available at beadaholique.com and be sure to click the notification button and subscribe on YouTube where we have a channel with new videos coming out every week thanks for joining us

You recently viewed

Clear recently viewed