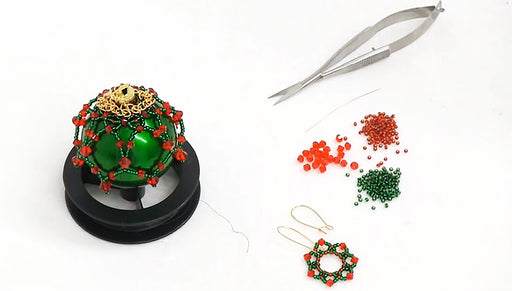
How to Make a Beaded Christmas Ornament Topper

SKU VID-0658
Designer: Julie Bean
In this video see how to dress up a plain ornament with an ornately bead woven topper. This project uses seed beads and crystal bicones to make a sparkly netted topper that will look lovely hanging on your tree. This project makes a wonderful hostess gift as well.
Audio Transcript
Note: This audio transcript is auto-generated and may not be completely accurate.
you Hi, this is Julie with beadaholique.com and it's not the easiest project in the world it's not hard in terms of difficult level it just is a little bit time-consuming because there is a lot of bead work to be done with it I actually had this project on my to-do list for about four years because there's a little bit of challenge figuring out how to do something like this but I've created this tutorial for you and you'll be able to find all the ingredients at beadaholique.com so I've hopefully taken some of the struggle out of this type of project and it's going to be easy for you to see how to follow it on the video here it's really a perfect medium for a video because we're working on a curved surface and we're not really following a traditional bead weaving stitch so I have a 2 inch ornament and actually it's plastic I just got this at the dollar store you know you get a pack of 10 of these for a dollar it's really fun to be able to dress them up like this and make them look really spectacular and then I just took a spare piece of chain and attached it with a jump ring to the top to make a little bit of a fancier ornament hanger I'm going to take my pair of rubbers and just balance this ornament on it so I can reference it throughout the video as I'm creating this and then these are little pair of holiday earrings it's just a little side note real quick before I dive into this tutorial this is going to be the basic shape that we start with to make this ornament topper and I just thought of such a fun shape that I create a little pair of earrings out of it and you can see the tutorial for these earrings also at beadaholique.com and they're called the festive holiday flower earrings I'll just put those aside but fun little side note terms of supplies you'll need an ornament you'll need some 11 o green seed beads some 11 o red seed beads 4 millimeter red bicones and 6 millimeter red bicones you're going to need some thread I'm using fireline smoke size point zero zero six unless all the supplies you need not a lot which is actually really fun tools you'll just need a pair of snips and a size twelve beading needle so let's begin we're going to start with about two cards of thread it's not impossible to add more thread as you go with this project but it's not the easiest thing to do so I would suggest trying to start with a couple yards of thread to begin with and you'll notice I'm just flattening the tip of my thread I like to do that when I'm using fireline to flatten it a little bit so it goes through the eye of the needle a little bit smoother a little bit better oops here I was trying to show you what I was doing and I pulled it out there we go to begin with we are going to thread onto our needle 28 beads and we're going to alternate between red and green so one two three four five six just keep doing this until you picked up twenty eight beads after you've got your twenty eight beads slide them down towards the tail end of your thread just make sure you leave enough of a tail that you're gonna be able to re thread a needle onto it at the end so I say about six to eight inches should be about fine and we're going to create a knot like so and we're going to create another knot pull that tight to create a ring and I knew it was 28 beads because for this particular topper it's going to fit as a nice ring around the topper you will want to double check that all ornaments are a little bit different so make sure that it fits if it doesn't just add more beads just make sure you make your number divisible by 4 so I'm using 28 I could've done 24 I could have done 32 just make sure it's divisible by 4 so I tied another knot or so make sure that's really good and secure and now I'm going to start my bead weaving so right now I want to work my needle into a couple beads and exit the green bead I'm going to pick up one green bead one red and another green I'm going to skip over the red bead and go up and into the fall and green bead and I actually want to go through the red bead next to it as well as the green bead next to it and exit so I picked up three beads and I went through three beads and pull that down and that's going to create a little Dart so I'm going to repeat green bead a red bead and a green bead again skip over that middle red bead go through the green bead the red bead next to it and another green bead exiting the green bead and pull and now we got two little darts and we're just going to do this all the way around the ring it's our final one so we exited the green now we're going through the three beads next to it and actually I'm going to continue going down that first green bead on the dart on that first start I should say pull now I want to exit the red bead okay so this is what we have so we've created the ring I've got all the little darts and then we worked our way back through that first Dart along the right-hand side of it and we're exiting the red bead now we're going to pick up two green beads one four millimeter bicone and two more green beads slide those down I want to show you this on the white mat it's going to be a little easier okay so now I'm just going to go through that outer red bead and pull just like that I'm going to do that all the way around just connecting through these outer red beads so again two green beads bicone two more green beads and go through at outer red bead and pull and do feel free to deviate from what I'm doing it is about experimenting that's part of the fun of it this was just a pattern I came up with but there are a lot of different ways of doing a topper like this so what you see I'm going through that red bead but now I also want to go through the greenside beads and that bicone bead as well so we've completed our circle and we're exiting the bicone but first I want to show you how this is starting to look on the ornament so now we're going to make another row and what we want to do on this one is we're going to basically repeat what we just did but not use a bicone in the middle or use a red bead instead so again two green beads one red bead now instead of that red bicone and two more green we're just going to now go through again the red outer bead it just happens to be a bicone and this is going to help to cinch it up a little if I kept adding beads and adding beads it just keeps spreading and it wouldn't create this tapered look along the top of the ornament that's why I'm going to go ahead and create a row which is actually just going to pull it all in a little bit so two green beads one red to green go through that outer bicone see how that kind of curves it a little bit I don't want to exit that by Cove there okay it's actually a really pretty wreath designed now so it started as a flower then it became a wreath there's a lot of different things you can do with these little objects now we're going to add our next row so this time we're going to do three green beads a bicone and three green beads three green beads bicone three green beads then we're going to go up through that red bike because we are making multiple passes through some of these beads as why I chose the point zero zero six fire line nice thin thread okay so again three one three through the bicone we're just going to repeat all the way around don't worry about this tail just try keep it out of your way okay last one this time we're going to go through the three side beads on the first start of the sequence as well as the bike on let me show you what we've got so far so we have the start of our beaded top and you can maneuver these however you want so they kind of lay on top of each other certain ways all right so we are exiting a bicone so now we're going to change what we're doing up a little bit so we're going to introduce our six millimeter bicones we're going to do that by picking up four green beads a four millimeter bicone three more green beads a six millimeter bicone and one more green bead and if you look here on the ornament this is what we're starting to create this is first Dart slide that down now go back up through the bicone and pull now we want to repeat so we're going to pick up three green beads a bicone and four of the green beads again I need to pour out a little bit a few more of the green beads one two three four millimeter one two three four and now we're going to go through that red outer bicone and we made a dart so we're just going to repeat again it's just a matter really if this whole process is just going around and around and repeating your step for whichever round you're on so we're going to pick up four green four millimeter bicone three green six millimeter bicone and then one green we're going to loop back around and go up through that six millimeter bicone and it's important at each time you do this to pull tight so you have good thread tension and then complete the other side the same way as the first and through that outer Becca I've just made my last dart so I'm going to go through that red bicone okay so here is my needle and I want to go run it all the way through the right side of that first Dart I made in this row so I want to go through the bicone and exit the bicone and I want to then exit that green bead and we are down to our very last row that we're going to make so my ornament fell over but here we are example that we're following so we are down to this row here and I'll show you what this looks like so far so you could stop like that it's actually pretty it's a nice little topper but I do want to show you how to complete that last row and that last row is just a repeat of the row we just made there's absolutely no difference except for you're going through these little green beads and this was not a full tube when I started because I made this I made those earrings so you're definitely gonna have plenty of bees final sequence is just a repeat of the last one so we're going to do four of the green beads do the four millimeter bicone three green beads six millimeter bicone and a green bead now if you wanted this to be longer like the actual darts you hang a little lower you could just add green beads at this point you could just make it like six or eight or even ten green beads so it hangs down further really feel free to embellish upon this idea and experiment but for the purpose of the video I'm just going to keep it the same as my example go back up through that bicone pull so that your beads are nice and secure you've got good thread tension now we're going to repeat going the opposite direction so that our dart is nice and even so we've got three green beads four millimeter bicone and four more green beads whoops okay slide those down and now we're going to go through the green bead like so and when we pull this you will see our dart okay just repeat four green beads bicone three green beads large bicone one green bead pull it down go back up through the bicone pull it nice and tight repeat going the other direction so three green beads bicone four green beads through the side green bead and pull like so and we're just going to do that all the way around final one this looks a little wobbly here but what's going to happen is when drapes over the ornament gravity is going to pull it down so it has these nice this nice draped effect so last one okay maybe a little bit hard to see but this was at original green bead right there so we're going to go through it and some additional beads like so there we go we've completed our circle and you can see now it's starting to kind of pull up a little bit which is good that's what we want so at this point I've gone through several beads I'm going to tie a knot and now I'm going to go through some more beats always retrace your thread path don't create a new thread path and if you want just for added security you can actually is going to be very discreet or not no one's going to notice it just make a knot around this speed just get my tail out of the way one more time okay and now let's go back up through our bicone and up through some more of the beats there see very discrete and that's a really good way of making a secure knot I'm just going to trim my tail now we just need to get rid of our original tail which we're going to do so by threading our needle back onto it tying a couple more knots and then trimming it okay just trim that and we're done so now that we're all done we're just going to take our beaded top slip it over our ornament straighten it out a little bit and there we go and then here's the example where I've just taken a piece of chain about five or six inches and just connected it with a jump ring to the top so that is how you do a beaded ornament op you

You recently viewed

Clear recently viewed