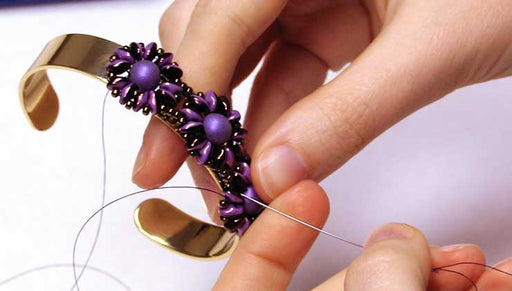
How to Bead Weave a Decorative Element for a Clasp

SKU VID-1436
Designer: Julie Bean
In this video learn how to bead weave a little decorative element to go on the end of a clasp, chain extender, or other design location. This quick and easy element is a nice finishing touch to a design and can easily be adapted to a lot of variations, even becoming a focal piece.
Audio Transcript
Note: This audio transcript is auto-generated and may not be completely accurate.
Hi, this is Julie with beadaholique.com and on our youtube channel is how to do loom work and this project puppy-love is also on the website with the pattern but I wanted to show you in this video how to do this little finishing touch it was just a little add-on I did and I thought it'd be fun to show you how to do it in this video so I used Nemo thread to do my loom work and that's what this is here so I'm gonna go ahead and weave this little accent with the same naima thread and the same ten oh my Yuuki delicacy beads as I did in my loom piece you can also use fireline that would work well for this little decorative accent although I would not recommend it for the bracelet itself so to do this you're going to string on a couple feet of your thread and I just have my basic beading needle here I'm gonna pick up four of them I you keep delica beads and I'm going to just bring them down to just maybe four or five inches from the end and I'm gonna make a knot and by doing so I make a loop and I pull them all together so I have this little cluster now and now I'm gonna go ahead and make another knot and I actually went through my knot twice there just gonna pull it down so that's nice and secure that's not gonna move now I'm gonna go up through one of my beads and I'm gonna pick up a red bead now I'm just gonna go through the white bead next to it and I'm gonna pick up another red bead you might already be guessing at how this is made the entire little accent is made by just going around and around picking up different sequences of beads as you go so really very easy and something that can be easily adapted to a lot of different variations and designs using different beads as well so I've almost made it all the way around I just need one more red bead okay so now I'm gonna go through that white bead so I've completed my circle and actually I could stop right there you just have a really petite little accent or you can keep going and this was actually the debate I was having when I was making this is how many layers do I add cuz it was pretty fun to just keep adding so I just went through the red bead next to it and all this is gonna be is going around and around so now I'm gonna pick up two of my black beads and go through the next red bead now I'm gonna pick up two more black beads I'm gonna go through the next red bead two more of my black beads go through the next red bead and two more and now we're gonna go through those two black beads as well so let's see what shape we have now so another fun little shape but I'm not done it actually reminds me of a quilting block at this point and so now I'm gonna add two white beads and then just go through the two black beads one layer over two more white beads okay so I went through two more black B is gonna pick up two more white beads oops I think I caught my tail I did just grab that out of there okay two more white beads all right and now I'm gonna go through the next two white beads over and let's see what we've got now so again we could just stop or we could keep going and I'm gonna go one more layer so I'm gonna pick up three black beads so one two three these are actually gonna end up sitting on top of my previous set of two black B it's just gonna now go through those two white beads three more black beads and we are almost done with this and I could have kept going more you could really just keep going and going okay and then three more black beads and one more set of three black beads and then I will show you how to tie this off all right so we've got the last three black beads we went through the three white beads and now we've got our matching little guy and that would make a very cute pair of earrings actually at this point so I'm gonna go around another time without picking up beads just gonna retrace my steps and this is just helping to make it extra secure and extra tight so the Tenno my yuki delicas they have pretty nice big holes so you could use even a thicker thread if you wanted to that would work in this case I like using the same thread I already used in my project that way I didn't need to buy any more ingredients speaking of ingredients you can find all the supplies for this project at buta Holly comm we have a wide selection of my yuki delicas and a lot of different loom patterns - a lot of free projects with loom patterns so I've gone all the way around and I'm just going to now have my thread exit one of those black beads gonna slip my needle under my thread bridges between a couple black beads make a little loop and have my needle go through that loop and pull down and pull snug I'm gonna do that one more time right at that same spot and pull and now I'm gonna go through a little bit more okay and let's just do one more not something like this guy really nice and secure especially if you are putting him on a clasp on a bracelet because that's gonna get a little bit more wear than say a pair of earrings okay make sure my tail here is out of the way alright and personally I don't like ending where I'm exiting a black bead going into a white bead when I trim my tail just because I have the black thread here so I'm just gonna go in through those couple white beads out of black bead and at this point I'm gonna trim my tail I'm just using a pair of scissors there we go now what you can do with the original tail you have you have two options if you feel that your thread was nice and secure and I actually feel it's pretty darn secure you could just trim it right there or you can thread your needle back on to your tail and then just work it in onto your beadwork you can just go around a couple times with that tail just to help give it a little bit of extra security if you wanted to you could tie another knot in here it's definitely an option Nimmo knots are pretty secure and pretty tight there's a very nice soft thread so when you when I tied that double knot I feel good about it so here I went through a couple more beads and I'm just gonna trim it off and there we go and if you look at the way I attached it I just took a jump ring and I went ahead and I threaded it through one of my beads so that was the only way that well that was the only manner I used to attach it so it was very simple very easy and nice and clean so just open a jump ring slipped it through a bead and slipped it through the end chain link and closed it back up but there's that little bauble that we were able to bead weave pretty quickly using beads from our existing project quick and easy and they're just kind of fun little accent so I hope you enjoyed this video if you did please subscribe to our youtube channel and check out all our other videos at beadaholique.com as well as on YouTube that's what that looks like on my wrist so thanks for watching you

You recently viewed

Clear recently viewed