Beadaholique Live Class: Bead Looming 101 featuring the Beadalon Jewel Loom

SKU VID-1769
Designer: Design Team
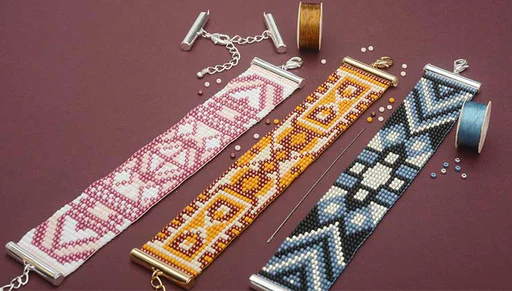
In this live event, join Beadaholique Designers, Kat Silvia and Alexandra Smith, as they show you the possibilities for creating beaded loom jewelry with the Beadalon Jewel Loom. Focusing on the ideal materials like beads and cord, as well as discussing the various finishing techniques, our designers are here to answer all of your questions to help get you on your way to creating one-of-a-kind handmade jewelry.
Audio Transcript
Note: This audio transcript is auto-generated and may not be completely accurate.
hi everyone welcome back to the beadaholique design space I'm Kat Sylvia and I'm joined today by Alexandra Smith and we are doing a class all about the bead loom and specifically the beadalon jewel loom so we're gonna focus this is kind of gonna be a 101 really focus on this loom we have this loom we also have the baby jewel loom so there's kind of different little techniques that you can use for each of them and we're gonna walk through that today I'm really looking forward to it this is a long-awaited class we've done a lot of loom kits over the years and you know we've really explored a lot of different videos and different types of looms so while I might address some of the other looms today we're really gonna focus on the jewel loom because it's a great beginner tool and we're gonna kind of walk through and show you why so yeah I'm excited for this class it's gonna be great let's start us off with our giveaway so like I said we are focusing on the jewel loom and the baby jewel in so I thought it would be great to give our winner two of our kits so with this kit over here this is gonna use that baby jewel loom so this is the full kit so you will get the loom with this and this you'll be able to make our looms statement earrings now with this kit over here this is the full jewel loom and again this is one of our full kits and you can see that little bracelet up top there so you are going to get the full pattern and everything you need to create that bracelet so you're gonna get a bracelet and an earring and then you will have both of the looms that we're gonna be discussing here today so all you need to do to win this giveaway is just leave a comment here let us know where you're tuning in from or if you have a question for us we are here to answer them we have Brian behind the camera back there he's gonna be feeding us questions alive so if you guys have any questions shout him out or just say hey that's pretty I like the color blue whatever that will enter you to win our giveaway and we will announce the winner live here at the end of our broadcast which usually runs about 45 minutes to an hour so stay tuned yeah what a nice gift yeah great I was like and if you do already have a jewel and you can give these as a guest room for yourself I won't tell but we do offer our kits in refills as well so if you do already have a loom or a baby jewel link you can get the refill and the refill is just going to be your beads your thread the pattern all the instructions still so you'll still get all of that but it just doesn't have the added bulk of the glue or the loom because you should already have plenty of that to work with so it's kind of a great little great little thing yeah wonderful all right so why don't you guys just come in here and take a look at our table we have lots of our looms out here tons and tons of patterns and this is going to be a great opportunity to really just show you guys all the different options with patterns and just creating all those beautiful pieces there has been really fun for us and it's a great little creative technique that we like to do we kind of like to mix it up because you know a loom is very simple we're gonna break it down for you and the fun is in the pattern so we have a lot of these a lot of these that you're seeing are actually our kits we do also have a lot of these as projects another thing too and let me draw your attention actually back here down to these four here these are four of our new pallets and these are the Toho designer pallets that we've curated here at Vida holic downloads so we just launched that just today so you guys can go and get the pallets and get all the projects with all the matching things all the slide clasps and glue and thread and needles all that's there for you but I just wanted to point out those four in particular because I had a lot of fun creating those patterns yeah that's beautiful I love how you used two of them are very contrasty and then two are more blended yeah great mix it's a great option to kind of show what you can really do when you really start to play with a lot of these and we're also going to actually be talking about bead mixes as well to you know how you can use that sort of create a totally mixed pattern where it doesn't have to be all angular and have a very specific thing if that kind of freaks you out or scares you a little bit so we have everything ready to go there - all right so are you ready to officially dive in yeah all right let's do it all right so I have the beadalon jewel loom in front of me here so I'm actually gonna do an unboxing because I want you guys to see what you get with your jewel loom alright so this is how it comes it actually ships flat which is kind of great it makes it perfect for travel so here we go alright so I'm just going to open this up and in your jewel loom here I just pull this out all right so it actually comes in a nice little plastic pouch in here so and it does come flat so you do have to assemble it but I'm going to show you how to do that all right all right so this is your jewel loom here so you get this blue plastic piece here and now when you're looking at it you have these two little holes here on the one side and then when you flip it over you see that those two holes are accompanied by these little notches these little round notches and that's where we're gonna anchor a thread so this is considered the back so I'm just going to flip that back over all right so what else do we get here we get a little pamphlet that's gonna walk you through all of this setup and some other little techniques there for you so that comes with it and then the other thing that we have in here is where you're going to get one needle and you're going to get a little thing that's gonna help you thread your needle it's very similar to a sewing a little kit there so we have that and then the last little piece here is you're gonna have this little metal rod alright so let me set my little packaging aside here I'm actually gonna put that down alright so let's go ahead and set up our loom so this little rod is going to actually help to bow the Loom together so what you're going to do is just sort of anchor it on one side there and then you can sort of place it on your table and you're just going to bend it upwards until you get that little rod to stick into the other side so now we have it nice and bowed so this is what our jewel loom looks like setup so you saw I that was so easy it just kind of slides right in like there and fits nicely and you can take that out to store it so it will store flat although I will say that if you do leave your loom bowed for long enough it will kind of stay a little bit bowed so just keep that in mind but I like to leave mine set up here because I know that I'm going to use it but if when you're done with your piece you can take that out and it will kind of relax and flatten out again alright so let's actually do some looming now so what I'm going to do is I'm going to take out my loom needle and this does come with one however if you do need additional loom needles oops I'm making a mess the jewel loom beadalon does sell an additional piece here where you'll get six needles so if you need to replace those over time we do have those and we do also have the tulip needles as well so they are both going to be nice and perfect the loom the tulip needles are a little bit longer so these are great if you're doing a wider piece because this is where you're gonna do your warp and your weft threads excuse me these are gonna be for your warp threads I was going to do this oh my goodness these are for your weft threads all right let me start talking about what I'm trying to talk about here good lord say better you than me I thought I was I know you know and I knew I was gonna do it too I knew I was gonna screw that up is so funny alright so on the back of our loom here what we're gonna do is we're just gonna take our thread and we're just gonna tie a little overhand knot onto that little notch there and this is just going to help us anchor our thread right there and then I'm just gonna double that up just to just to be sure and you are using naima thread yes I'm using the NEEMO the size D and that's what our kind of typical thread that we like to use is alright so I now have that anchored onto the back so when I flip it back to the front here's what I need to do I'm gonna bring it up and over and then I'm just gonna let it sit in one of those little notches there now these little notches are great they go all the way across the beadalon jewel loom and these are going to help to separate your threads the reason why the jeweling is so unique is compared to let's say the Rix loom which is a solid rod in the back where your threads are gonna sit this one actually has the little notches so it spaces everything for you so if you're going to do 11 OC beads you can use each individual notch as a thread now if you're going to be working with larger beads or you're going to be working with multi hole beads this is how you might want to set it up so you'll see on this one here I've actually spaced them out and was able to use those notches to help keep my my warp threads separated there so okay so let's continue so I'm just going to bring it down and I'm going to bring it down to the other side and you can count or you can eyeball but you're just going to sit it in the other side there and then when you turn it to the back what you're going to do is you're going to come around that little notch and then you're going to place it up into the one next to it and you can kind of just do this going back and forth setting it into the little notch twisting it around that little knob back there so you turn you don't even have to wind it around no because there's no reason to waste your thread you don't have to wind it around you can't I mean you can't you know it's not gonna do anything different so there you go I just wind it it you don't have to you know it's up to you it just depends and you're starting off to the side of the Loom yes I'm starting a little bit off to the side because I'm gonna kind of do it across the way now I'm gonna do you know as many as I want here I don't know maybe we'll see let's see okay so this is how you do it just kind of wind it back in front and bring it over this is sort of the boring part but this is how you're gonna set it up and this is the way that you would want to do it for an eleven oh this is how we do it for the kits and again this is the NEEMO size D it is the most standard that we use here at beadaholique.com for and that is over at beadaholique.com so that is where you can get all the materials that we're going to be talking about all the kits that we're going to be showing everything all the projects it is all right there for you so if you're curious and you're going hey where do I get that that is over at beadaholique and we do have a question sure okay so usually and we've talked about this before we've talked about stretching the Nemo chord ahead of time the reason you don't have to do that here is you can actually see and if the camera wants to zoom out just a little bit you'll actually see that I'm kind of stretching it as I'm doing this it's sort of running through my hand and I have really good tension on my jewel loom here so you can see that I don't have to stretch it out the reason you have to do it if you're doing like a fringe or something is because there's not going to be that tension on it that's going to pull so there's going to be enough tension as I'm working here to really allow that to happen all right I'm gonna do one more here and then let's count where I'm at you're going pretty wide with that yeah I figured why not and now you'll need one more warp thread then you will need beads is that correct that is absolutely correct so let's see one two three or four eleven twelve thirteen fourteen fifteen sixteen seventeen eighteen so I have eighteen warp threads here which means seventeen beads will fit in there and I'm happy with that alright so I'm gonna come around to the back here and just kind of wind now this is where you might want to wind a little bit wind it around leave a nice little tail for yourself and I'm gonna snip that off and now take my little tail here and just tie it now if you've done an odd number and you're doing this on the other side you would just wind it around and just tie a little knot with the end that you've already gotten there all right and if you're working with a pattern obviously you'll want to know what your pattern is to know how many beads across you need and that will tell you how many warp threads you need exactly and I'm gonna trim these just so they don't get in my way all right perfect so that is the whole setup part so as Alexander was just saying let me show you how to read a bead pattern so we have these patterns here and this is the one for the kit that you're going to get so let me show you what the actual finished piece looks like so here's that finished bracelet and it goes all the way from the top to the bottom now with this slide clasp one thing that I want to point out is that you'll notice that it starts with a row of gold beads but when you're looking here you do not see that row of gold beads why because it's hidden inside that slide clasp so always keep that in mind with if you're trying to create a pattern you are going to always it and you're going to use the slide clasp this is if you're going to do a pattern with a slide clasp you're going to lose one row of beads there so keep that in mind if you're creating your own pattern so but it's very simple you can start here and just work your way down and then we have our a and our B so you would just continue and work your way down so let's say you're up at this point so on your needle you're just gonna pick up a light blue three dark blue a light blue and so on and so forth onto your needle and that is your whole completed row so it's not like a peyote stitch for example where you're picking up one bead at a time finding the bead that you're going into you picking up another bead at a time so you're picking up a whole row of beads at a time so let's go ahead and see what that looks like alright so now again we're gonna use our size D and I'm oh and I'm gonna just cut off a little chunk here now you can see that on this one it is much more coiled because I haven't run it through my hands and I haven't stretched it out this is where you can stretch it out so this is one method you can kind of do this Alexandra is going to show you how it works with a thread protector so that's another option that you have when you're doing and working with an emo or with another thread but you can just see that it's already relaxing just enough for me don't need to worry too much all right there we go alright now let's thread our needle here so you didn't measure so basically you start with however much cord you're comfortable working with yes I cuz I especially for my demonstration purposes here but if you're gonna do a full bracelet you're probably gonna have to cut off at least halfway through at least once don't try to do one whole thread you'll drive yourself crazy and it will get tangled alright going for a nice bright green here matches your outfit yes I thought about that I was putting my tea and I was like I think I think it's a red everything sorry all right so I'm gonna try to do this a little bit I'm gonna do it facing me so that I can but I know you guys will be watching a little bit backwards okay so what did I say I had 18 so I need 17 beads here so one two three four five six seven eight I was 17 right you are a swift stringer four six eight ten twelve fourteen sixteen seventeen perfect okay so you've noticed that I've left them on my needle and there's a reason for that you don't want to string it down onto your thread because what you're gonna do with your needle is come underneath all of those warp threads and the thread I'm working with now these are the weft threads and the way you remember that is that weft is left and right so that goes across it so your needle is like your shuttle so this is how you want to start your bead weaving now depending on how long you want your piece to be is where you might think about starting here so if you really want it to be super long you can start it a little bit towards the top there alright so now what I'm gonna do is I'm just gonna press up and make sure that all of my beads fall in here and this does help the first row is always the toughest so you might need to give them a little help here I've noticed that I've kind of gotten off there by one so here we go you're using your fingers to adjust those warp threads I am sometimes done is taken a fine nose plier and just kind of gently plucked up each of those warp threads and placed it in between where I need it sometimes that'll help I was gonna say and that can help too especially if you if you're trying to work with different size beads or anything like that all right so now at this point I've just got all of my beads just kind of pressed up through with my finger so what I'm gonna do is I'm going to keep my finger there pull the needle all the way through and out the other side and I'm going to leave a fairly long tail here today because I'm going to be showing you a different kind of finishing technique at the with my little sample piece here so I've gotten my thread all the way through one side I still haven't moved my finger keeping them all in a nice little neat row and now because we went underneath we're gonna go over and what we're gonna do is I like to keep my needle kind of cocked back a little bit so that you're kind of scraping the top of the beads as you're going back because we want to make sure that this needle goes over all of those warp threads as we're going through and by doing it this way kind of keeping it leaned back a little bit like that you're ensuring that you're not getting and kind of shredding any of your thread there all right so that is our first little row and you can see that it's a little bit wobbly because we don't have a lot of structure there and I have my tail coming out this other side so I'm just going to kind of put that up there at the top so there's been no not made with the tail you don't need to fasten it in any way that is right okay I have another row here so same thing so you come underneath and get it as close as you can to the top there press it up you can see it this one it's it's already sort of now pre separated for me so that's really nice so I can just go ahead and run my needle straight through and you can see that my row is a little separate it's what I like to do is just kind of just move it up let everybody get nice and comfortable they're keeping everything nice and stable and then just pull now don't pull too taut because then you're gonna end up with crunching so just just enough you don't need to worry your your bracelet is not going to look slack if you do it that way I know that's always a big thing of like tension so you just need to pull just so that it just snug enough but not too tight alright and there you can just kind of adjust and bring everybody together alright so I'm gonna do one more row and while I'm doing this I'm going to try to talk about something that has come up a couple of times and it's about this rod so if you bring your attention to my loom there's a metal rod here that sits in here the instructions will tell you that you can take it out I don't necessarily find that that is helpful for me because what can happen is it can put and really pull too much on the NEEMO now if you're using a different material it might not work that way you might you know find that it works better for you let me just count my beads will then 14 16 17 18 all right so the other thing too and if you watch my left hand here one of the things I like to do is I like to actually kind of rest and stabilize my loom with this hand because it gives me a place to rest my hand so that I can use my finger to push the beads up there from the top so it's entirely up to you it does I've noticed have a put a lot of tension on the NEEMO I'll say to take that rod out at this point before you continue to do your bead weaving and I like to use it as a little hand rest so again it's entirely up to you I don't want to go again what the manufacturer suggests but if you do find that you don't want to take it out you don't have to so that is just a little little tip all right and now I'm gonna go back over so this is the basic process of looming now if you were following a pattern like I was saying you would just sort of follow along now if you find that you drop a bead it just means that you went underneath a warp thread so if you find that oh I there's a bead missing all of a sudden it's because your thread just kind of missed it as you were doing the second step so you're always going underneath and then up and over and then underneath and then up and over and then you can pull that all the way through and this is why we recommend using a loom needle it's nice and strong it's flexible but you can just see how long it is and it will absolutely accommodate the full length of the loom if you do end up doing a full piece now again if you are using the dual loom and you wanted to do a full piece with all of the work threads here you can see how much longer that here and I'll just go ahead and take it out it's hard to see in the package now that I'm looking at it that would be a very thick piece if you would use every groove mm-hmm so the tulip needle is just ever so slightly longer than this piece so it might be it might behoove you to use this if you wanted to do that so if you were creating let's say a really wide cuff or a focal piece or something like that the tulip needles are really great for them so that is the tulip all right so that is the basics of the jewel loom so I'm gonna toss at Alexandra she is gonna do and do a little work with the baby jewel loom but I'm gonna keep doing this and then we're gonna have some finishing techniques that I'm going to show you off show off here in just a few minutes Alexandra are you going over there okay alright so what I have in front of me here is the baby jewel loom you'll see that it's a downsized version of what Kat has almost exactly except for that the rod is kind of built in it's just already curved because this is portable for the size that it is I think the reason that the rod is removable there on the larger one is to make it more portable so that's all set to go and what this is great for is designing smaller pieces so you could conceivably create a full-size bracelet on here although what's best we have found is to do some alternative sorts of sizes of projects that are for earrings or for you could do pendants you can do vocals for bracelets so that's been a lot of fun to play with the baby jewel room for these sorts of things and we do have kits in for the earrings now what I'm going to show you here is how to use the value loom with artistic wire and I have 26 gauge wire here and I'll be using some size 6o beads and the baby deulim is great for that because you don't want to end up wasting a lot of wire it's one thing to waste a little 9mo thread it's different to waste some some nice wire right so this method is great for again creating alternative sorts of pendants earrings different vocals and components now I'm measuring off three and a half feet and I'll tell you that three and a half feet is a good size to create for Wharf and I don't know if that's helpful or not but it's it's the one measurement I've gotten so far in my practice with this and so you could also alternatively keep your wire on the spool and just put it onto the loom as you go and then clip when you're done but I'm going to take my nylon jaw pliers and go ahead and just run that along the length of my wire to kind of smooth it out and get the preliminary curves and kinks minimized here now I can continue to do that once I've completed my my loom here too so what I'm going to do is come around the backside and grip let's see I'm going to come in this direction and I'm gonna grip about an inch down with my thumb and I'm going to create one two three loops I really want to be secure here because you'll notice even as I've created three loops when I pull the wire kind of slide so I need to make sure my son stays on that while I do my preliminary stringing on here so what I'm gonna do same as Kat did is bring my wire over the groove first group and across the way now it's not exactly the same count of groove it doesn't it doesn't have to be exact I'm going to come around the other notch there and for my size beads I'm going to space it every two groups for this size 6o beads and that will be good for the width of those beads I'm just gonna create four warps here which will accommodate three beads and that's just to just show you how this works with the tension what it looks like in the hands and just to give you a sense of this because it was new to me I I hadn't actually worked with the stiff wire on the little before so I've got my four warps there and I'm actually going to use the Griffin silk now I'm using the size four Griffin silk in a dark color that you can see and you'll notice that on the Griffin it's got a little built-in needle no it's a thin sort of wire needle that's not traditionally used for this purpose but it does work so what I also want to point out is if you have trouble getting it through your beads we will change it on to a big eye needle we can do that too so cats going to show you how to use this wire needle in a little bit what I'm going to show you is the alternative which is to clip this off and put it into one of these big eye needles now these are so great because they're really versatile and easy to use so you can see I've opened that up it's not cool and it's just open all the way and I stick my thread in and it's very secure in the grip of my cord and so these come in packets like so they're about two inches long and they're great for lots of different types of bead work so I've got my needle on there and what I'm gonna do is take up let's see I'll work with these red beads you'll see I'm working with a bead mix and that's another fun thing to do if you don't want to have to create a pattern cat is the queen of pattern I'm les pattern minded so this is great for me so I'm going to take on three beads and the same way she did I'm gonna come underneath pull my cord through whoops and that'll happen where it slips again the first row is always the trickiest to get situated and against her advice here I have the beads on the thread as opposed to the needle now for the size of these beads and the stiffness of my my wire it's actually gonna work fine so I'm working my big eye needle back through over the tops of those wire work threat wires and just like so now I I'm just doing a practice so I don't have enough thread to work with here obviously but that's how I would continue and just down the length that's what it looks like to use the artistic wire with the Griffin silk and when we're talking about the warp and weft threads so and especially if you are deciding to work with the wire your weft cord just needs to be able to fit through your beads twice so if you wanted to use the Griffin silk with say an 11 oh it's not necessarily going to work because the cord is too thick it won't fit through each bead twice and especially if you do switch out the needle don't forget you're backing your ear cord so that actually if you're looking at it you have two cords on your needle and when you're sending it back through it's actually going over three times yeah so you have to be mindful of that but in terms of if you wanted to use a really thick cord as your warp threads here and then small beads you could do that it just this is the cord that is actually going through the beads you know so if you didn't want to use different materials you can you can do it that way as well so let me show you where it is really useful to use this thicker Griffin cord is for a couple of examples I have here this uses this uses the 6o beads like I have and just a little bit of a pattern this was just a experimental swatch that I did using again 26 gauge wire with the size for Griffin silk and so what it does is provides a nice structure for your beads on this wire in comparison I've got eight Oh beads on these little projects here and not sure if you can see on camera but this one was done with the Nemo thread and you can see that the beads are a little bit loose and what I have to do on either side toward the edges was work mine I'm Oh back and forth several times to kind of fill the space and give it the structure it needed so it wasn't crunching and even so you can see the beads are a little bit crunched so on my second pass I decided to use the Griffin silk in the size two to just downsize it to the size of my beads and that gives it kind of just a nice flat structured look if you can kind of see the difference there so I hope that's helpful also we will have a video coming soon on the technique for finishing these off how are you going to cut your warp wires off and finish them using wrapped wire loops and for the difference there you can see what I've done on on one is with sort of a peacoat edge of beads two and one to create that taper and then I'm in this case I use little bead caps to bring the wires together through and hide hide those little junctures so this opens up a lot of design possibilities for different ways to attach say strain reducers multi strand clasps chain fringe the possibilities are really really wide with it and I'm looking forward to playing a lot more with it myself so that's what's been happening with the wire so what's next cat shall I talk a little bit about some of the different materials here yeah we can we can absolutely do that let's start talking about oh you know what actually I want to while we're on the Griffin silk a little bit which kind of goes with the materials I want to show the piece that I kind of have working over here real quick okay so the first thing is I'm going to address a question that just came up is how long can you make it on the Joule loom so just kind of show you on the loom that I've been working on here with my green little green on there if you look at my loom and you look at my ruler on my beadaholique feed mat i have you can make 11 inches here now this is not a roll over loom where you can kind of tweak it back and it'll continue to be longer so if you are curious from sort of end to end that you're going to get about 11 inches in there so just kind of as a little bit of a guide so we just had a question about that all right cool all right moving on mhm now let's bring over this little guy here that I've been working on now this is kind of cool and this is where I've really been able to utilize the spacing here at the top to make room for some of those bigger beads now what I'm doing here is I'm actually using some two whole beads and you can see those are the little square beads there and these are six millimeters so I paired them with a six millimeter fire polished bead and on the outside here all these cream beads are actually eight Oh seed beads so you can just see how different in size they are compared to my eleven oohs down here it's just you know a NATO versus an eleven oh is actually quite a quite a big size difference there so you can see those alright so I'm using the Griffin silk here you can absolutely use Griffin silk but here's the thing that I don't love about the way that it eventually looks if you look on the side here you'll notice that it has a really nice sort of red wrapping kind of thing that happens on this side right but if you look on this side it just looks like these little red dots because you're not getting that sort of double wrap style that you would get from say a rapid loom and I have a little example here of a rapid loom and you can see on the purple cord you're getting that wrap on both sides so it actually gets to become part of the design and a design element so while this is still a loom piece it was created on a different loom and we did a whole class about the rapid loom so if you guys are curious about that please do watch that this is will really kind of walk you through all the basics of that it'll be the whole loom setup and everything so I see what you mean about the a tree that you enjoy about the Griffin yeah wrap it loom piece but for myself when you're working with different sizes and shapes of beads between your warp threads it doesn't bother me that they're asymmetrical on either side just because it kind of lends itself to the design that you're doing so right doesn't bother me well and and that's good and like I said that's what this is why I wanted to show it I just don't love it as much but Alexander if you wouldn't mind handing me one of our kids they're just on it girl all right so this is another one of our kits here and this uses multi hold beads and sort of just different things happening here so let's kind of talk through what this is now this uses the Nemo as that thread so this does not use the Griffin silk and you can see that on that one side you have that red wrapping and on the other side it is the little dots but it actually still looks wrapped because it's a nice thin cord there so that's something to kind of consider as well but we have three whole beads in here we have a toe seed beads we have 11 OC beads those that's the red and white there we have different sizes of fire polish beads you have those square beads running down the center so this pattern looks very similar on the loom to what I have here where all those warp threads are kind of separated out so you can do that here and this is a great example of it this is like I said this is again one of our kits so you can follow along with a pattern to sort of get this patchwork loom kit happening here so so anyway so let's I want to show you why we potentially don't recommend using the Griffin needle with this so what it comes it's a twisted wire needle and it comes right on it as Alexandra was demonstrating and let me just try to do just a very simple I'm going to use to my little beads here all right so going with my pattern I'm going to pick up one of my 800 seed beads one of my six millimeters one eight oh one six and one eight now instead of trying to keep it on the needle because the needles so flexible anyway what I'm gonna do is I'm actually going to string it all the way down here all right now sorry I have to flip it round I guess my brain doesn't work that way all right so same thing so now what I'm gonna do is I'm gonna take all that thread and kind of move it to this other side and just kind of hold it and just get it all the way on the other side of that loom get it out of my way riff in cord when it comes on the card is about six feet it's two meters mm-hmm-hmm so alright so now what I'm going to do is just kind of press it up as though I did before and I'm you can see that I'm kind of creating a little bit of a tension with my fingers to kind of get it in there and then coming in with my finger underneath and again this is why I like that little rod under there and just now I'm just going to kind of pull that together alright so now this is where we kind of have to come back to our needle all right so now we're gonna kind of snake it through but you're gonna have to be a little more cautious with this because see it wants to kind of do its own thing I'm gonna sneak it through and more okay so I couldn't get it through that last bead there so what I'm gonna do is I'm going to kind of pull it through a little bit bring it back and then try to get that last bead individually and this is where it can be tricky to get over all of those warp threads alright so now we're gonna pull it through I'm not purposely you're trying to be messy with this but this is not working the way I hoped and it's it's kind of showing that this can be a little more difficult to do the Griffin silk and I think it's just because you have to use the different tools that kind of come with it so really trying not to make this look difficult that well it was an experiment yeah to try to use different gages widths textures of materials yeah and if you did want to use a silk or a different cord as your warp threads please do so because then that could be a really fun design element if you had like those little red cords kind of going through because you'll be able to see that little color pop there for example instead of having that blue just know that as Alexander was mentioning the Griffin silk it comes about two meters to a card so you might have to use a couple of different cards and kind of string something together to really if you wanted it to be nice and wide because you're only going to get a chance to go back and forth a couple of times there so it'd have to be a thinner pattern or something like that and we do have a question so the first couple questions about tension and I knew this would come up because it's good and we want to talk about it so the first question is something that I addressed a little bit briefly earlier is about the idea of the rod here in the center now you can take it out and if you take it out from a brand new jewel loom what will happen is your loom will start to go flatter and sometimes I find it difficult to even get my hand in there to sort of go back and forth I don't mind keeping it in there you can remove it now when you remove your piece from the loom you can actually still leave this intact but what really happens is if you remove that it's gonna put a lot of tension on your Nimmo and in my opinion it stretches it out a little bit too much just for my liking but again experiment with it I would just hate to have you kind of do that and then have it it'll be like really really lacks now when you're looking at this piece it's it's nice and kind of bouncy up here you know and that's that's how I like it so when you take it off the loom so let me okay let me grab this one so we need to take something off of the loom this to me is nice and flexible I like the way it wears it stands up it curves nicely it's not too taut and this is a piece that I didn't take the rod out of I left the rod right where it was and I just tied it off at the end as we normally do you don't really have to let these relax as much now if you're working with a type of piece like a leather or something that really takes that tension and really wants to bring it back together you can let it relax for a little bit as we recommend with the rapid looms but for this there's no extra tension it's really strong I can kind give it a nice good tug and it's not gonna go anywhere because those slide clasps are really nice and secure so in terms of tension that's what you want to achieve now if you look at the piece that I've just been working on here you'll notice that there's a little it's I'm not even going to say it's a graduation it's so slight but it's just because of the beads so it's not because you're pulling it tight let me see if I can kind of pull it too tight you see how that happens there on the end watch this little bead right there I know this might be difficult to show on camera but watch how that thread kind of looks like it starts to go into that bead that's too much tension you're going to end up with a little a little kind of puckering on the sides so you don't have to do that and if you have it to be too loose let's say I pull these out you can see that a little bit of that cord goes there but all you need to do is just pull it so that it's it's nicely in there and you keep nice straight edges and that's really all you have to worry about so don't don't be yanking your loom it's not going to make it any stronger I promise because once your beads are set it's kind of like they're trapped in there with the tension of the loom so you don't really need to make sure it's super real tight you know don't try to muscle through because you won't end up achieving a nice straight line on the sides so I hope that answers that question about tension was there where there are more questions about tension sure okay yeah so these are your weds that go left and right as you're kind of leaving here you just want to keep it nice and let's see if I can do another row here I think that might help to kind of demonstrate now part of this tension issue that I've found and learning myself is as you come over the top of your warp threads in your second pass to stabilize those beads you kind of have to keep that row nice and straight coming up to the rest of your work because if it gets slanted which has happened for me you'll lose that tension in the loop of your thread that is what Kat is going to show you how to kind of really keep consistent and I think that's the key is just keeping those side stitches consistently taut against your edge warp thread silence as she counts alright okay so I have a new new thing so what I'm gonna do is I'm gonna really kind of yank this next one in so really pull it super tight and you'll see and over it over the course of time see I couldn't even count right cuz the word cat alright so let's really pull this now if you pull it really tight you'll see it puckers on the side there that's too much it's way too much and you see it starts to pucker here alright let's keep that as is and I'm just waving my needle through you know if you drop a bead is there a way to fix that without taking all of your beads off yes there is and we recommend kind of switching your needle to a size twelve beading needle I'm gonna just really pull that in okay so hopefully you can see what's kind of started to happen here is I've started to get some crunching because the beads you know they all kind of want to fit where they want to fit like they're not even really happy but you see that you have that little puckering there that happened with these two beads so they kind of like start to sit in so you can see that it kind of notches in there too much tension so if you notice that right away you're like oh I may have pulled it a little bit too much so what we're gonna do is we're going to wiggle it out you want your beads to be happy yeah happy beads happiness so you just kind of pull on the sides and I'm just kind of getting my nail in there to the last little beads and that can kind of help wiggle it out so it is fixable if you catch it as you're sort of doing it but just as you go just kind of just kind of gauge how how tight your your weave is but like I said all you're doing is you're just catching those threads going back and forth the tension is kind of keeping them together here and you can sort of scooch them up one thing that you can also do is you can take a little piece of cardboard and kind of just you know scooch it up like that to make sure everything is like nice and even so if you have let's pretend this is cardboard you can kind of scooch them up just like so so that they kind of scooch up that way but that way you can keep everything nice and even there and just like so alright so cool so that is that so now I know I want to get to talking about some of the finishing methods because you guys really do have a lot of questions on that so I want to absolutely that okay so I left a nice long thread here on this side so I'm going to actually add my loom needle onto my tail that I started with here okay now let's pretend I've come all the way down here and this is my big loom piece and it's beautiful and I love it and I'm ready to tie it off okay if you want to do a method like this where you're adding leather cord here to the end what you want to do is you're going to do a little bit of a build-up method now in this video here I'm not going to show you how to do this method this is the method we used for all the kits and we have tons of videos showing you how to pair your threads tie them off and glue them here but I do want to take a second and while we do have a video for this this is something that people are gonna want to see so we're gonna do it alright alright so what you're going to do is you're going to do a selvage method and all that means so that you're going to be building up cord right here so how do we do that we go over that first one there under the second over the third under so you're just kind of weaving up and down and up and down and up and down down going over and you're just weaving weaving weaving all right so now you've alternated going all the way through and you're just gonna pull your thread through and scooch it right down now I've seen people actually start their bead waiting that way where they start with that kind of a weave but I don't feel like it's necessary myself so start the weave like this mm-hmm start with beads right away yeah I mean because the other thing too is that by going up and down and been doing this method you're not actually this is not how you would actually add the bead into the loom right so it is a little bit of a different method alright and like so so you just go back and forth a whole bunch of times and what you're in essence doing is you're going to build up you can already see it start to happen just a little bit but you're gonna build up as much space as you need to sort of glue off and this is where you bring in a different type of class like this is where you can do a ribbon crimp so let's say you're gonna build up like a quarter of an inch so that you can use a ribbon crimp on the end there and then yes thank you so for the tube method here the slide clasp method we recommend using the e6000 here and this is going to be nice and kind of gloopy which is going to be good it's going to fill that clasp and take care of all those knots for you but for this one you're gonna want a little bit more of a stiffer edge and for that we recommend the super new glue now this is the finishing off method that you'll want to leave it on the loom for if you are doing the other method obviously you'll be cutting it off but you're just going to be building up a little selvage there just like so so this is the super new glue method so let me see if I can try to get a couple more here I'm gonna build this up and you guys are welcome to watch me but let's see is there anything else that we wanted to talk about any last little questions guys we do have videos for a lot of the stuff that we've shown here today the only thing is we are going to be having a video for that wire that beautiful wire work that Alexandra was doing and that will be coming very very soon so that is the only thing we don't have a video for just just yet hi guys I'm so sorry we had a little momentary lapse there we are back though so thank you for sticking with us okay so actually that gave me a little bit of a moment to build up my selvage here so you guys can come on back in and let's go ahead and take a look at what I've been able to do here so this is what I mean you can see all that blue underneath there so that's just sort of building up whatever textile you're working with to create that sort of fabric there that is going to be perfect to add on our little leather pieces for now you can actually take a little piece like this and just sort of fold it over and that'll kind of work like and this is actually faux leather which is really nice because you can glue this and you can actually sew the edges down if you wanted to do that alright and I do have a video that shows you how to do this exact technique so if you're curious about that be sure to check that out and then one last little thing I want to talk to you guys about is the idea of ending a piece with ultra suede so this is what this purple here is so this is what it looks like to back your piece of loom with ultra suede now what you can do here is just so in all of your little threads there and then on the edge there it's just a very basic whip stitch and you just use that last warp thread to kind of whip stitch this together so you can kind of get a nice little backing and you can do that also with the leather that we have and leather and leather alternatives as well so this is how that works with the ultra suede so that's another way that you can also finish it off so you can do a little clasp like so now one thing I do want to say is that if you do finish it off let's say this was like a ribbon cramp or something else you can absolutely add a little button to this you don't have to sort of do the the tie off method and leave like all this slack hanging I just thought that was kind of a neat idea but you can absolutely add a little button here you can sew that on you can add snaps but once you've had this fabric built up here you'll be able to do that and you will absolutely be able to see that video here and I'm so sorry about our little technical difficulty there guys but Alexander has one last little technique I want to show you and it's about sort of tapering that end to if you have a wider piece you can get it to fit into a little end there right so you can see that on the end got some size 8 Oh beads in the very last row that size up in the next row to the 6o beads that I used for the remainder the weaving and it was my effort to make the clasp fit because I realized I wouldn't have one that would fit quite the width of the stick so beads so by tapering down to a toe it's gonna go really nicely in this 13 millimeter slide clasp so yeah that's a handy way to facilitate the use of other sorts of clasps ribbon crimps whatever size finding you're gonna use you can adjust it by tapering down the size of your bracelet okay and you've done a little edging thing there we do have a video showing you how to do that but that's how to kind of add a little extra little extra flair to your loom piece there so that's a good example alright so thanks for sticking with us you guys we are ready to announce our giveaway winners so get those last comments in here but go ahead and take a look if you guys have questions if you still have questions after our live feed be sure to reach out to us on Facebook we take care of all of the messages that come through there if you guys want to learn something new or have an idea let's say you have an idea for another live class be sure to hit us up there as well so thanks so much for tuning in with us here today all right and we have our giveaway winner and it is Gwen Dugan so congratulations to Gwen Dugan you are the winner of our fabulous giveaway and these are both available on the website so if you didn't win we still have all of our kits ready for you all right congratulations Gwen all you need to do is email us at service at beadaholique and we will get your address and we will send this out to you today so thanks so much for tuning in guys and we will see you back here very soon have a great weekend everyone bye you

Customer Reviews

Based on 10 reviews Write a review

You recently viewed

Clear recently viewed