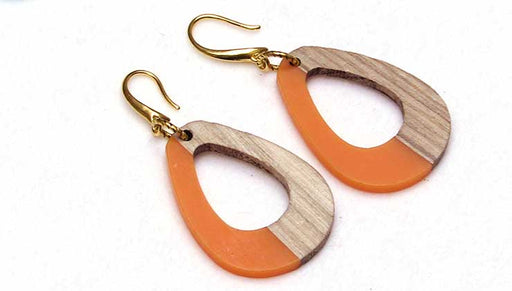
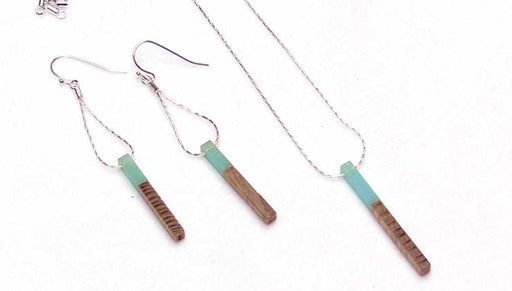
How to Make Earrings using Zola Elements Wood and Resin Focals

SKU VID-1750
Designer: Kat Silvia
In this video you will see how to make two different styles of earrings using the wood and resin focals from Zola Elements. Whether you prefer post earrings or hook earrings, you will see how versatile these items are and that they can work nicely with both.
Audio Transcript
Note: This audio transcript is auto-generated and may not be completely accurate.
source of earrings using the zola elements wood and resin vocals so I have two different styles here and they're gonna look very similar but what I wanted to do is take an opportunity to show you that you can do a post earring or an earring hook so I'm going to show you both versions in this video so let's talk about what these vocals are so these are made of a colored resin at the top and you can see that that's drilled on this particular one right there and then it has a nice wood base and what I love about these is that they are thick so they're gonna offer a really beautiful style they're still very lightweight so as you can see I'm going to be doing a turquoise version here and then I have this sort of army green and peachy pink version here and let me just draw your attention up here what I have is I brought out some of the other color variations we have so you can mix match and choose the ones that you like all right so let's first get started and I'm gonna start with this one because this is going to involve a little bit of glue so for this one we're gonna need some e6000 and I have a little post-it note here and what I what we're gonna do is we are going to add our little surgical steel post right on to the back of it just like so and we're going to use a little East 6th ousand to do that so I have my little scrap of wire here let me just kind of get a little bit of glue onto it I find it's easier to work that way there we go alright now you don't need much I'm gonna do both here just let me just get a little bit of glue get that onto my little scrap of wire you can also use a toothpick as well I'm gonna add that on to the center of my post then I kind of smoosh it around a little bit we don't like I said we don't want too much but just enough cuz we really want a good bond and then I'm gonna do this with my pliers so you can kind of see what I'm doing but you're just gonna Center it right down onto that wooden resin piece just like so and I'm just pressing down there we go and that looks pretty centered I'm just gonna move that around just it there we go alright I'm just gonna quickly repeat with the other one and then I'm gonna set these aside and again just kind of getting that nice little blob right in the middle there there we go all right and again I'll just sort of do this with my pliers so you can sort of see now you can move it up a little bit towards the top or down a little bit depending on how you want it to sit on the ear I'm gonna go right as dead center as I can eyeball very good I'm just pressing it down just a little bit all right perfect so while that is all drying I'm gonna just set that all aside there we're gonna move on to our second style now for this style we're gonna need our pair of chain nose pliers to put this together but this one does not involve any glue because instead of having a link like I'm using to make those at the top there I just notice that shifter there we go I'm gonna be using these little links here so instead of the pendant I'm gonna use the link so let's take a look at this now you have a couple of different design options with this one what you can do is you can actually do the wood resin wood resin or you can flip it around and you can have that resin touching just like so I think I'm gonna do an alternating one let me see how that looks mmm actually I think I might go this way I think it'll be a nice little sort of mirror image there okay so here's what we're gonna do I'm gonna use some jump rings now these are really pretty twisted jump rings and these are from Nunn design and because the jump ring needs to be so large to accommodate the thickness of the Fogle's I suggest using a jump ring that has a little bit of something going on to it but when we get it to the top you're gonna see why I'm gonna switch over to a different jump ring so let me start first by taking one of my jump rings here into my chain nose and my bent chain nose pliers and I'm just gonna give that a nice little gentle twist opening it nice and wide and I'm gonna slide on my focal and slide on the top connector there and kind of let that fall together because I want to be able to get a nice grip there we go and now we're just gonna close that up making sure it's got a nice good closure there all right so that's part one so you can see how we needed such a big jump ring there to fill that space now this is an eight point five millimeter jump ring and it is 17 gauge so it's gonna be kind of part of our design so like I said we want to make it pretty alright so now up at the top I want to mirror that so what I'm gonna do is I'm gonna take another jump ring give it a nice little gentle twist open slip it on here and what I'm gonna do is I'm gonna actually just go ahead and close this jump ring up so that we have a nice balance in our design so we have that nice jump ring on either side of that top connector now I want to add an earring hook now you have a couple different options you can twist that earring hook to the side but I really want that nice sleek elegant look to it so what I'm gonna do is I'm gonna take these little itty bitty jump rings now this is a four millimeter at 19 gauge jump ring and just with my players can I give that a little twist open and I'm going to slip it onto the jump ring here and I want this to be nice and tight there we go and then I'm going to slide on that earring hook so then just coming in and closing up that jump ring it's going to help orient our earring hook but it won't take away really from the design of the larger jump rings so it's nice and small it's almost kind of hidden in there so you can just see how that one looks alright so while that other one's still drying I'm just gonna put my second earring together that way you can see it one more time but it's really simple just jump rings very very easy and you just need it just basic tools so if you want to do this version there's no glue or anything like that involved and I just love these jump rings from Nunn design they're really really versatile and they do come in several other styles but so these are eight point five millimeters and they're 17 gauge so just if you're wondering kind of what fits with this particular design we find that these ones fit really nicely you could also go bigger and make it even an even bigger element to the design that's absolutely your choice and the tiny one at the top it's a little finicky because I want it to be tiny you could also go bigger as well all right that one on and just making sure I have a nice good closure with the tippy tips of my pliers there there we go all right so now we have our one pair finished over here now normally I would recommend that you let this try for a little bit longer but I'm gonna continue here so hopefully I won't knock my glue out of the way so what I'm gonna do is the easy thing is we're gonna do the same thing with our beautiful twisted jump rings from Nunn design now these are similar they are eight point five millimeters but these ones are gonna be 16 gauge so just about the same now alright and then go ahead and carefully slip it on to your post and I'm gonna kind of get this post out of the way as much as I can cause I don't want to knock it loose there we go alright so this is what our earring is going to look like so you have that post in the back so it's a little bit of a different look you can see this one has a little bit more going on at the top it's going to be obviously a much longer earring but this one here has that post on the back now don't worry I know you might be concerned that you'll see that little piece on the front you'll see it through the resin you can see that it's a little bit darker but don't forget this will be up against your ear so it will be dark anyway so don't even worry about that alright let me do my second one really quickly here so I do want to make a mention here if you are going to do post earring so you have a couple different options and backs and the ones that I chose here today are these little rubber bullet clutch backs and the reason I wanted to do that is because if you do have sensitive ears but still want to do this design just know that these posts are surgical steel and then to just kind of make sure that you don't have any extra added irritation you can add on these little bullet clutches here and they're just going to be a nice little rubber there's no metal involved here at all so these are really nice and they're nice and hidden but like I said these are lightweight so if you didn't want to do the post you don't have to I know sometimes we like to do that with their heavier earrings but these are the two different designs and I would flip that over but definitely make sure that you let it dry for at least 24 hours we want to make sure that you have a nice secure bond so that you don't lose your earrings all right I hope you enjoyed this video you can get all of these supplies and see even more tutorial videos by heading over to beadaholique.com

You recently viewed

Clear recently viewed